
Deploy staging to production SGEN — the safe, step-by-step workflow
⏱ 2-minute answer below · full walkthrough ≈ 12 min · skim the bold step headers to move faster.
In short. You have a staging site that is ready to go live. In SGEN, the mechanism is a backup-and-import: export staging as a .sgen archive, put production visitors on a Maintenance Mode holding page, then import the archive on production. The import replaces the production database and media in one operation. After that, verify identity settings (site title, email, domain), smoke-test from an incognito window, and turn maintenance off. Twelve steps, under 30 minutes for a typical site. Your production pre-deploy backup is the only undo if something goes wrong — never skip Step 5.On this page: Before you start · Where to go · Steps 1-12 · Rollback plan · Troubleshooting · Tips
How to deploy a staging site to production in SGEN
This workflow covers the full sequence in the order that protects you: back up staging, put production on hold, take a rollback snapshot of production, import the staging archive, verify identity, smoke-test, and go live.
Every step uses a panel you already know — Migration → Backups, Migration → Import, Tools → Maintenance Mode, and Settings → General — with links to the reference article where a step needs depth.
This deploy replaces your production site's database and media with the staging archive. Ensure staging is clean and reviewed before you start. Once you click Import Now, the previous production content is gone — your pre-deploy production backup is the only way back.
What is this for?
Use this workflow when you maintain a staging environment — a separate SGEN install on a subdomain like your-site-staging.sgen.com — and need to promote it to a live domain like yourdomain.com.
The SGEN mechanism is a backup-and-import: you export staging as a .sgen archive, then import that archive on production. Maintenance Mode covers production while the import runs so no visitor sees a partially replaced site.
Good use cases
First-ever launch — You built the full site on staging: pages, products, settings, redirects, SEO. Import that archive to a fresh production install and go live without rebuilding anything by hand.
Major redesign or rebuild — The redesign ran on staging for weeks. Once approved, a single import replaces the old production site with the redesigned one.
Content migration with a clean cutover — You validated migrated content on staging first, then pushed the finished state to production at once.
What NOT to use this for
- Small content updates — Adding a blog post or updating a price does not need a full staging deploy. Edit directly on production.
- Incremental changes that must not overwrite production edits — The import is a full replacement. If production has received direct edits since staging was last synced, those edits disappear. Merge any production-only changes into staging first.
- Reverting a single broken page — Use page revision history or fix the page directly.
- Non-SGEN archives — The Import panel only accepts
.sgenand.ziparchives created by SGEN's own backup system.
How this connects to other features
- Manage backups — Steps 2 and 5 both live in the Backups panel.
- Import a backup — Step 6. Full detail on upload limits and what carries across in a full-site import.
- Maintenance Mode — Steps 4 and 10.
- Redirect rules — verify redirect rules from staging are present on production after the import.
- Configure site identity — Step 8. Field-by-field reference for General Settings after an import.
Before you start
- Admin access on both installs — Editor and Contributor roles cannot reach Migration or Tools.
- Staging is clean and approved — every page is published, redirects are configured, and any checkout or contact form has been tested end-to-end.
- Staging admin credentials in hand — after the import you log in to production with the staging site's admin username and password, not production's current password.
- Archive within the upload limit — open Migration → Import on production and note the "Max upload size" before you begin.
- Incognito window available — for smoke-testing as a visitor after go-live.
- Team notified — anyone with production admin access should not make edits during the deploy window; the import overwrites them.
Where to go
Keep one browser tab on each admin during this workflow:
| Panel | Staging | Production |
|---|---|---|
| Migration → Backups | your-site-staging.sgen.com/sg-admin/migration | yourdomain.com/sg-admin/migration |
| Migration → Import | — | yourdomain.com/sg-admin/migration/import |
| Tools → Maintenance Mode | — | yourdomain.com/sg-admin/tools/maintenance_mode |
| Settings → General | — | yourdomain.com/sg-admin/settings |
Steps
The twelve steps run in order. Each depends on the previous one being complete.
1. Pre-flight on staging
Before creating the archive, confirm staging is genuinely ready.
Open staging in an incognito window (not logged in as admin) and check:
- Homepage loads — hero image, navigation, and call-to-action are present and correct.
- At least two inner pages load — test your About page and a key conversion page (contact, pricing, or product listing).
- Key form works — submit a test enquiry or a test checkout order and confirm it completes without errors.
- Redirects are in place — navigate to any old URL you expect to redirect and confirm the browser lands on the correct page.
- Site identity — the browser tab shows your site name, not a placeholder like "My SGEN Site".
If anything is broken on staging, fix it first. The import copies whatever is on staging — broken pages and misconfigured settings come across unchanged.
Pre-flight checklist:
- [ ] Homepage renders correctly in incognito
- [ ] Two inner pages load without errors
- [ ] At least one form submits and delivers correctly
- [ ] Redirects tested for any restructured URLs
- [ ] Site identity (name, logo, favicon) correct on the staging public site
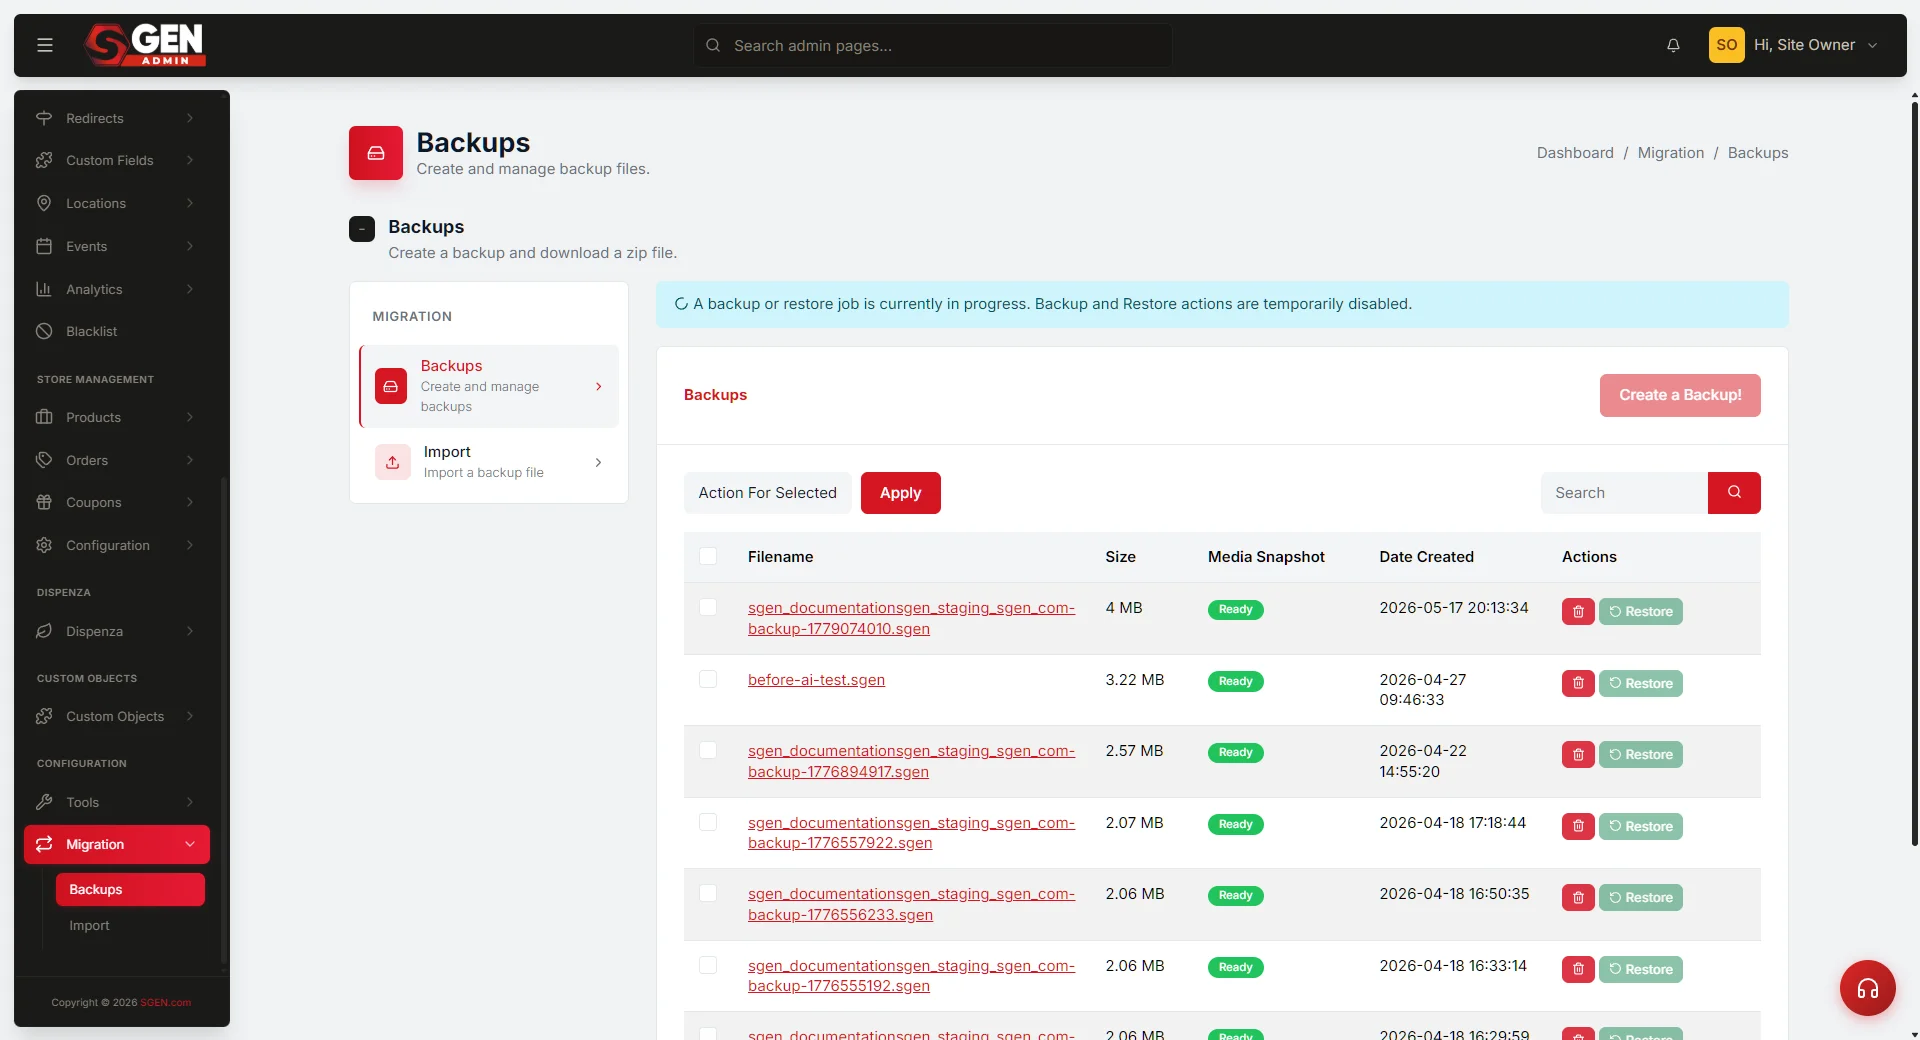
2. Take a full backup on staging
Log in to the staging admin and navigate to Migration → Backups.
Click Create a Backup! in the top-right corner.
SGEN bundles the database and uploads into a single .sgen archive. The page appears unresponsive until it finishes — typically 10-60 seconds; allow two to three minutes for large media libraries. The new archive appears at the top of the list when done.
After the archive appears, rename it immediately. Click the filename text in the row, type a descriptive name such as pre-production-deploy-20260505, and press Enter. The row updates in place without a page reload.
See Manage backups for full detail on creating, renaming, and downloading archives.
3. Download the staging backup locally
Click the filename link on the newly created archive row to download the .sgen file to your local machine.
Open your Downloads folder and confirm the file is there and the size matches the archive row.
`` pre-production-deploy-20260505.sgen ← confirm size matches panel (e.g. 92 MB) ``
Keep this file accessible — you will upload it to production in Step 6.
4. Enable maintenance mode on production
Switch to the production admin tab (open yourdomain.com and sign in).
Navigate to Tools → Maintenance Mode.
Write a holding message. Visitors who arrive during the deploy window will see this text — be specific about timing if you know it.
Flip the Enable maintenance mode? switch to on. Click Save Changes.
Open an incognito window and visit yourdomain.com — confirm the holding message appears instead of the real site.
For full maintenance mode detail, see Maintenance Mode.
5. Take a fresh backup on production
This is your rollback safety net. If the staging archive has a problem — wrong content, missing media, staging test data on production — this backup lets you restore production to exactly the state it was in before you started.
In the production admin, navigate to Migration → Backups.
Click Create a Backup!. Wait for the archive to appear. Rename it immediately to pre-deploy-production-20260505.
Download this archive to your local machine as well. Two copies — the server's backups directory and your local disk — is your minimum safety net. See Manage backups — Tips.
Do not proceed to Step 6 until this backup is on disk.
6. Import the staging backup on production
In the production admin, navigate to Migration → Import.
Drag the staging archive (pre-production-deploy-20260505.sgen) onto the Import dropzone, or click the browse link and select the file from your Downloads folder.
Confirm the green file badge shows the correct archive name before proceeding.
Click Import Now.
SGEN processes the archive server-side. Do not navigate away or refresh during this step. When the import finishes, your admin session ends and the browser redirects to the production login screen.
See Import a backup for full Import panel detail and a list of what carries across (and what does not) in a full-site import.
7. Log back in and confirm content
The login screen appearing on production confirms the import completed.
Log in using the staging admin credentials — the username and password for an admin account on the staging site. These replaced the production credentials during the import.
After logging in, run a quick content check:
- Pages list — shows the expected staging pages, not the old production pages.
- Media Library — contains staging media files.
- Blog or Shop — shows the correct item count from staging.
If the pages list looks like the old production site rather than staging, stop — the import may not have applied. See the troubleshooting section below.
8. Identity check — verify production settings
This is the most important post-import step. The staging archive carries staging's identity settings — site title, site email, logo link, analytics tokens. You must update any field that shows a staging value.
Navigate to Settings → General on the production admin and check:
| Field | Expected production value | Common staging bleed |
|---|---|---|
| Site Title | your business | "your business Staging" |
| Site Email | hello@yourdomain.com | staging SMTP address |
| Logo link | https://yourdomain.com/ | staging subdomain URL |
| Homepage | Correct published page | staging draft page |
Update any field that shows a staging value. Click Save Changes when done.
Also open Settings → Email and verify the SMTP host and From-address are production values. See Configure site identity for field-by-field guidance.
9. Quick admin smoke test
Before turning maintenance off, verify that key pages look correct in the admin preview.
- Open the Pages list and click Preview on your homepage. Confirm the layout, navigation, and hero section are correct.
- If you run a shop, open a product page preview and confirm the price, images, and call-to-action button are present.
- Check Redirects — confirm the redirect rules that were set up on staging are now present on production.
If anything is missing or broken at this stage, do not turn maintenance off. Fix it in the admin first, or restore the pre-deploy production backup (see the Rollback plan section).
10. Toggle maintenance mode off
Navigate to Tools → Maintenance Mode on the production admin.
Flip the Enable maintenance mode? switch to off. Click Save Changes.
Production is now live.
11. Public smoke test — incognito then mobile
Open a private or incognito browser window and visit the production domain.
Test in this order:
- Homepage — loads completely, navigation is present, hero image renders.
- About or key interior page — loads, no missing images or broken layout.
- Contact form or product checkout — submit a test and confirm it completes and delivers correctly.
- One redirect — navigate to a URL that should redirect and confirm it lands on the correct page.
- Mobile — load the homepage on a mobile device or browser mobile emulation and confirm the layout is responsive.
The incognito window is essential — your own logged-in session may show a cached or admin-exempt view. Only a non-logged-in visit shows exactly what visitors see.
12. Monitor the first two hours
Watch for visitor-facing problems in the first two hours after go-live.
- Broken-page reports — any page that returns an unexpected error or blank screen. Check your Redirects settings if specific URLs are failing.
- Missing images — images absent on the public site but present in the admin Media Library. This can indicate a file-path mismatch between staging and production.
- Form delivery — confirm that contact or order form submissions are arriving in the production inbox, not a staging address.
If you use analytics, confirm traffic is registering on the production property — not the staging property — after go-live.
What success looks like
A successful deploy produces all of the following:
- Production admin shows pages, products, and settings that match staging.
- Site title reads "your business" — not a staging variant.
- Site email reads
hello@yourdomain.com— not a staging relay address. - Logo link resolves to
yourdomain.com, not the staging subdomain. - Maintenance mode is off and confirmed via an incognito window.
- Homepage, an inner page, and a form all pass the incognito smoke test.
- No broken-page reports from visitors in the first two hours.
Examples in context
| Scenario | What happens | Key notes |
|---|---|---|
| First-ever launch | Full site built on staging — pages, shop, forms all tested. Import the archive to a fresh production install (near-empty, ~12 MB). Full sequence takes around 20 minutes. Site goes live without rebuilding anything by hand. | Staging backup panel after Step 2 — archive renamed, ready to download (see mock above in Step 2). |
| Major redesign | Old design ran on production while redesign lived on staging for weeks. Run the workflow at a low-traffic window. A 92 MB import typically finishes in under 90 seconds. The Maintenance Mode holding page covers visitors while it runs. | Write a specific holding message — "back within the hour" — and confirm it from incognito before starting the import. |
| Deploy goes wrong | After turning maintenance off, the shop shows staging test products instead of real inventory — staging database was not cleaned before archiving. Re-enable maintenance mode immediately, then import the pre-deploy production backup from Step 5. Restores original production in under five minutes. | The production pre-deploy backup from Step 5 exists precisely for this situation. Never skip it. |
Rollback result — production restored to pre-deploy state:
Rollback plan
If anything is wrong after the import — wrong content, missing pages, staging test data visible, broken checkout — restore the pre-deploy production backup you created in Step 5.
Rollback procedure:
- Re-enable maintenance mode on production immediately (Tools → Maintenance Mode �� switch on → Save Changes).
- Navigate to Migration → Import on the production admin.
- Upload the production pre-deploy backup (
pre-deploy-production-20260505.sgen). - Click Import Now and wait for the import to complete.
- Log back in with the original production admin credentials.
- Verify production content is back to its pre-deploy state.
- Turn maintenance mode off.
The rollback import takes the same amount of time as the original import. If the production server's backups directory was affected by the failed import, use the local copy you downloaded in Step 5.
What to do if it does not work
- Import fails immediately after clicking Import Now — the archive may exceed the server's upload limit. Check the "Max upload size" shown on the Import form. Contact your hosting provider to raise the limit if needed, or reduce the archive size by pruning unused media from staging before recreating the backup.
- Browser tab times out during the import — the import may still be running server-side. Wait two minutes, then navigate back to the production admin. If the login screen appears, the import completed — log back in and check content. If the admin loads with the old content, the import likely failed — try again with a fresh upload.
- After logging back in, content looks like the old production site — the import may not have applied. Navigate to Migration → Backups and check whether a new row appeared at the top of the list. If no new row is present, the import failed silently — retry the upload or contact your hosting provider about server resource limits.
- Site title or email on production shows staging values after import — the import succeeded but identity settings need updating. Go to Settings → General, correct the field values, and save. See Step 8.
- Some pages are missing on production after import — those pages may not have been published on staging. Log in to the staging admin, confirm all pages have a Published status (not Draft), recreate the staging backup, and re-run the import.
- Maintenance mode holding page is not appearing to visitors — you may be checking from a logged-in admin tab. Open a fresh private or incognito window — your own admin session is exempt from the holding page redirect.
- Visitors see a partially loaded site after you turned maintenance off — re-enable maintenance mode, check whether the identity check (Step 8) was completed correctly, then turn maintenance off again and re-test from incognito.
Tips for a smooth deploy
Clean staging before archiving. Remove test products, draft placeholder pages, and staging-specific content before Step 2. What is on staging is exactly what arrives on production.
Sync redirects before you deploy. Redirect rules in the staging database arrive with the import. Any redirect rules that existed only on production will be gone. Cross-check production's redirect list against staging's before Step 2 and add any missing rules to staging first.
Run the deploy at a low-traffic window. Even with maintenance mode active, the import puts a load on the server. Early morning or off-peak hours reduce the risk of a slow or failed import.
Plan for the post-import settings sweep. The identity check in Step 8 covers the obvious fields. Set aside 15 minutes after the import to open every Settings sub-panel — Email, Integrations, SEO, Ecommerce — and verify all values are production values, not staging ones.
Tell your team before Step 4. A quick message prevents a teammate from making direct edits to the production admin mid-import — those edits would be overwritten by the staging archive.
Related reading
- Manage backups — full guide to creating, renaming, and downloading
.sgenarchives. Steps 2 and 5 of this workflow. - Import a backup — full guide to the Import panel, upload limits, and what carries across (and what does not) in a full-site import. Step 6.
- Maintenance Mode — full guide to writing holding messages, toggling the switch, and testing from incognito. Steps 4 and 10.
- Configure site identity — field-by-field reference for the General Settings screen. Step 8 identity check.
- Redirect rules — verify redirect rules survived the import. Run after Step 7.