
import backup SGEN — restore or clone a site from an archive
⏱ ~5 min read · quick-answer above the fold · full reference below.
In short. Go to Migration → Import. Drag your.sgenor.ziparchive onto the dropzone (or click browse), confirm the filename badge turns green, then click Import Now. SGEN replaces the entire site — database, media, settings, and user accounts — with the archive contents. When finished, your session ends and you are redirected to the login screen. Log back in using the admin credentials that belong to the imported archive, not your current ones. Immediately open Settings and update environment-specific values (mail server, analytics tokens, payment keys) before live traffic hits the restored site. This action is irreversible — create a fresh backup of your current site before you click Import Now.
On this page: What this is for · What it covers · Reference · Steps · What NOT to use this for · Troubleshooting · Tips
How to upload a .sgen or .zip backup file and restore your site
The Import panel lets you restore your site from a previously downloaded backup archive, or seed a new SGEN installation from a known-good snapshot of another site. Drag and drop (or browse for) a .sgen or .zip file, click Import Now, and SGEN replaces the current site in a single operation.
This replaces your entire site.
Importing a backup overwrites all current content, settings, and user accounts
with whatever was in the archive.
Create a fresh backup of your current site first —
that backup is your only way to reverse the import if something goes wrong.
What is this for?
Import covers two scenarios:
- Disaster recovery — the site is broken or in a state you cannot fix by editing. Upload the archive and SGEN restores the full site state in one shot.
- Environment cloning — you want a target installation to exactly match a source snapshot. Common cases: staging-to-production handoff and new-site seeding from a template.
Here is what the Import panel looks like when you arrive at Migration → Import:
What NOT to use this for
- Partial content imports — Import replaces the entire site. To migrate only pages or blog posts between sites, use Tools → Post Migration (Import/Export), which operates on individual content types without touching settings, users, or media.
- Reverting a single accidental change — restoring a full-site backup overwrites everything else too. Use per-post revision history for small rollbacks.
- Importing from a different platform — the Import panel only accepts archives created by SGEN's own backup system (
.sgenor.zip). WordPress export files, CSV files, and archives from other platforms are not supported here. - Importing without a pre-import backup — once you click Import Now, the current site is overwritten. There is no undo from the admin panel. Always create a backup of the current site first.
What it covers
A full-site import is intentionally complete. The table below shows what the archive contains and what it does not.
| Item | Carries across? | Notes |
|---|---|---|
| Pages, posts, events, custom post types | Yes | Full content, SEO settings, and publication status |
| Products, categories, inventory | Yes | Ecommerce records |
| Site settings (general, mail, integrations, appearance) | Yes | Includes source environment values — update after import |
| User accounts, passwords, permission levels | Yes | You log in with archive credentials after import |
| Media files (uploads directory) | Yes | When the archive includes uploads |
| Plugin and module configuration | Yes | All database-stored config |
| Form definitions and settings | Yes | Definitions only — not submission records |
| Form submission records | No | Only form definitions are in the archive |
| Server-level configuration | No | PHP settings, web server config, cron jobs are outside SGEN's backup scope |
| Changes made after the archive was created | No | The import replaces everything with the archive snapshot |
| Environment-specific destination credentials | Needs update | Mail server, analytics tokens, payment keys carry over from source — update manually |
Reference
The Import panel exposes a single control. All settings are embedded in the archive itself.
| Field / element | Description |
|---|---|
| Backup archive (dropzone) | Drag a .sgen or .zip file here, or click browse to open a system file picker. Once selected, the filename appears as a green badge confirming the file is ready. |
| Import Now (button) | Submits the archive. SGEN uploads the file, replaces the site database and media with the archive contents, clears the current session, and redirects to the login screen. |
| Max upload size notice | Displayed on the form. If your archive exceeds the limit shown, contact your hosting provider to raise the server upload limit before proceeding. |
Supported archive formats: .sgen (native SGEN backup format) and .zip (SGEN-structured zip). Archives from other platforms are not accepted.
Examples
Disaster recovery after an accidental bulk-delete.
An admin deleted 300 product records by mistake. Navigate to Migration → Import, upload the archive created the night before (sgen_yoursite.com-backup-20260422.sgen), and click Import Now. After the import completes the session ends and you are redirected to login. Log back in — the product catalog is restored to last night's state.
The dropzone confirms the file is selected before you click Import Now. The file badge turns green and shows the archive name so you can verify you have the right file before committing:
Preview: Import panel — file selected and ready to submit — a screenshot of this screen will be added here.
Clone staging to production. Your team finished building on staging, created a backup via Migration → Backups, then opened Import on the production installation. Upload the archive and after logging back in, production matches staging exactly — all pages, products, settings, and media in one step.
When the import completes, a green confirmation banner confirms the archive was applied:
After import, check environment-specific settings immediately. The archive carries the source mail server address, analytics tokens, and integration keys. Open Settings and update each value to its destination equivalent before the site goes live.
Keeping a consistent naming pattern for your archives makes it easy to find the right snapshot at restore time:
How this connects to other features
- Manage backups — the Backups panel is where you create the archive files you upload here. The two panels form the full backup-restore cycle.
- Tools → Post Migration (Import/Export) — per-content-type transfers (pages, posts, events) that do not wipe settings, users, or media. Use this when you need a selective move, not a full restore.
- Settings — review and update environment-specific values (mail server, analytics tokens, payment keys) after every import from a different environment.
- Users — the user accounts in the imported archive replace your current user accounts. After import, log in with the archive's admin credentials.
Before you start
- Have the
.sgenor.zipbackup archive accessible on your local computer. - Know the admin credentials that belong to the archive you are importing — you will need them to log back in after import completes.
- Create a fresh backup of the current site. That backup is your only recovery path if the imported archive turns out to be wrong or incomplete.
- If the site has live visitors, schedule the import during a low-traffic window — the operation rewrites the database while visitors may be browsing.
- Confirm your archive file is within the server's upload size limit shown on the Import form. If your archive is larger, contact your hosting provider to raise the limit first.
Where to go
- Log in to your SGEN admin panel.
- Click Migration in the left sidebar.
- Click Import in the Migration sub-navigation.
The Migration area shows two sub-items — Backups and Import. The Backups tab is where you create the archive you will upload here:
Steps
1. Locate the Import panel
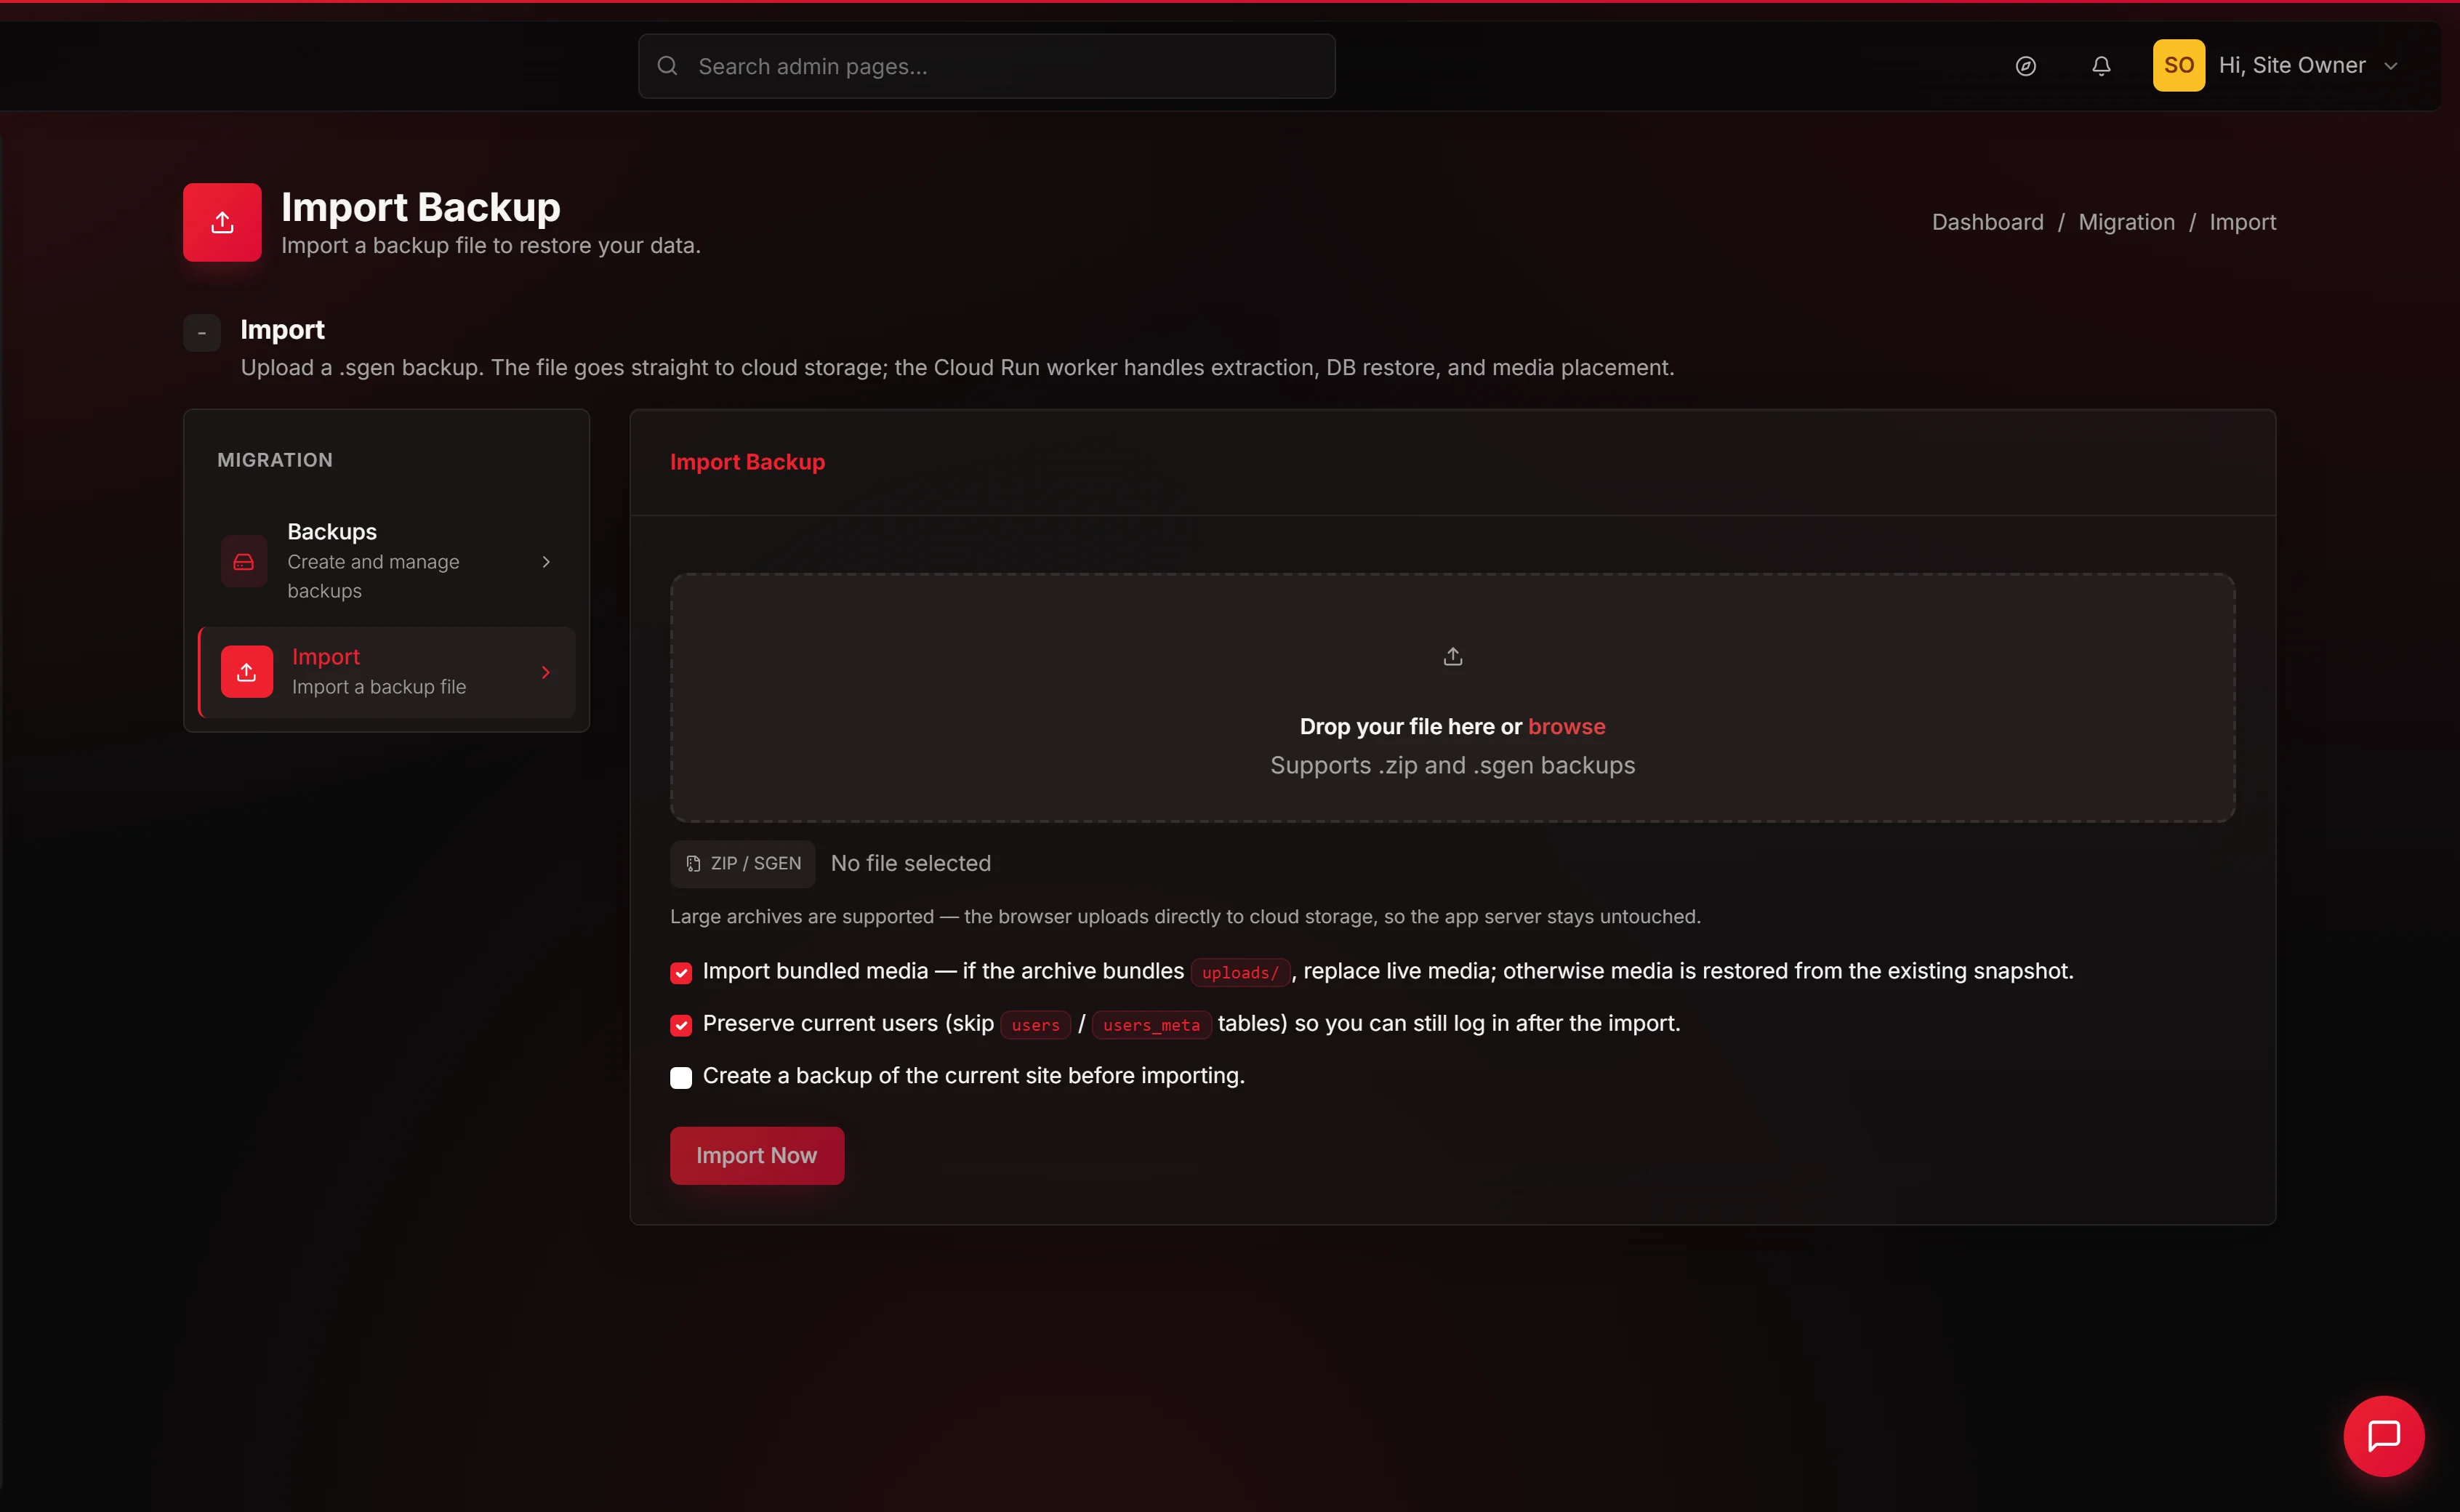
Open Migration → Import. The panel shows a card titled Import Backup with a dropzone file picker and an Import Now button. A warning banner sits above the dropzone reminding you the operation is irreversible. Confirm your archive is within the displayed upload size limit before selecting the file.
2. Select the backup archive
Drag your .sgen or .zip file onto the dropzone, or click the browse link to open a system file picker. Once selected, the filename appears inside the dropzone as a green badge. Verify the filename matches the archive you intend to restore before moving on.
3. Click Import Now
Click Import Now. The browser uploads the archive and SGEN processes it server-side. Do not close the tab, navigate away, or refresh the page during processing — depending on archive size, this can take from a few seconds to a couple of minutes.
4. Log back in with the archive credentials
When the import finishes, your admin session ends and you are redirected to the SGEN login screen. Log in using the admin credentials that belong to the imported archive, not your current password. If the archive was from a different site, use that site's admin credentials.
5. Verify the restored state
After logging back in, open the Pages list and confirm the page count matches the archive. Open Products (if applicable) and confirm the catalog is intact. Open Settings and update any environment-specific values — mail server, analytics tokens, payment gateway credentials. Then open the public site in a fresh browser window to verify pages, images, and forms load correctly.
What success looks like
After a successful import you are redirected to the login page. Log in and browse the admin panel — the content, pages, and settings should match what was in the archive.
Here is what a healthy Pages list looks like immediately after a successful restore from sgen_yoursite.com-backup-20260422.sgen. The page count (19), status distribution, and author names all match the snapshot:
If page count, product pages, and published status all match what you expected, the restore was successful. Open the public site and submit a contact form or place a test order to confirm the full visitor-facing flow. Then open Settings and update every environment-specific value before pointing live traffic at the restored site.
What to do if it does not work
- Import form does not appear — the Migration module is not enabled on this installation. Contact your SGEN platform administrator.
- File is rejected as too large — the archive exceeds your server's upload limit. Contact your hosting provider to raise the upload size limit, then retry.
- Import finishes but you cannot log in after — the archive's admin account has different credentials than your current ones. Use the password for that archive's admin account. If you do not know those credentials, contact your SGEN platform administrator for account recovery.
- Images appear broken on the public site after import — the archive may have been created without the uploads directory. Contact your SGEN platform administrator — the media files may need to be restored separately.
- The import panel shows a size warning before you select a file — your archive already exceeds the server limit. Download a snapshot from a closer date if one is available, or contact your hosting provider before proceeding.
- The page becomes unresponsive during the upload — do not navigate away or close the tab. Large archives can take several minutes to process server-side. Wait until the page reloads to the login screen (success) or returns an error message before taking any action.
If the import runs but the site content does not match the archive — or you cannot log in at all — the empty-state below is what the admin panel looks like after a failed or incomplete restore. Stop and contact your SGEN platform administrator before attempting another import:
Tips for a clean import
- Always create a pre-import backup. Before clicking Import Now, create a fresh backup via Migration → Backups and download it. That file is your way back if the imported archive turns out to be from the wrong date or contains incomplete data.
- Name archives with site domain and date. A filename like
sgen_yoursite.com-backup-20260422.sgenis unambiguous months later. The SGEN backup system uses this pattern by default — keep it. - Schedule imports during low-traffic windows. The import rewrites the database while visitors may be active. Off-peak hours reduce the risk of a visitor hitting a blank page during the operation.
- Update environment settings immediately after import. Mail server, analytics tokens, and payment gateway credentials all need to be updated for the destination before the site goes live. Do this before testing any visitor-facing flows.
- Keep a README alongside your backup folder. A one-line entry per archive — what changed, why it was created, the date — saves you from opening every file just to find the right one.
- Confirm the archive covers the date you need. A backup taken just before the incident is worth more than the most recent backup if the most recent was taken after the problem was introduced. The Backups list shows timestamps — use them.
Next step
After a successful import, review Settings to confirm that environment-specific values (mail server, analytics keys, payment gateway credentials) are correct for this installation. Then browse the public site to verify that pages, images, and forms load as expected.
- Manage backups — the other half of the backup-restore cycle. Run this before every import so you always have a way back.