
Configure your site identity
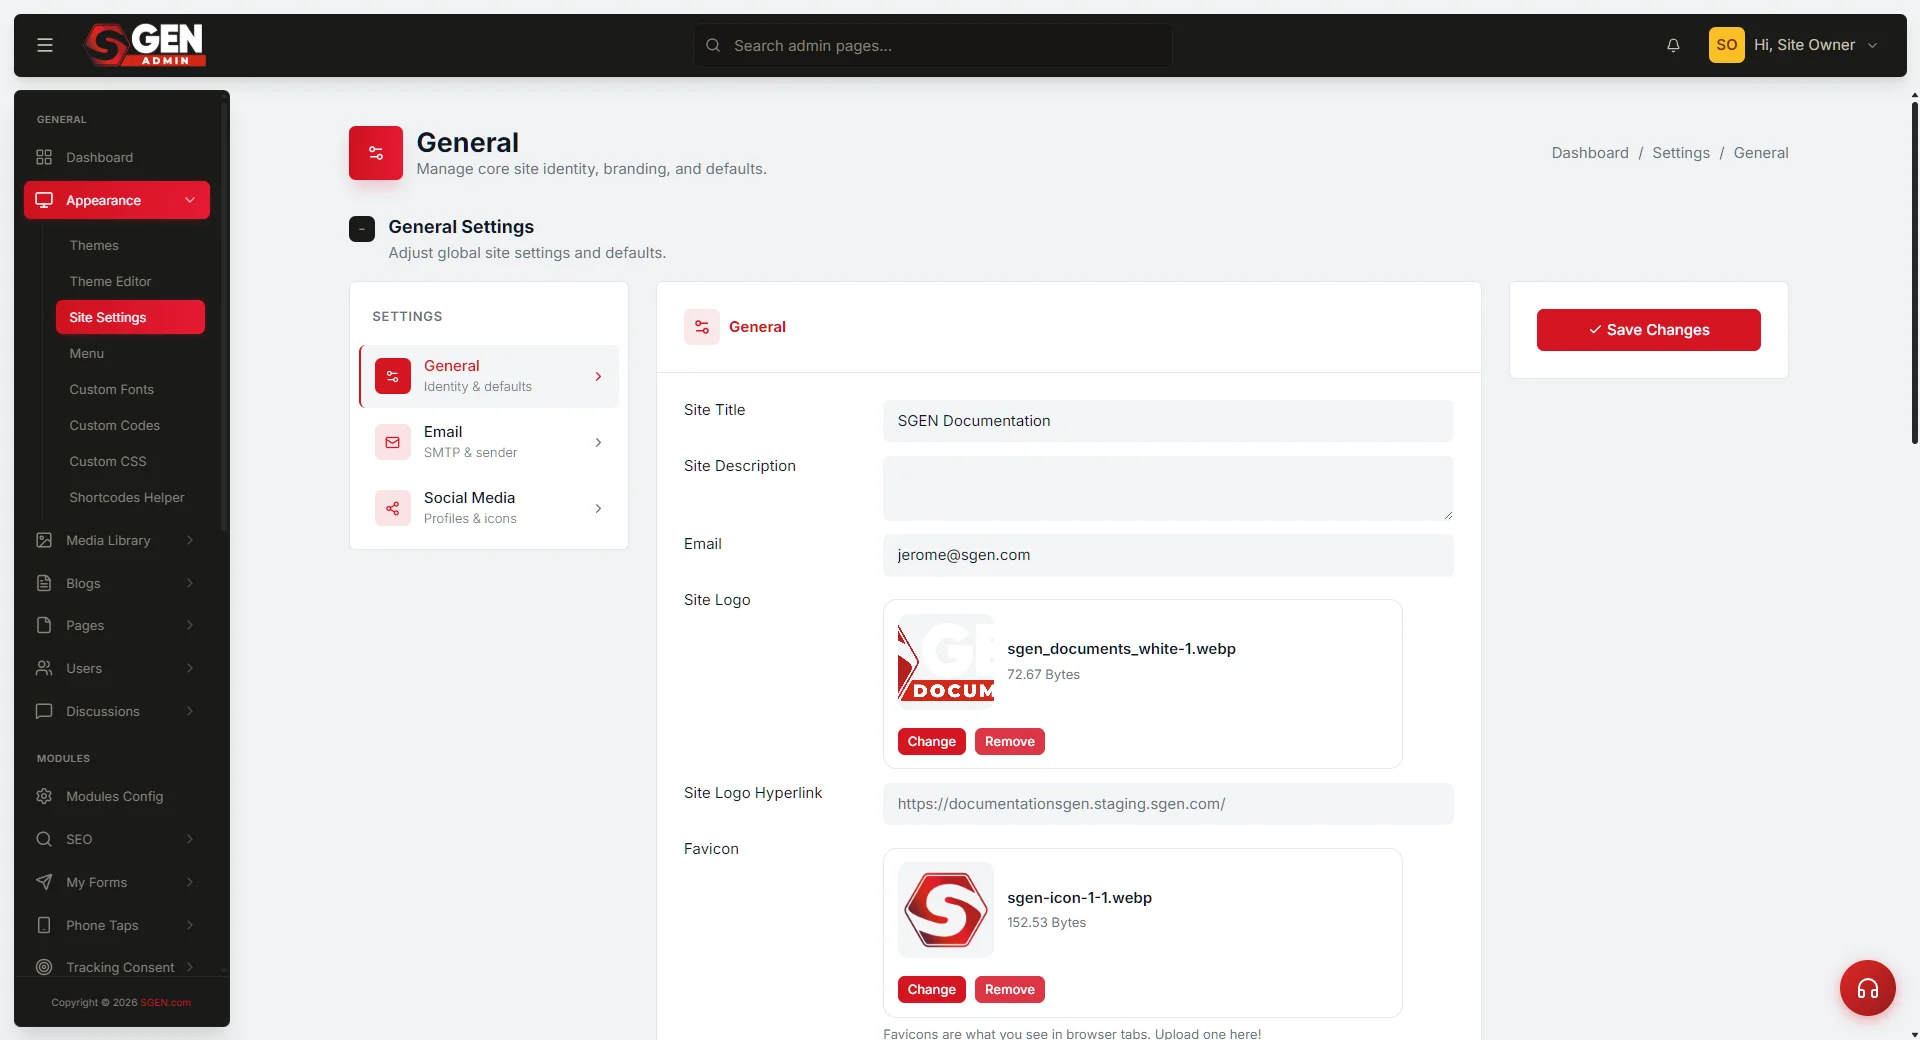 General screen showing the Identity card (Site Title, Tagline, Logo, Favicon, Timezone, Homepage, 404, public sign-up toggle)." loading="lazy" style="width:100%;max-width:900px;height:auto;border-radius:8px;border:1px solid #e5e7eb;display:block;margin:12px 0">
⏱ 60-second answer below · full reference ~12 min · skim the bold lead-ins to move faster.
In short. Open Settings → General. Three cards stack top-to-bottom on one form: Identity (site title, tagline, logo, favicon, timezone, homepage, 404 page, public sign-up toggle), Business Information (phone, address, hours for footer + local-SEO schema), and Age Verification (optional gate for regulated retail). Fill in what applies, click Save Changes once — all three cards persist together. Changes go live immediately on the next page-view, no redeploy needed. First-pass setup after the wizard takes about ten minutes.
On this page: What this is for · Options (field list) · Steps — Identity card · Steps — Business Information · Steps — Age Verification · Troubleshooting
How to set your site identity, business address, and age gate from one Settings screen
What is this for?
General Settings holds the site-wide facts that every other feature consumes: name, brand, contact details, timezone, homepage routing, and the optional age gate. Three cards stack top to bottom — Identity, Business Information, and Age Verification — and all persist on a single Save Changes click. Changes go live immediately on the next page-view.
The Identity card with fields filled in:
The four toggle-style flags on this screen at a glance (the active red pill is the SGEN default — public sign-ups off, age gate off):
Scope
What this screen covers:
- Identity card: Site Title, Tagline, Site Email, Site Logo, Favicon, Logo link, Timezone, Language, Homepage, 404 Page, public sign-up toggle.
- Business Information card: Phone, Address line 1, Address line 2, City, State, Postal code, Country, Opening hours, Google Business CID.
- Age Verification card: Enable toggle, Expiration days, View as (Popup / Landing page), Verification logo, Disclosure HTML, Yes/No button text, Yes/No redirect URLs.
What this screen does not cover: SMTP credentials (Settings → Email), social profile URLs (Settings → Social Media), SEO title templates (SEO → Global SEO), analytics IDs (Settings → Integrations).
Options
| Field | Card | Type | Effect |
|---|---|---|---|
| Site Title | Identity | Text | Browser tab, email From-Name, og:title fallback |
| Tagline | Identity | Text | Fallback SEO description, og:description fallback |
| Site Email | Identity | From address on all system emails | |
| Site Logo | Identity | Media picker | Header + footer logo on every public page |
| Favicon | Identity | Media picker | Browser tab icon (32×32 PNG) |
| Logo link | Identity | URL | Where clicking the header logo navigates to |
| Timezone | Identity | Select | Applies to every timestamp on the site |
| Language | Identity | Select | Built-in labels and date formatter locale |
| Homepage | Identity | Page picker | Page loaded at the root URL |
| 404 Page | Identity | Page picker | Page loaded when a URL does not resolve |
| Anyone can register | Identity | Checkbox | Shows or hides the public /register route |
| Phone | Business | Text | Footer and LocalBusiness JSON-LD |
| Address line 1–2 | Business | Text | Footer and LocalBusiness JSON-LD |
| City / Postal / Country | Business | Text | Footer and LocalBusiness JSON-LD |
| Opening hours | Business | Textarea | Footer display, one line per day |
| Google Business CID | Business | Text | Links site to Google Business Profile |
| Enable age verification | Age | Checkbox | Sitewide gate before any content |
| Expiration days | Age | Number | Days a Yes click is remembered in cookies |
| View as | Age | Select | Popup (overlay) or Landing page (replaces page) |
| Disclosure HTML | Age | Rich editor | Gate message shown to visitors |
| Yes / No button text | Age | Text | Button labels on the gate |
| Yes / No redirect | Age | URL | Where each button click navigates |
Examples
The ten numbered walkthroughs below cover the full range of tasks this screen handles — from first-day branding to age-gate configuration. Each maps to specific fields in the Options table above.
Example 1: Replace placeholder branding after setup. Open Settings → General, replace the placeholder in Site Title, fill in Tagline, pick your logo and favicon from the Media Library, set Timezone, and click Save Changes.
A green flash confirms the write:
Open your homepage in a new tab. The tab title, logo, and favicon update immediately — no cache warmup, no redeploy.
Example 2: Populate the business card for local SEO. Scroll to Business Information, fill in Phone, Address, City, Postal code, Country, and Opening hours (one line per day). Add your Google Business CID if you have one. Click Save Changes.
The details surface in your site footer and in the LocalBusiness structured data your site emits for search engines. Right-click your homepage → View page source to confirm:
A visitor who scrolls to your footer sees the same details in plain text:
Example 3: Turn on age verification for a regulated storefront. Scroll to Age Verification, tick Enable age verification, set Expiration days to 30, pick View as → Landing page for a full-page gate, upload a verification logo, type your disclosure HTML (the SGEN default reads ARE YOU 21
OR OVER?https://google.com is rarely the right choice). Click Save Changes.
Open the site in an incognito window — the gate appears on every public URL until the visitor confirms. The configured Age Verification card looks like this:
Once saved and opened in an incognito tab, the gate renders before any site content. The popup variant:
A preview modal lets you verify the disclosure copy and No-redirect before saving:
Example 4: Seasonal logo swap. Upload the new logo to your Media Library, open Settings → General, click Choose Image next to Site Logo, pick the file, and click Save Changes. The header updates immediately across every public page. Swap back the same way — no template changes needed. Favicon is a separate field; swap it too if you have a seasonal variant.
Example 5: Swap the homepage to a custom page. In Pages, build your welcome page and set it to Publish. Open Settings → General, set the Homepage dropdown to that page, and click Save Changes. Your root URL now serves the welcome page; the latest-posts feed moves to /blog.
Example 6: Multi-location NAP. The Business Information card holds one address — your headquarters NAP for the global footer and primary LocalBusiness JSON-LD. For per-location contact info, build a Page per location and add the NAP in the page body. A complete headquarters card:
Example 7: Switch the site language. Open Settings → General, change the Language dropdown (e.g. English (en) → French (fr)), and click Save Changes. Date formats and built-in labels (Read more, Comments, Search) switch to the new locale. Your own page content stays in whatever language you authored it — the Language field controls SGEN's labels and date formatter only, not user content.
Example 8: Disable public sign-ups before launch. Open Settings → General, untick Anyone can register, and click Save Changes. The /register URL returns a 404 until you tick it back on. This also works for taking sign-ups offline temporarily without disabling sign-in for existing accounts.
Example 9: Custom 404 page. Build a Page with on-brand copy and recovery links (shop, blog, contact, search), set it to Publish, then open Settings → General and pick it from the 404 Page dropdown. Click Save Changes and verify by visiting a non-existent URL.
Example 10: Pre-launch identity checklist. Walk every field on this screen before going live. Skipping even one ships an unprofessional first impression:
Walk it on staging the day before launch, screenshot the panel, then re-walk on production after the domain swap.
What NOT to use this for
- Do not use General Settings to configure SMTP or email delivery. The Site Email field on this screen is only the From address shown on system emails. SMTP host, port, username, and password live in Settings → Email.
- Do not use General Settings to configure your SEO titles or meta descriptions. Your Site Title flows into SEO as a fallback, but the full SEO control surface (title templates, separator, social cards) lives under SEO → Global SEO.
- Do not treat the age verification feature as full regulatory compliance. Age verification in SGEN is a self-declaration prompt — a visitor who lies about their age still gets through. If your industry requires real age proof (ID upload, credit-card check), pair SGEN with a dedicated age-verification service.
- Do not assume every field saves independently. The General panel is one form with one Save Changes button. If you edit a field in the Business card and then edit a field in the Age Verification card, you need one click of Save Changes to persist both. Navigating away before you click Save loses both changes.
- Do not paste social media account URLs into the Business card. Social profiles live in a dedicated Settings → Social Media panel with one field per platform.
- Do not type sensitive PII (personal account numbers, tax IDs) into Opening hours or any other Business field. These fields render verbatim in your public footer and are readable by anyone who visits your site.
- Do not point the Site Logo or Favicon at an external image URL. The picker reads from your Media Library by ID. Pasting an external URL into the field will render a broken image on every public page.
- Do not use the Anyone-can-register toggle as a security control. Switching it off only hides the public sign-up page; an administrator can still create accounts from the Users panel and an existing customer can still sign in.
How this connects to other features
- Email — when your site sends a system email (form notification, password reset, order confirmation), the From Name defaults to your Site Title and the From Email defaults to your Site Email if you have not configured per-email settings under Settings → Email.
- SEO → Global SEO — your Site Title is the fallback title shown in browser tabs and search results when a specific page has no SEO Title of its own. Your Tagline is the fallback meta description.
- Media Library — the Site Logo, Favicon, and Age Verification Logo pickers all open your Media Library modal. Upload from there if the image is not already on the site. Deleting a media file that one of these fields points at leaves a broken image on every public page until you re-pick one.
- Pages — the Homepage and 404 Page dropdowns list every page with status Publish. Moving a page to Draft or Trash removes it from those dropdowns; the public site falls back to the default homepage until you pick a new one.
- Users → Manage users — the Anyone can register toggle controls whether your public
/registerpage is reachable. When it is off, new customer accounts can only be created by an administrator from the Users panel. - Appearance → Header and Footer — the Site Logo and Favicon you pick here are consumed by the header and footer templates on every public page.
- Settings → Social Media and Settings → Email — these are sibling tabs of General. Use the sidebar on the left of the panel to switch between them. See Configure social media links and Configure SMTP and transactional email.
- Ecommerce → Orders — your business address and phone surface in order receipts and shipping notifications. A correct Business Information card here means correct customer-facing emails everywhere.
- Custom Codes — if your theme uses a custom header or footer template, the Site Logo and Favicon are still pulled from the values you set here. No template change is needed when you swap branding.
Before you start
- You are signed in to SGEN as an Administrator or Site Owner.
- Your logo and favicon files are uploaded to the Media Library, or are ready to upload during this flow. A horizontal PNG or SVG at 2x render size is the safe bet for the logo; 32x32 PNG is the safe bet for the favicon.
- Your business address, phone, and opening hours are written out the way you want them to read in the footer.
- Your timezone is decided. Pick the zone your business operates in, not the zone your hosting server runs in.
- If you plan to swap the homepage to a custom page, the page is already built and set to Publish.
- If you plan to set a custom 404 page, the same — built and Published.
- If you plan to turn on age verification, your disclosure HTML is ready and you have picked a redirect URL for visitors who decline. The default
https://google.comredirect is rarely the right choice.
Where to go
- Open the left navigation in your SGEN admin.
- Click Appearance → Site Settings (or open
/sg-admin/settingsdirectly). - The General tab loads by default. A small sidebar on the left of the panel content offers three tabs: General, Email, and Social Media.
- The General panel scrolls top-to-bottom through three cards: Identity, Business Information, Age Verification.
Steps — Identity card
1. Write your site title and tagline
Site Title appears in every browser tab, at the top of every transactional email, and in the admin top bar. Write your real business name — roughly 60 characters is the safe upper bound for narrow tabs.
Tagline is a one-sentence summary. Pages with no SEO description of their own fall back to this tagline in search results and social shares.
2. Set your site email
Site Email is the From address on confirmation emails, password resets, and form notifications. Use a real, monitored inbox. Leaving it empty risks system emails going out with no visible sender — many email providers treat that as spam.
3. Upload the site logo and favicon
Click Choose Image next to Site Logo — your Media Library opens as a modal. A horizontal PNG or SVG at 2x render size stays sharp on high-DPI screens. Repeat for Favicon (32×32 PNG on a transparent background works for both light and dark browser themes).
If you want the header logo to link somewhere other than the homepage, type the URL into Logo link. Leave it blank and clicking the logo sends visitors to /.
Once saved, this is how those identity values appear on your public site — logo in the nav, site title in the browser tab, and favicon in the tab corner:
The favicon and og:title / og:description tags are pulled directly from Site Title and Tagline — no extra SEO configuration needed. To confirm, right-click your homepage → View page source → search og:title:
4. Set your timezone
Pick your business's primary timezone from the Timezone dropdown (grouped by region, with live search). Every timestamp — blog post dates, order timestamps, comment times — displays in that zone. Changing timezone does not re-timestamp historical data; a post published "at 3pm UTC" displays "at 4pm BST" after switching to Europe/London, but the underlying time is unchanged.
5. Pick the homepage and 404 page
Homepage lists every published page plus a Default option. Leave at Default and the root URL shows the latest-posts list; pick a page and the root URL shows that page (the posts list moves to /blog).
404 Page works the same way — pick a published page to replace the default "Page Not Found" view. A good custom 404 has navigation back to the homepage, a search box, and links to popular content.
6. Decide whether to allow public sign-ups
Anyone can register controls whether the public /register page is reachable. Leave it off for administrator-only account creation; tick it on for membership and ecommerce sites. When off, /register returns a 404 — an administrator can still create accounts from the Users panel.
Steps — Business Information card
7. Fill in the business details
The Business Information card has nine fields: Phone, Address line 1, Address line 2, City, State, Postal code, Country, Opening hours, and Google Business CID. All are optional — fill in what you want visible.
The values surface in two places: in your site footer wherever the theme template calls for contact info, and in the LocalBusiness structured data that search engines consume (a complete set helps Google show your location in map results).
Opening hours is a free-text textarea — one line per day reads cleanly in the footer and parses into the schema correctly. Google Business CID (optional) links your site to a Google Business Profile; find it in the Profile URL as the numeric string after ?cid=. Leave blank if you do not have one.
A complete Business Information card:
Steps — Age Verification card
8. Turn on age verification
Tick Enable age verification. Additional fields appear: Expiration days (how long a Yes click is remembered in cookies — the SGEN default is 1, meaning every day; 30 is a more typical production value), a logo picker, the disclosure HTML editor, Yes/No button text fields, Yes/No redirect URL fields, and a View as select.
If Enable is off, none of the age-gate fields affect your public site.
9. Pick the view mode
Popup overlays the gate on top of the requested page — lighter touch, good when only some pages are age-sensitive. Landing page replaces the entire page until the visitor confirms — stricter, good when the whole catalog is age-sensitive.
10. Write the disclosure and configure the buttons
The disclosure field is a rich editor that accepts HTML. Keep it short — one paragraph naming what they are about to see and what the law requires. The SGEN default reads ARE YOU 21
OR OVER?
Set the No button redirect to an appropriate destination (a search engine, industry help page, or parent-friendly site). The SGEN default of https://google.com is rarely the right choice. The Yes button redirect is optional — leave blank and the visitor stays on the page they came for.
Save and verify
11. Save the whole form
The Save Changes button sits in the sticky right-hand column and stays visible as you scroll. Click it once — all three cards save together. A green message reading Site settings has been successfully updated! confirms the write.
12. Verify the changes on your public site
Open a new browser tab and confirm:
- Browser tab shows your new Site Title; header shows your logo; favicon appears in the tab corner.
- Footer shows your business phone, address, and hours wherever the theme surfaces them.
- Post dates and comment times are in your chosen timezone.
- Age gate (if enabled) appears in an incognito window; Yes dismisses it, No redirects to the URL you set.
- Page source contains a
LocalBusinessJSON-LD block (from Business Information) andog:title/og:descriptiontags (from Site Title and Tagline).
What success looks like
The green Site settings has been successfully updated! flash appears and the changes are live on the next page-view — no redeploy needed. The full verification checklist is in step 12 above.
What to do if it does not work
- My logo uploaded but is not showing in the header. Reload the public site with a hard refresh (Ctrl+Shift+R on Windows, Cmd+Shift+R on Mac). Browser caching often keeps the old logo for a few minutes. If the logo is still missing, re-open Settings → General, confirm the Site Logo field shows your chosen image thumbnail, and click Save Changes again. If the field shows a number rather than a thumbnail, the Media Library entry was deleted — re-pick the image.
- The favicon did not change after I uploaded a new one. Browsers cache favicons aggressively — sometimes for days. Hard-refresh the page, then try the site in an incognito window or a different browser to confirm the new favicon. Once your browser cache expires (typically within 24 hours), the new favicon will appear in normal tabs too.
- The browser tab title still shows my old site name. Hard-refresh. If the title is still wrong, confirm the Site Title field holds your new name and save again. A stubborn tab title is almost always browser cache.
- Timestamps on my site are in the wrong time zone. Confirm the Timezone field is set to the right zone and click Save Changes. Timestamps update on the next page-view — no migration is needed. If the dropdown is at UTC, that is the SGEN default — pick your real timezone and save.
- My Homepage dropdown does not list the page I want. Only published pages appear. If your page is in Draft or Trash, move it to Publish first under Pages, then come back to this screen.
- I picked a custom 404 page but visiting an unknown URL still shows the default. Clear your browser cache, then retry in an incognito window. If the default still shows, confirm the page you picked is in Publish status under Pages — a 404 page that has been moved to Draft falls back to the SGEN default.
- The homepage swap did not take. Hard-refresh, confirm the Homepage dropdown shows the page you picked, and re-save. A common gotcha: editing the page itself (renaming, changing slug) under Pages does not move the Homepage pointer; the pointer stays on the original page until you re-pick it here.
- Age verification is on but visitors do not see the gate. Hard-refresh the site in an incognito window. A normal window that already passed the gate once will not show it again until the remembered-days window elapses or the visitor clears cookies for your domain. Check that Expiration days is set — the SGEN default of
1prompts every day, but a missing or zero value can cause unpredictable gate behaviour. - Age verification logo is not appearing on the gate. The Verification logo field reads from your Media Library by ID, like the site logo. Confirm the field shows a thumbnail (not just a number), and that the underlying media file has not been deleted from the library.
- The age gate appears but the No button does nothing. The No button redirect is empty or points at a broken URL. Open the Age Verification card, fill in a real URL into No button redirect (not the SGEN default of
https://google.comunless you intend that), and save. - The Site Title still reads "SGEN Documentation" on my public site. That is the SGEN default placeholder. Open Settings → General, change the Site Title field to your real business name (your business in the examples above), and click Save Changes.
- My business address shows in the footer but with weird spacing. The Opening hours field is rendered as plain text — line breaks are preserved. If your hours line wraps oddly, shorten each line or change the wording. Multiple short lines often read better than one long line.
- I saved and the success flash appeared, but one of my changes reverted. Confirm you are on the General tab (sidebar highlighted as General) rather than Email or Social Media — the three tabs are separate forms. Re-edit and save again on the correct tab.
- The Anyone-can-register toggle does not stop new accounts being created. The toggle hides the public
/registerpage; an administrator can still create accounts from the Users panel, and existing accounts can still sign in. If you need to disable login entirely, that is a different control — see Manage your site's users. - JSON-LD structured data is missing from my page source. Confirm the Business Information card has values in at least the City and Country fields. With both empty, SGEN omits the LocalBusiness schema block rather than emitting an incomplete one. Fill in the missing fields and save.