
How to configure email sending on your site
⏱ Quick answer below · full page ≈ 7 min · skim the bold lead-ins to move faster.
In short. Connect your site to an SMTP provider (Google Workspace, SendGrid, Mailgun, or similar) by filling in the SMTP host, port, encryption, username, and an app password — then click Save and use the built-in Send Test Email tool to confirm delivery. Always retype your password when saving, even when changing only another field, or the stored password is wiped.
On this page: What is this for? · Options · Good use cases · Before you start · Steps · What to do if it does not work
Your site sends transactional email automatically — welcome messages, order receipts, password-reset links, contact-form notifications. Every one of those rides on the credentials you enter here. Email Settings is where you set those credentials, configure the From name and address your customers see, optionally add a logo to branded templates, and verify everything works with a one-click test send.
What is this for?
Connect your site to an outbound email provider — Google Workspace, Microsoft 365, SendGrid, Mailgun, Postmark, or any standard SMTP service — so automatic emails reach recipients' inboxes reliably instead of falling back to unreliable hosting mail. You configure this page once at setup, then revisit only to change providers, rotate credentials, or troubleshoot delivery. It covers the connection and sender identity only — email template content is under Notifications.
Scope
Email sending configuration covers the delivery credentials and sender identity for every automatic email your site sends. A correct configuration here is what makes your transactional email arrive in recipients' inboxes rather than spam folders or nowhere at all.
What this covers: From Name, From Email, Email Logo, SMTP toggle, SMTP host, port number, encryption type (TLS/SSL/None), SMTP username, SMTP password, and the Send Test Email diagnostic.
What this does not cover: email template design and copy (Notifications editor), bulk marketing campaigns (use a dedicated ESP), contact-form recipient routing (Forms settings per form), or email sending logs (check with your SMTP provider's dashboard).
Options
| Field | Required | Notes |
|---|---|---|
| From Name | Yes | Displayed in recipients' inboxes. Use your business name: "Your Store". |
| From Email | Yes | Reply-to address. Use a real monitored inbox on your own domain. |
| Email Logo | No | Shown at the top of branded email templates. Pick from Media Library. |
| Enable SMTP | No | Switches from basic hosting-mail (unreliable) to your provider's authenticated SMTP. |
| SMTP Host | If SMTP on | Your provider's outbound mail hostname. |
| Port | If SMTP on | 587 for TLS, 465 for SSL. Port 25 is often blocked by hosting providers. |
| Encryption | If SMTP on | TLS (recommended for most providers), SSL, or None. |
| Username | If SMTP on | Your account username. For SendGrid: literal string apikey. For Google Workspace: your email address. |
| Password | If SMTP on | App password or API key. Save with blank = wipes the saved password. Always retype on save. |
Common provider values:
| Provider | Host | Port | Encryption | Username |
|---|---|---|---|---|
| SendGrid | smtp.sendgrid.net | 587 | TLS | apikey |
| Mailgun | smtp.mailgun.org | 587 | TLS | Your Mailgun SMTP login |
| Google Workspace | smtp.gmail.com | 587 | TLS | Your Gmail address |
| Microsoft 365 | smtp.office365.com | 587 | TLS | Your Microsoft 365 email |
| Amazon SES | Region-specific (e.g. email-smtp.us-east-1.amazonaws.com) | 587 | TLS | SMTP username from SES console |
Amazon SES — sandbox mode. Fresh SES accounts run in sandbox mode until you apply for production access. In sandbox, SES rejects every recipient that is not pre-verified in your AWS SES console — you can only send to addresses you have manually verified. Apply for production access (a one-screen form in the AWS console, typically approved within 24 hours) before your site goes live, not on launch day.
Examples
Example — connect Postmark for reliable transactional delivery. Your Store connects Postmark because of its high deliverability for order receipts. Open Email Settings, enable SMTP, set host to smtp.postmarkapp.com, port 587, TLS, enter your Postmark account API token as both the Username and Password, and save. Run Send Test Email to confirm the first message clears Postmark's inbound address without hitting spam.
Example — connect SendGrid on launch day. The site owner sets From Name to "Your Store", From Email to hello@yoursite.com, ticks Enable SMTP, enters host smtp.sendgrid.net, port 587, TLS, username apikey, pastes the SendGrid API key into Password, and saves. They then use Send Test Email to send a test to admin@yoursite.com and confirm delivery before the site goes live.
Example — rotate credentials after a security audit. Your Store's IT policy requires quarterly credential rotation. The site owner generates a new SendGrid API key, opens Email Settings, types the new key into Password (all other fields unchanged), and saves. The new key is now live.
Example — switch from Google Workspace to SendGrid for better deliverability. After tracking a 12% bounce rate on order receipts, the site owner switches to a dedicated transactional email provider. They change host to smtp.sendgrid.net, update the username to apikey, paste the API key, save, and run a test send. Bounce rate drops to under 1%.
Good use cases
- Initial setup — connect to your business email provider so customers receive confirmations and receipts from a professional, branded address.
- Provider switch — move from shared hosting mail to a dedicated transactional sender (SendGrid, Postmark) for better deliverability.
- Credential rotation — replace the app password every few months or after a team member with access leaves.
- Pre-launch verification — run a test send before a campaign or sale to confirm delivery is working.
- Delivery troubleshooting — a Send Test Email click confirms or rules out a credentials issue in seconds.
- From Name update — refresh the sender identity after a brand rename without touching your provider.
What NOT to use this for
- Email content / wording — edit templates under Notifications; this page is connection-only.
- Marketing campaigns — bulk newsletters and sales emails belong in a dedicated ESP (Mailchimp, ConvertKit, etc.).
- Deliverability reputation — SPF, DKIM, and DMARC records are set at your DNS provider, not here.
- Per-inbox delivery checking — the test tool verifies the SMTP connection; it cannot tell you whether a recipient's spam filter will accept your messages.
- Password auto-preservation — do not leave the Password field blank when saving, even to change only another field. The "Leave blank to keep current password" placeholder is misleading: a blank save clears the stored password and breaks email delivery. Always retype the full password.
How this connects to other features
- Notifications — controls subject lines, body templates, and merge fields. Email Settings provides the connection; Notifications provides the content. Emails not arriving → check here first. Emails arriving with wrong wording → check Notifications.
- Forms — contact-form submission alerts go through these credentials. If you stop receiving form notifications, rule out Email Settings before troubleshooting the form.
- Password resets — the reset link email uses these credentials. A misconfigured or wiped password here is the most common cause of sitewide reset failures.
- Order receipts — every receipt, shipping notification, and order-status email rides on these credentials. A cleared password breaks all receipts at once.
- Media library — the Email Logo picker draws from your Media library. Upload your logo there first, or upload directly from the picker on this page.
Before you start
Have these things ready before you open the Email Settings page.
You will need the SMTP host name from your email provider — for Google Workspace this is smtp.gmail.com, for Microsoft 365 it is smtp.office365.com, and other providers will list theirs in their setup docs. You will need the port number — usually 465 for SSL or 587 for TLS — and the encryption method matching the port. You will need the username, which is usually your full sending email address. And you will need the password — and this is important — most modern providers require an "app password" instead of your regular login password.
An app password is a separate string that the provider generates specifically for connecting third-party apps like SGEN to your email account. If you try to use your regular login password instead of an app password, the connection will fail with an authentication error and emails will not send. Generate the app password in your provider's account settings before you start filling out this page.
For Google Workspace, you will find app passwords under your Google Account → Security → App passwords (you must have 2-Step Verification enabled to access this page). For Microsoft 365, app passwords are generated in your account under Security info → Add sign-in method → App password. For SendGrid and similar dedicated transactional providers, you do not use a traditional username and password — instead you use the literal string apikey as the username and a generated API key as the password. For Mailgun, similarly, you create SMTP credentials inside the Mailgun dashboard for each sending domain.
Have your logo image file ready if you want to set one — a PNG or JPEG file under 200 KB is ideal so that emails load quickly for recipients.
Where to go
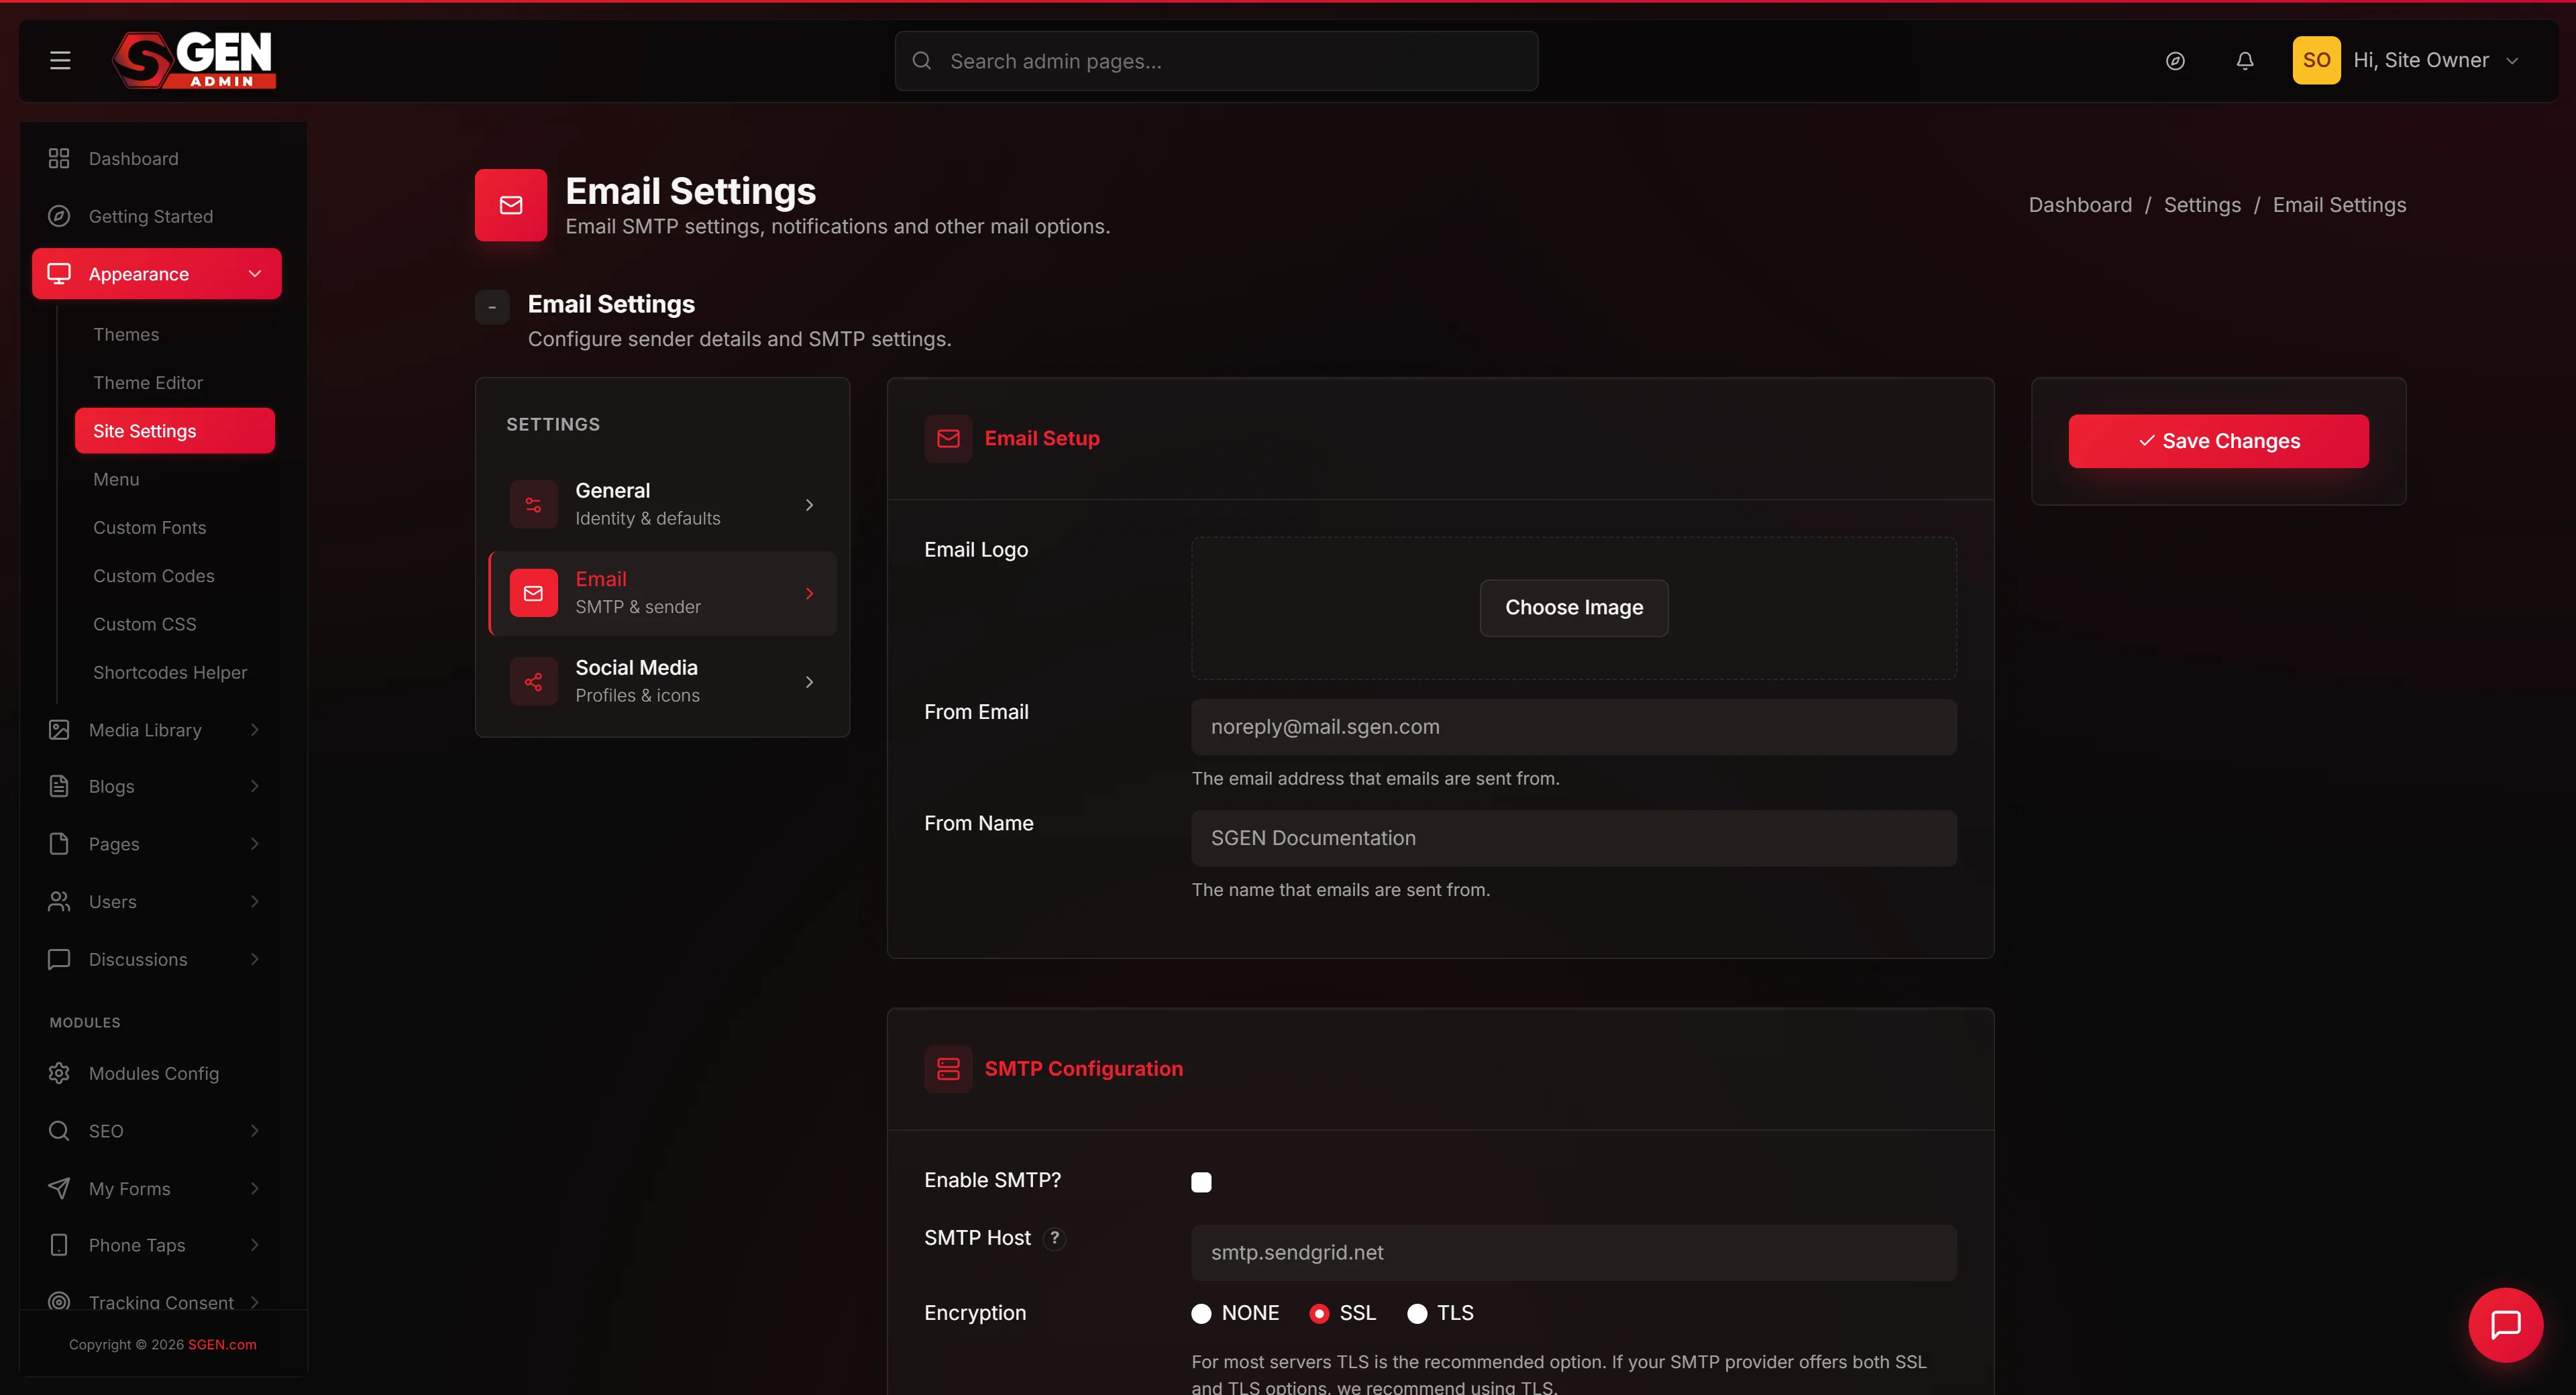
In the admin sidebar, click Settings, then Email Settings. The page that opens shows three cards stacked top to bottom — Email Setup, SMTP Configuration, and Email Testing. The Save button sits at the bottom-right of the page and saves everything in the first two cards together. The Send Email button sits inside the Email Testing card and sends a one-off test message immediately.
Steps — Set up SMTP for the first time
1. Fill in the From Name and From Email
In the top card (Email Setup), enter the name you want recipients to see when they receive an email from your site. This is typically your business or brand name, like "Your Store." Then enter the email address you want emails to come from — most people use a generic address like orders@yourdomain.com or noreply@yourdomain.com so that customer replies do not go to a personal inbox. Optionally, click the Email Logo field to choose a logo image from your media library that will appear in some email templates. Choose a logo at a reasonable size — under 200 KB is ideal so that emails load quickly for recipients on slow connections or mobile data. The Email Logo is optional — if you skip it, your emails will not include a logo at the top.
2. Turn on SMTP and enter your provider details
Scroll to the SMTP Configuration card. Toggle the SMTP Enabled switch to On. This tells your site to use your configured email provider instead of the basic fallback that comes with most hosting environments. Enter the SMTP Host from your provider's setup docs. Choose the encryption method — SSL is typical for port 465, TLS for port 587. If your provider lists a specific encryption, match what they list. Enter the port number that matches your encryption choice. Most providers use port 465 with SSL or port 587 with TLS — port 25 is rarely used today and is often blocked by hosting environments.
3. Enter your username and app password
Type your username — usually this is the full email address you are sending from. For dedicated transactional providers like SendGrid, the username may be a fixed literal string (SendGrid uses apikey, for example). Type your app password into the Password field. Critical: type the full app password every time you save this page, even if you are coming back later only to change something else like your From Name. The Password field shows the placeholder "Leave blank to keep current password" — that placeholder is misleading. If you save with the password field blank, your stored password gets cleared and emails stop sending until you re-enter it. Always retype the full password when you save. This is the single most important rule for this page.
4. Save the configuration
Click the Save button at the bottom-right of the page. The page will reload with a green success banner saying your mail configuration has been saved. If you see a red error banner instead, check the From Email field — make sure it is a valid email address — and try saving again. If you do not see any banner at all, scroll back to the top of the page after clicking Save — banners appear at the top and may be off-screen on smaller displays or after a long page scroll.
5. Send a test email to confirm everything works
Scroll to the Email Testing card at the bottom of the page. Type your own personal email address (one you can check right now) into the Email field. Type a short test message in the Content field — at least 5 characters, anything like "Test from Your Store" is fine. Click the Send Email button. Wait a few seconds, then check your inbox. If the test email arrives within a minute, your setup is working. If the test email does not arrive within a few minutes, check your spam folder, and then revisit the steps above to verify each field.
What success looks like
Within a minute of clicking Send Email, a test message arrives at the address you specified. The From name shows the name you configured. The From address is the one you entered. The subject line is "This is just a test email." The body contains the content you typed. Back on the Email Settings page, you see a green success banner reading "Test email sent successfully!" The page returns to its normal state and is ready for further edits or for you to leave it alone for the next several months.
What to do if it does not work
- If you saved successfully but no test email arrives, the most common cause is that the SMTP password field was left blank during the save. Always retype the password when you save — even if you only meant to change the From Name. Re-open the Email Settings page, retype the full password, save again, and run another test.
- If the Send Test Email button shows a red error banner with "could not authenticate" or "authentication failed," your provider rejected the username and password combination. Double-check that you are using an app password (not your regular login password). Most providers require an app password for third-party SMTP clients. Generate a fresh app password in your provider's settings and re-enter it.
- If the Send Test Email button shows "could not connect to host," the host name, port, or encryption is wrong for your provider. Visit your provider's setup docs and verify the exact values they list. Common combinations are
smtp.gmail.comwith port 465 and SSL, orsmtp.office365.comwith port 587 and TLS. - If the Test Email succeeds but real customer emails are still missing, the issue is downstream — check Notifications to confirm the relevant template is configured, and confirm with the customer they are checking the correct address.
- If test emails arrive successfully but your customers are reporting they don't get receipts, the issue is on the recipient side — usually spam-filtering, blocked sender, or a deliverability concern. Your provider may need additional setup like SPF or DKIM records on your domain. Reach out to your email provider's support team for deliverability help — most major providers have a deliverability advisor or domain-authentication checklist they can walk you through.
- If the Save button appears not to do anything, scroll back to the top of the page after clicking — the success or error banner appears at the top and may be off-screen on smaller displays.
- If your password contains lots of special characters (lots of quotes, less-than or greater-than signs, ampersands), your provider may strip or rewrite some of them during save. If you suspect this is happening, regenerate an app password using only letters and numbers — most providers offer this option, and it eliminates the special-character ambiguity.
- If you change providers and the new credentials do not work right away, give it a minute and try the test send again — many providers have a short propagation delay between when an app password is created and when it becomes accepted at the SMTP edge.
- If your password is autofilled by your browser's password manager, the field may show characters but those may not be what gets sent — clear the field and retype manually if you suspect the autofilled value is the wrong one.
Example 1: Connect Google Workspace on launch day
Generate a Google App Password (Google Account → Security → App passwords — requires 2-Step Verification). In Email Settings, set From Name and From Email, enable SMTP, enter smtp.gmail.com, SSL, port 465, your Gmail address as username, and the 16-character app password. Save, then run a test send to your own inbox.
Example 2: Switch to SendGrid for better deliverability
Create a SendGrid account, complete domain authentication (SPF + DKIM at your DNS provider), and generate an API key with Mail Send permission. In Email Settings, set SMTP Host to smtp.sendgrid.net, TLS, port 587, username apikey (literal string), and paste the API key as the password. Save and run a test send.
Example 3: Recover a wiped credential
If emails suddenly stop after a minor edit (like updating the From Name), the credential was likely cleared. Open Email Settings, retype the full password, save, and run Send Test Email to confirm delivery is restored.
Example 4: Debug an authentication error
If Send Test Email returns "Authentication failed," the server reached your provider but rejected the credentials. Generate a fresh app password from your provider's account settings, re-enter it, save, and test again.
Tips
- Dedicated From address — use
orders@yourdomain.comorsupport@yourdomain.com, not a personal inbox. - Set up SPF and DKIM at your DNS provider — this improves deliverability and keeps your email out of spam folders.
- Save app passwords in your password manager — they are usually shown only once and cannot be retrieved, only regenerated.
- Test after every change, no matter how small — the Email Testing card takes 10 seconds.
- Switch providers without a gap — configure new credentials and confirm with a test send before disabling the old account.
- One app password per site — if you run multiple SGEN sites, use separate credentials so a compromise on one does not affect the others.
Frequently asked questions
Why does my provider's regular login password not work? Most modern email providers require an "app password" for third-party connections. Your regular login password is reserved for the web sign-in form and is not accepted at the SMTP layer. Generate an app password in your provider's account settings.
Why does it say "Leave blank to keep current password" but emails stop working when I do? That placeholder text is unfortunately misleading on this page. In practice, leaving the password blank when saving clears the stored password. Always retype the password when you save.
Can I use my personal Gmail address instead of a Workspace account? Personal Gmail accounts can work for low-volume transactional sending, but Google has stricter limits and may rate-limit or block the account if it sends bursts of automated email. For any real volume, use Google Workspace or a dedicated transactional provider like SendGrid.
What is the difference between SSL and TLS, and which should I pick? Both are encryption methods for the SMTP connection. SSL is typically used with port 465, TLS with port 587. Match whatever your provider's setup docs list — they are not interchangeable for a given port.
How do I know if my provider needs SPF or DKIM records? If you send from a custom domain like yourdomain.com, your provider almost certainly recommends SPF and DKIM records at your DNS provider. Recipients' spam filters use these to verify your emails are legitimate. Most providers have a domain-authentication wizard that walks you through adding the records.
Can I have different credentials for different types of email (e.g. receipts vs. password resets)? No — this page configures one set of credentials for all transactional email on the site. If you need separate channels, choose a single provider that gives good deliverability across all your transactional needs.
Will changes here affect emails already in flight? No — Email Settings only affects emails sent AFTER you save. Emails already queued or in transit continue using the credentials they were sent with.
Next steps
- Settings → Notifications — configure the wording, subject lines, and templates for every automatic email your site sends.
- Forms → Add a form — set up a contact form and verify the submission notification reaches you.
- Rotate credentials every 90 days — set a recurring calendar reminder; include a Send Test Email to catch any silent failure early.