
How to connect Stripe and PayPal so your shop can take payments
⏱ 2-min answer below · full page ≈ 12 min · bold lead-ins mark each section so you can skip to what you need.
In short. The Payment Gateways tab lets you connect Stripe, PayPal, or both to your store. Each provider has its own enable toggle, a mode toggle (sandbox/test vs live), and a pair of keys for each mode. Paste your credentials, save, test a checkout — that's it. Come back to this page when you rotate keys, switch a provider to live mode, or add a second payment option. All other payment-related settings (checkout fields, taxes, shipping) live on their own tabs and are linked at the bottom.
On this page: Scope · Fields reference · Connect Stripe (test first) · Switch Stripe to live · Add PayPal · Troubleshooting
The Payment Gateways tab is where you tell your store how to accept payments. You can run Stripe alone, PayPal alone, or both at once. A master Payment System toggle controls whether your store accepts any payments at all; each provider also has its own enable toggle.
Treat your credentials like bank-account keys. Anyone with your live secret key can charge cards through your account. Generate fresh keys when you set up, store them in a password manager, and never paste them into chat, email, or a screenshare.
Scope
This doc covers the Payment Gateways tab under Store Configuration — connecting Stripe and PayPal, configuring test and live credentials, and setting up webhook verification. It does not cover creating a Stripe or PayPal account (do that on each provider's own website first), processing refunds, or looking up individual transactions. This page is wiring only.
Fields
| Section | Field | Notes |
|---|---|---|
| Payment System | Master enable toggle | Off = no payment options at checkout regardless of other settings |
| Stripe | Stripe Enabled | Shows Stripe card form at checkout |
| Stripe | Mode | Sandbox (test cards, no real money) or Live (real charges) |
| Stripe | Test Publishable Key | Begins pk_test_ — from Stripe dashboard Developers section |
| Stripe | Test Secret Key | Begins sk_test_ — keep private |
| Stripe | Live Publishable Key | Begins pk_live_ |
| Stripe | Live Secret Key | Begins sk_live_ — keep private |
| Stripe | Webhook URL | Read-only; copy into your Stripe webhook settings |
| Stripe | Webhook Signing Secret (test / live) | Begins whsec_ — from Stripe webhook config |
| Stripe | Log Webhooks | Capture events for debugging; turn off in steady state |
| PayPal | PayPal Enabled | Shows PayPal button at checkout |
| PayPal | Mode | Sandbox or Live |
| PayPal | Sandbox / Live Client ID & Secret | From your PayPal developer app |
Common use cases
- Day-one setup — paste test keys first, verify a test checkout succeeds, then switch to live keys on launch day.
- Adding PayPal — enable PayPal alongside Stripe so shoppers who prefer PayPal do not abandon.
- Key rotation — generate fresh keys in your provider dashboard, paste them here, save, then revoke the old keys.
- Pause payments — toggle the master Payment System switch to Disabled while you migrate hosts or troubleshoot an outage, then re-enable when ready.
- Debugging — turn on Log Webhooks temporarily to trace why some orders are slow to show as Paid; turn it off when done.
What NOT to use this for
- Creating your Stripe or PayPal account — sign up on their own websites first; this page only connects an existing account.
- Pasting live secret keys into Slack or email — treat them like passwords; use a secure password manager when sharing with teammates.
- Testing with real cards in sandbox mode — sandbox uses Stripe test cards only; no real charges go through.
- Running a real launch in sandbox mode — customers would see a confusing checkout where their card appears to succeed but nothing is charged.
- Processing refunds or looking up transactions — those happen in your Stripe or PayPal dashboard, not here.
- Leaving Log Webhooks on indefinitely — it captures every payment event and fills up storage at high volume.
How this connects to other features
- Checkout Fields — billing fields you collect become part of the payment authorization Stripe or PayPal sees. Stripe uses billing address for fraud detection.
- General Settings — if Store Status is Disabled or Maintenance, payments are blocked regardless of gateway settings.
- Taxes — tax is calculated before the payment is authorized; the amount your customer is charged includes tax.
- Shipping — shipping cost is added to the cart total before payment authorization.
- Notifications — the order receipt template references payment info (card last-4, PayPal transaction ID). A misconfigured provider can cause receipts to send with empty payment details.
- Webhooks — Stripe sends payment status events to the read-only Webhook URL on this page; the Webhook Signing Secret verifies they came from Stripe.
- Email Settings — a payment-success event triggers a receipt email through Email Settings. A misconfigured email setup means receipts will not send even when payments work.
- Refunds — refunds are actioned in the Stripe or PayPal dashboard; the credentials here also authorize that flow on the provider side.
Before you start
You need a Stripe account, a PayPal account, or both. Sign up at stripe.com or paypal.com if you have not already.
For Stripe: log in to your Stripe dashboard → Developers section. Locate your publishable and secret keys in two flavors — test (pk_test_ / sk_test_) and live (pk_live_ / sk_live_). Also set up a webhook: Developers → Webhooks → Add endpoint. Paste the read-only Webhook URL from this page into Stripe's URL field. Stripe gives you a webhook signing secret (whsec_).
For PayPal: log in to your PayPal developer dashboard → create an App → locate the Client ID and Secret in App settings. PayPal has a sandbox set and a live set; have both ready.
Credential format reference — each value has a recognizable prefix; pasting the wrong string into a field will save without error but fail at checkout:
Have all credentials ready before you open this page so you can fill it in once and save once. Saving with partial credentials may leave a provider enabled-but-broken.
Where to go
In the admin sidebar, click Settings, then Store Management. The Store Configuration page opens. Click the Payment Gateways tab across the top.
You will see three sections: Payment System (master toggle), Stripe, and PayPal. Save Changes is at the bottom.
How to connect payment gateways
Steps — connect Stripe in test mode first
1. Open the Payment Gateways tab
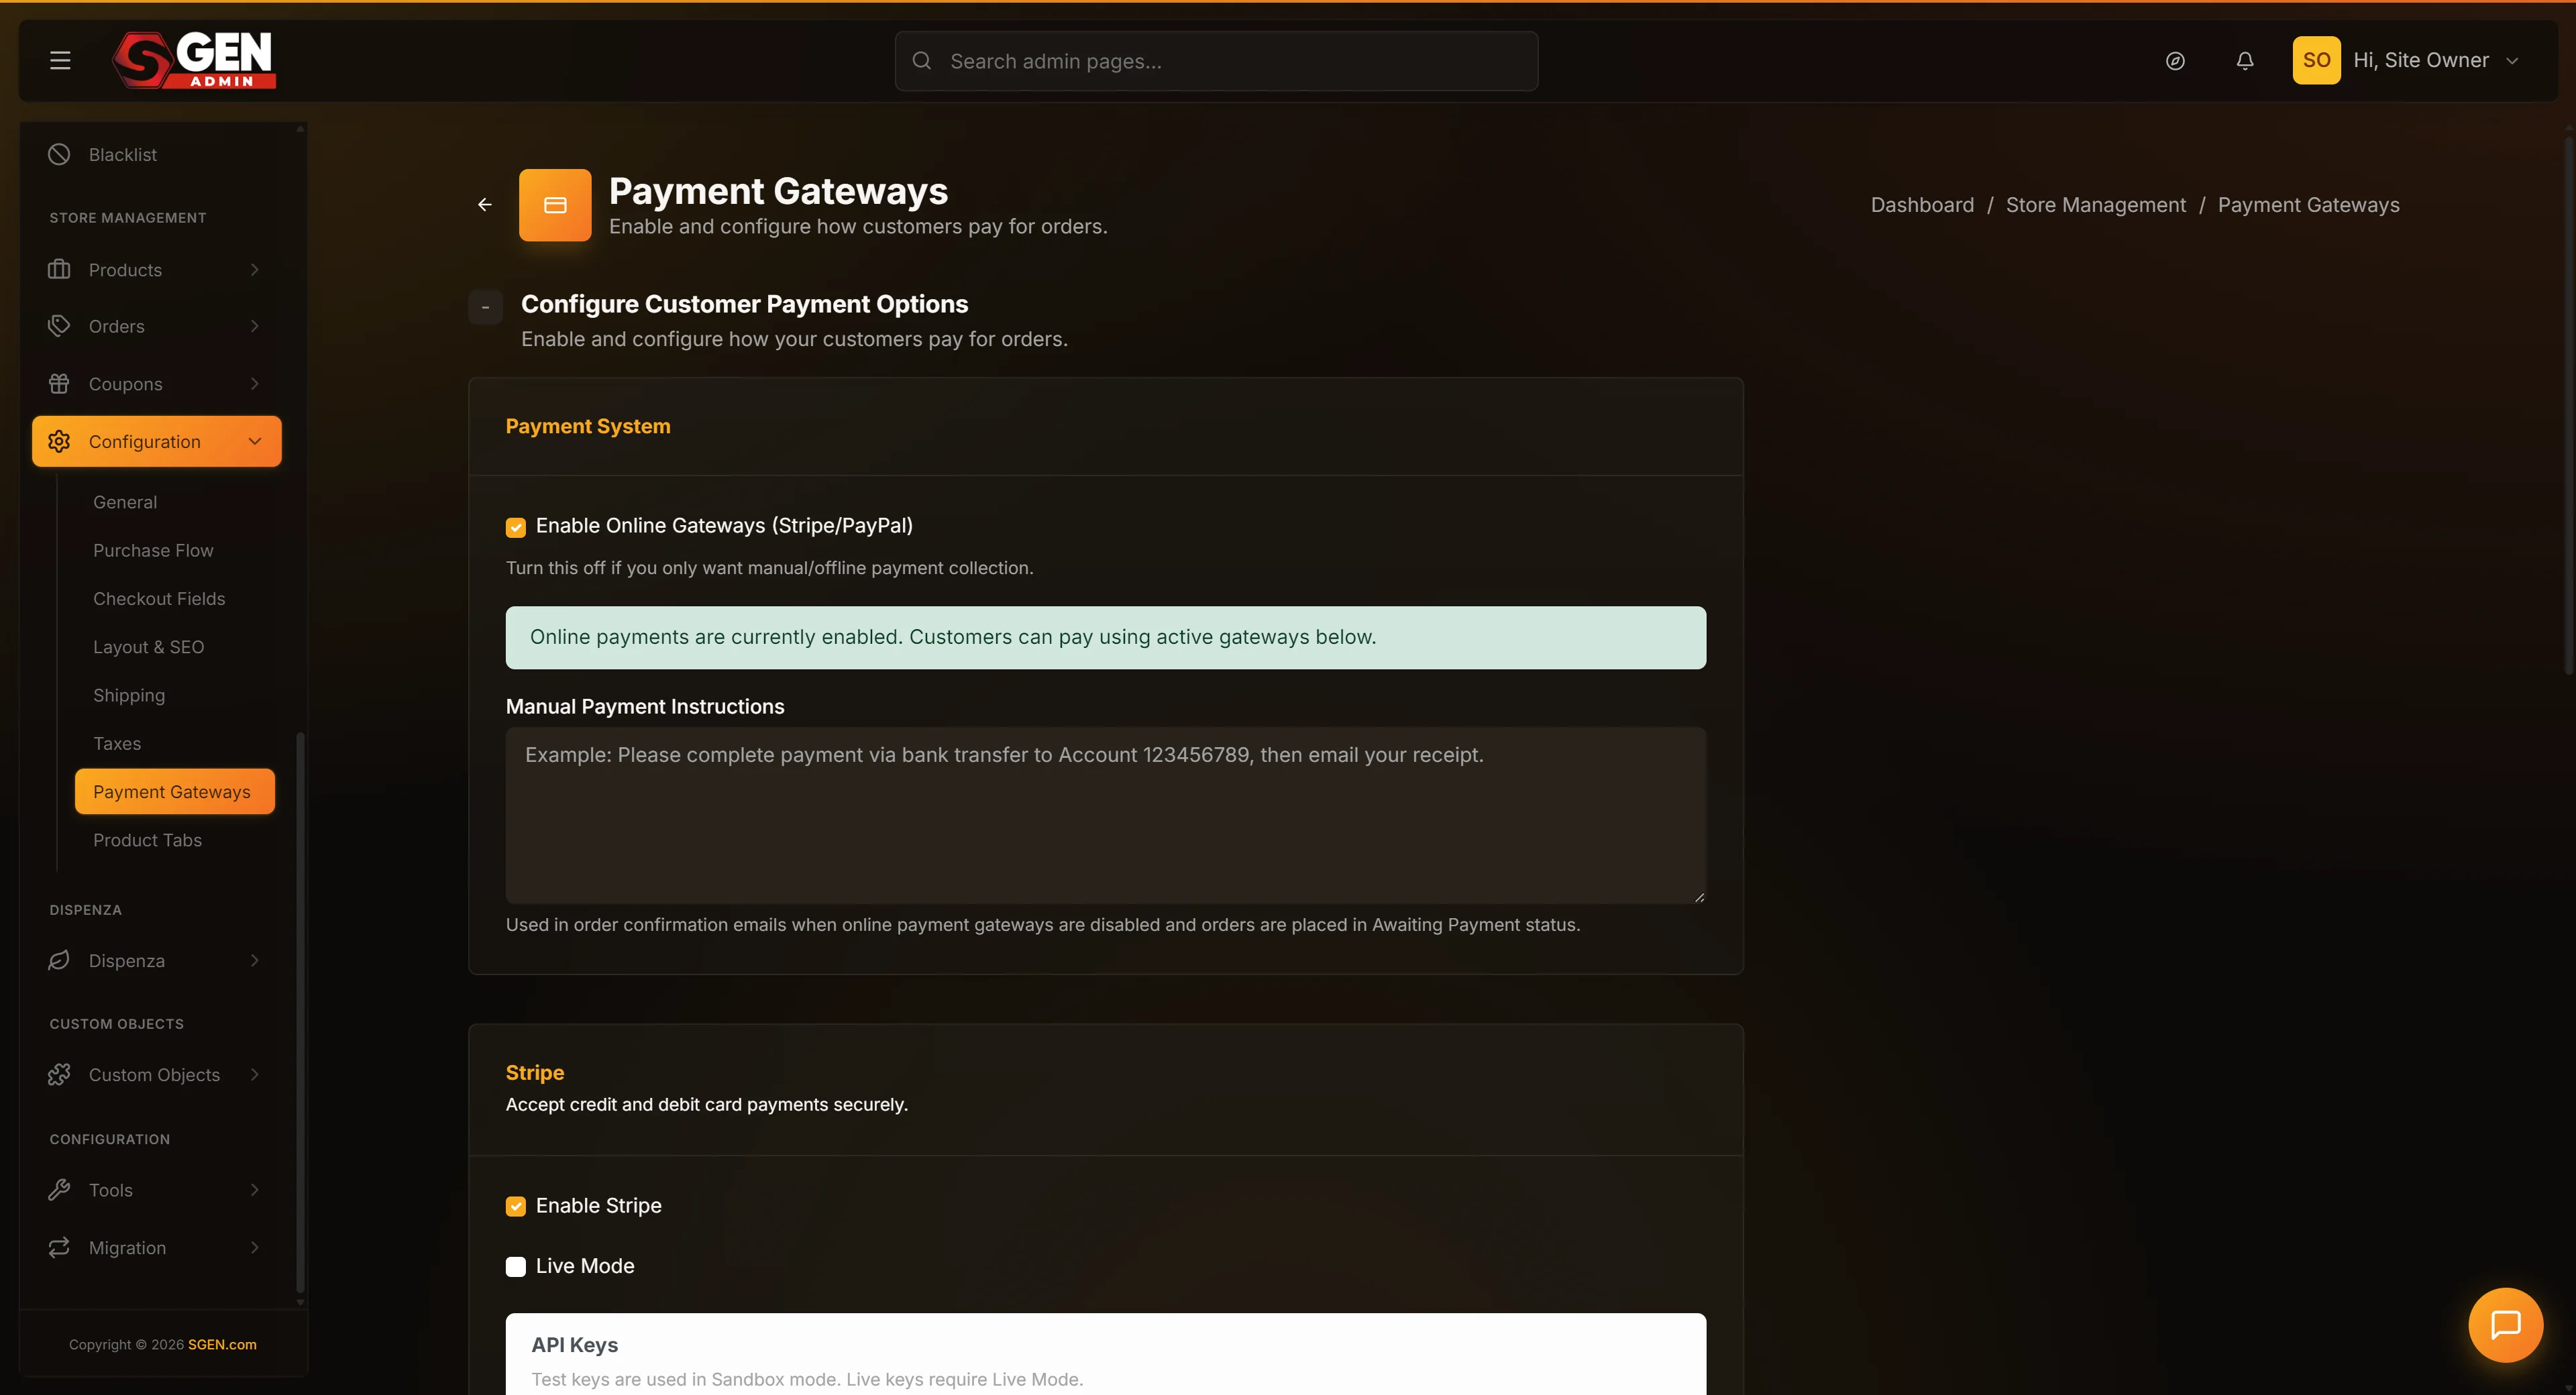
From the admin sidebar, click Settings, then Store Management, then the Payment Gateways tab.
2. Enable the Stripe section
Find the Stripe section. Toggle the Stripe Enabled dropdown to Yes. Set the Mode dropdown to Sandbox (test mode).
3. Paste your Stripe test keys
Paste your test publishable key (starts with pk_test_) into the Test Publishable Key field. Paste your test secret key (starts with sk_test_) into the Test Secret Key field.
4. Save Changes
Scroll to the bottom and click Save Changes. The page reloads with your values saved.
5. Test a checkout with a Stripe test card
Open your storefront in another browser tab. Add a product to your cart and proceed to checkout. At the payment step, enter a Stripe test card — the most common is 4242 4242 4242 4242 with any future expiry date, any 3-digit CVC, and any postal code. The order should complete and land on an order confirmation page.
If the test fails, your keys are wrong or in the wrong fields. Copy them fresh from your Stripe dashboard and verify which is publishable and which is secret.
Steps — switch Stripe from test to live mode
1. Confirm test mode is working first
Walk through a checkout in sandbox mode and confirm a test card succeeds. This is your safety check that the Stripe connection is healthy.
2. Open the Payment Gateways tab
Open Settings → Store Management → Payment Gateways.
3. Paste your live keys
In the Stripe section, paste your pk_live_ key into Live Publishable Key and your sk_live_ key into Live Secret Key. Both come from the Live mode toggle in your Stripe dashboard's Developers section.
4. Toggle Mode to Live
Switch the Stripe Mode dropdown from Sandbox to Live.
5. Save Changes
Click Save Changes. The page reloads with Stripe now in live mode.
6. Test with a real card
Open your storefront in another tab and walk through a real checkout. The charge should appear in your Stripe dashboard within seconds of the order completing.
If you want extra confidence, charge a $1 test product first, confirm the dollar lands in your Stripe balance, then refund yourself from the Stripe dashboard before opening your shop.
Steps — connect PayPal as a second payment option
1. Open the Payment Gateways tab
Open Settings → Store Management → Payment Gateways.
2. Enable the PayPal section
Find the PayPal section. Toggle PayPal Enabled to Yes. Set Mode to Sandbox if testing, or Live if going straight to production.
3. Paste your PayPal credentials
Paste your sandbox client and secret into the Sandbox fields. Paste your live client and secret into the Live fields. Values come from your PayPal developer dashboard's App settings.
4. Save Changes
Click Save Changes. PayPal is now connected.
5. Verify on the public checkout
Open your storefront and proceed to a checkout. You should see both a Stripe card form and a Pay with PayPal button as separate payment options. Pick PayPal, log in to your sandbox (if testing) or real PayPal account (if live), and complete the order.
What success looks like
After connecting Stripe and PayPal correctly, your checkout offers customers a clear choice — pay by card (Stripe) or pay with PayPal. A successful test charge in either mode creates an order in your admin and a corresponding entry in your Stripe or PayPal dashboard.
The page should show a green confirmation flash on save, and a status indicator confirming each provider is enabled in the mode you selected.
A successful payment also triggers downstream events: an order confirmation email to the customer, an order notification to your team, the order appearing in Orders, and inventory decrementing for purchased products. If any of those downstream events do not happen, the issue is in Email Settings, Notifications, or order workflows — not in Payment Gateways.
What to do if it does not work
No payment options at checkout — the master Payment System toggle is Disabled. Open Payment Gateways and toggle it to Enabled.
Stripe test card rejected — your test keys are wrong or swapped between fields. Copy them fresh from Stripe dashboard → Developers section. Publishable goes into publishable; secret into secret.
Real card rejected in live mode — your live keys may be wrong, or your Stripe account has not been activated for live charges yet. Check your Stripe dashboard for account status — Stripe sometimes requires extra verification before approving live charges.
Charge succeeds in Stripe but order does not appear in your admin — your webhook is not firing or not verifying. Confirm the Webhook URL on this page exactly matches what you entered in Stripe's webhook settings, and that the signing secret matches.
Webhook signature verification failure — the secret on this page does not match what Stripe gave you. Roll a fresh signing secret in Stripe (Developers → Webhooks → your webhook → Signing secret → Roll), paste it here, and save.
PayPal works in sandbox but breaks in live mode — your live credentials are wrong, or your PayPal account is not yet approved for live transactions.
Payment System toggled to Disabled but shoppers still see payment options — your storefront has cached pages. Check in a private browsing window; clear your caching layer if the issue persists.
Secret keys revert to empty after saving — your admin session may have timed out. Log out, log back in, and save again. Empty secret-key fields save silently as empty, blanking out previous values.
Suspected key exposure — rotate immediately. Generate new keys in the provider dashboard, paste them here, save, then revoke the old keys in the provider dashboard. Do not revoke first.
Example: launching with Stripe live mode
Your store has passed sandbox testing and is ready for real orders.
Open Settings → Store Management → Payment Gateways. The page is currently in sandbox mode from test setup.
Paste your live publishable key (pk_live_..) into Live Publishable Key and your live secret key (sk_live_..) into Live Secret Key. Paste your live webhook signing secret (whsec_..) into Webhook Signing Secret (Live). Switch Mode from Sandbox to Live. Click Save Changes.
Open your storefront in another tab and place a small test order with a real card. The charge should land in your Stripe balance immediately and the order should appear in your admin Orders list. Refund the test charge from your Stripe dashboard. Your shop is open for business.
Example: adding PayPal alongside Stripe
Your store has been live with Stripe for six months. Customer feedback requests PayPal as an option.
Log into your PayPal developer dashboard, create an App, and copy the live Client ID and live Client Secret.
Open Settings → Store Management → Payment Gateways. Scroll to the PayPal section. Toggle PayPal Enabled to Yes, set Mode to Live, and paste your live Client ID and Client Secret. Click Save Changes.
Open your storefront, add a product to your cart, and proceed to checkout. The payment step now shows two options — Card (Stripe) and PayPal. Complete an order through PayPal to confirm it works end-to-end.
Next steps
- Store Basics — set Store Status, currency, and origin.
- Checkout Fields — choose which billing fields appear on checkout.
- Shipping Methods — configure shipping rates and zones.
- See the Email Settings doc to make sure order receipts can send after a successful charge.