
How to choose which fields appear on your checkout page
⏱ 60-second answer below · full page ≈ 8 min · skim the bold lead-ins to move faster.
In short. The Checkout tab under Settings → Store Management lists the nine standard billing fields ��� First Name, Last Name, Email, Phone, Address Line 1, Address Line 2, City, State, ZIP/Postal Code, Country. For each field you can: toggle it visible or hidden, toggle it required or optional, and set a custom label. One Save Changes button commits everything. A physical shop typically keeps all nine; a digital-only shop often keeps just First Name, Last Name, and Email. Changes apply on the next page render — test in a private window to skip browser cache.
On this page: Fields at a glance · Good use cases · What NOT to use this for · How this connects · Steps · Examples · Troubleshooting
The checkout page is the last screen shoppers see before they pay. Asking for too much information nudges customers toward cart abandonment; asking for too little leaves your shipping or finance team without the data they need. The Checkout tab lets you trim the form to exactly what your business requires.
You can show or hide any field, mark it required or optional, and rename its label to match your audience's language — for example "Postcode" instead of "ZIP Code" for a UK storefront. A hidden field cannot be required. Hiding a field does not delete data from past orders that collected it.
Scope
This doc covers the Checkout tab under Store Configuration — the nine standard billing fields you can show, hide, rename, or make required. It does not cover adding entirely new custom fields (that is the Custom Fields feature), cart-level settings like coupon code display (that is Purchase Flow), or shipping-address field layout beyond the standard nine (theme-controlled). Settings here apply to every checkout on your storefront with no per-product or per-category overrides.
Fields
| Billing field | Show by default | Required by default | Customizable label |
|---|---|---|---|
| First Name | Yes | Yes | Yes |
| Last Name | Yes | Yes | Yes |
| Yes | Yes | Yes | |
| Phone | Yes | No (optional) | Yes |
| Address Line 1 | Yes | Yes | Yes |
| Address Line 2 | Yes | No (optional) | Yes |
| City | Yes | Yes | Yes |
| State / Region | Yes | Yes | Yes |
| ZIP / Postal Code | Yes | Yes | Yes |
| Country | Yes | Yes | Yes |
Each field has three controls: a Show toggle (visible or hidden), a Required toggle (mandatory or optional), and a Custom Label text input. A hidden field cannot be required. Hiding a field does not delete data from past orders that collected it.
Good use cases
- Rename Phone to "Mobile (for delivery updates)" so customers understand why you are asking, rather than seeing an unexplained field that feels invasive.
- Hide Address fields on a digital-only shop — if you sell downloadable products, shipping address adds friction with no benefit.
- Rename "ZIP Code" to "Postcode" (or "State" to "County") for a UK or European audience.
- Make Phone required when your shipping carrier needs a number for delivery attempts — fragile or perishable goods often fall into this category.
- Hide Last Name and rename First Name to "Full Name" for shops where many customers use a single name or stage name.
- Drop unnecessary fields before a holiday rush — every saved second on the checkout page improves conversion when traffic is high.
- Tighten required fields after seeing a pattern of incomplete addresses on shipped orders, so future orders carry the data your fulfillment team needs.
What NOT to use this for
- Do not add custom fields here. Company name, VAT number, purchase-order number, or gift message belong in the Custom Fields feature — the Checkout tab is a fixed set of nine billing fields with on/off toggles and label edits only.
- Do not turn off Email. Email delivers the order receipt and delivery confirmation. Without it, your customer has no purchase record and your team cannot reach them.
- Do not hide Country if you have tax or shipping rules that depend on it. Country drives every tax and shipping decision — hiding it forces orders to default to your store's origin country.
- Do not rename a field to capture different data. Changing the Phone label to "Date of Birth" does not change the input type or validation rules.
- Do not change labels mid-sale. Changes apply the moment you save; shoppers currently mid-checkout may see a confusing in-flight relabel.
How this connects to other features
- Payments — Billing address fields collected here become part of the payment intent. Stripe uses them for fraud-scoring; more billing data improves risk assessment.
- Shipping — Address fields drive shipping-zone matching. If a shopper enters an address outside your configured zones, shipping options will be empty.
- Taxes — State and Country fields drive location-based tax rules. Hiding either field forces every order to the default rate.
- Notifications — Order receipt templates use First Name, Last Name, Email, and Address by default. Hiding any of those fields leaves empty merge fields in your receipts — update notification templates to match.
- Custom Fields — For data outside the standard nine (delivery instructions, PO number, gift message), use the Custom Fields feature to attach extra inputs to the order.
Before you start
Know what your business needs. Before opening this page, walk a typical order in your head: What does your team need to fulfill it — contact info, shipping address, phone for the carrier? Digital-only shops usually need just First Name, Email. Physical shops typically keep all nine.
Know your audience's terminology. A US shopper expects "ZIP Code"; a UK shopper expects "Postcode." If you serve multiple regions from one store, pick the most common term or set up regional store variants.
Spot-check dependent settings before saving. Glance at your Notifications templates and shipping integration. Hiding a field those features depend on can quietly break a downstream step — a two-minute check before saving is cheaper than diagnosing a missed receipt later.
Where to go
In the admin sidebar, click Settings, then Store Management. The Store Configuration page opens. Click the Checkout tab from the row of tabs across the top. You will see a list of billing fields — each with a Show toggle, a Required toggle, and a Custom Label text input. Save Changes is at the very bottom.
How to configure checkout fields
Steps — hide a field on the checkout
1. Open the Checkout tab
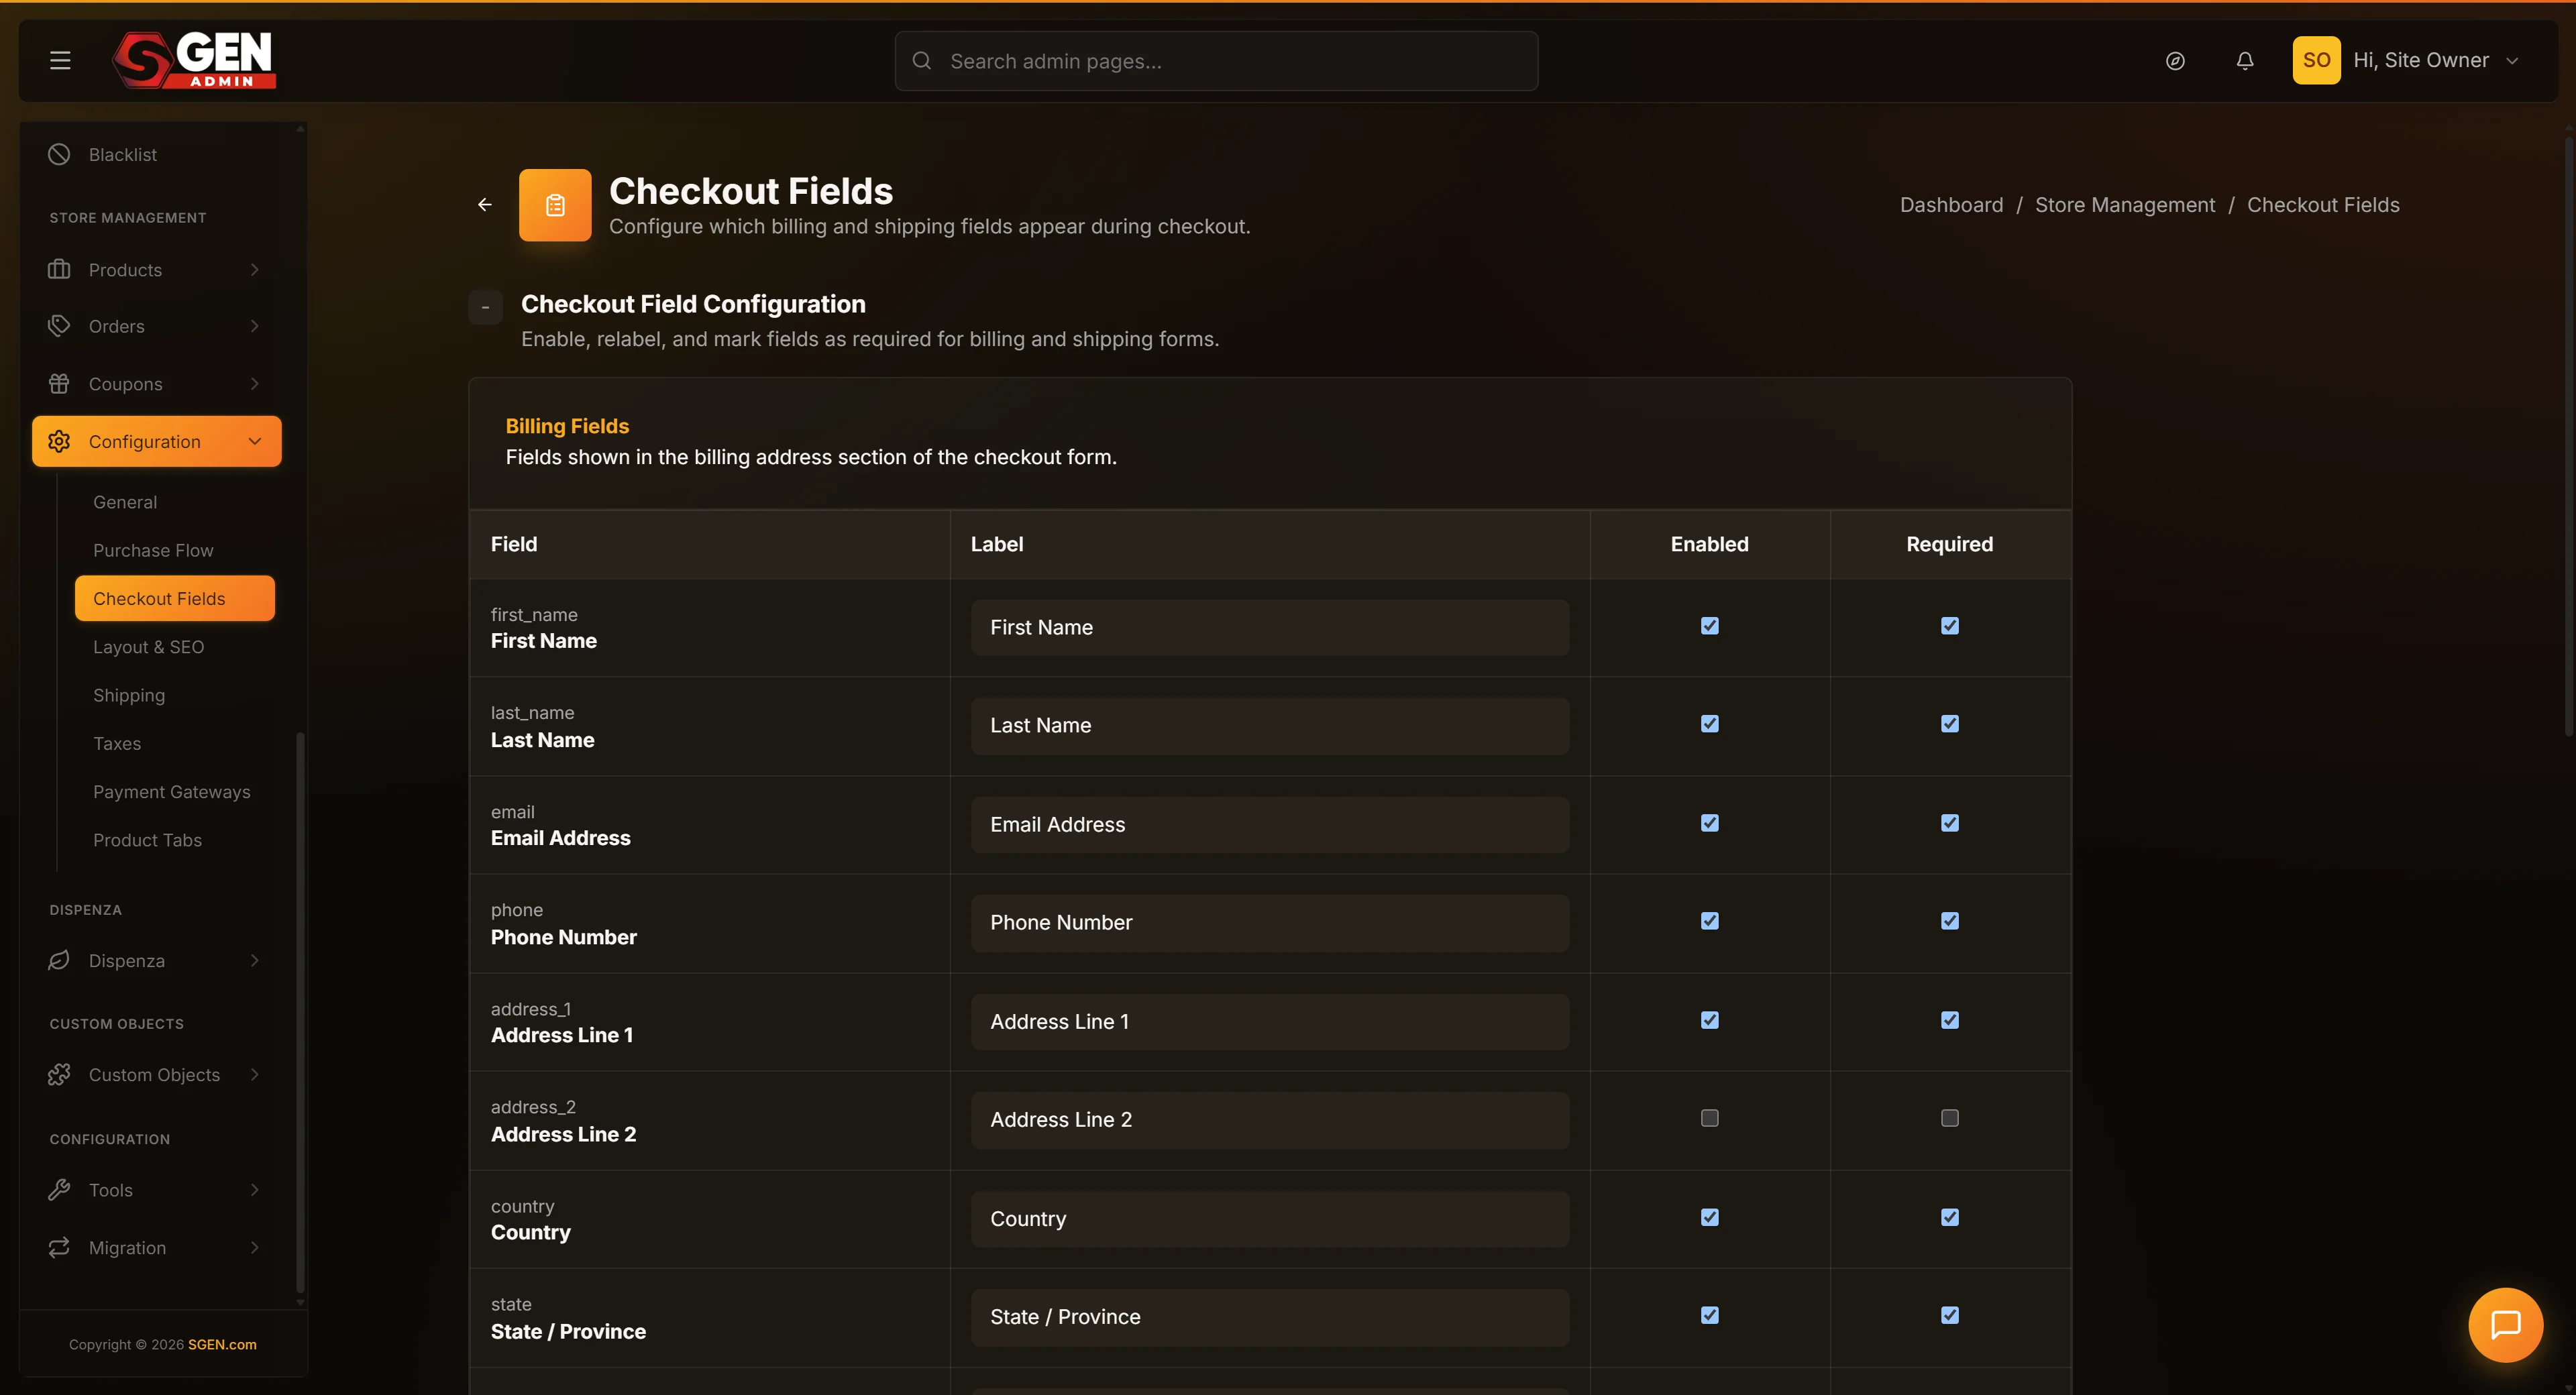
From the admin sidebar, click Settings, then Store Management, then the Checkout tab.
2. Find the field you want to hide
Scroll down the list of fields to find the row. Each row shows three controls: a Show checkbox, a Required checkbox, and a Custom Label text input.
3. Uncheck the Show checkbox for that field
Click the Show checkbox. The check disappears — the field will not render on the checkout page. If the field had a Required check, that check no longer applies; a hidden field cannot be required.
4. Click Save Changes at the bottom
Scroll to the bottom of the page and click Save Changes. The form refreshes with your new state.
5. Verify on the public checkout page
Open your storefront in a separate tab. Add a product to your cart and proceed to checkout. Confirm the field no longer appears. If it still shows, try a private browsing window — browser caching can keep the old form for a few minutes.
Steps — rename a field label
1. Open the Checkout tab and find the field
Open Settings → Store Management → Checkout. Find the row for the field you want to rename.
2. Click into the Custom Label text input
Click into the Custom Label text box. The current label appears ready to edit. An empty box means the field uses the default label.
3. Type the new label
Keep it short — a label that wraps to a second line on a small screen looks broken. "Mobile (for delivery)" is fine; a long explanatory phrase is not.
4. Save and verify
Click Save Changes. Open your checkout in another tab and confirm the new label appears. If it does not, check that you filled in the Custom Label box and saved — empty boxes fall back to the default field label.
Steps — make a field required
1. Open the Checkout tab and find the field
Open Settings → Store Management → Checkout. Find the row for the field you want to require.
2. Check the Required checkbox
Click the Required checkbox for that field. The check appears — the field is now mandatory at checkout.
3. Save Changes
Click Save Changes at the bottom. The form refreshes.
4. Verify on the public checkout
Add a product to cart, click checkout, and try to submit without filling in the now-required field. The form should block the submission with an inline error. If the form lets you submit without the field, double-check that the Required checkbox is checked — a slow connection can cause a save to silently revert.
What success looks like
After saving, changes apply on the next page render of the storefront checkout. Hidden fields disappear. Renamed labels appear with the new wording. Required fields block submission until filled in.
The page shows a green confirmation flash listing the fields you changed. Test the checkout once after every change by walking a product through in another tab. A well-configured checkout feels invisible — shoppers reach the page, recognize every field, fill in only what they need, and click Pay.
What to do if it does not work
Changes show in admin but not on the storefront. The most common cause is browser caching. Open the storefront checkout in a private or incognito window — you should see the fresh form there.
Required field still lets shoppers submit without filling it in. A slow connection can silently revert a save. Re-tick the Required checkbox, save again, and verify in a private window.
Custom label appears in admin but shows the default on the public page. Your theme template may be hard-coded to the default label. Test in a private window first; if the issue persists, the theme template needs to be updated to honor the custom label value.
You hid a field your shipping integration or notifications depend on. Re-show the field, save, then update the downstream setting first before hiding the field again. Hiding does not delete historical data — any past orders still carry whatever they collected when the field was visible.
Example 1: Physical shop — phone required for fragile delivery
Your Store ships fragile wine bottles that require signature delivery. Your carrier needs a phone number to attempt delivery; without it, the order returns unattempted.
Open the Checkout tab, mark Phone visible and required, and rename the label "Mobile (carrier needs to call before delivery)" so customers understand why the number is mandatory. Click Save Changes. From that point on, no order can complete without a phone number, and your carrier no longer returns orders for missing contact info.
Example 2: Digital-only shop — trimmed to three fields
Your Store Studio sells downloadable digital prints and ships nothing physical.
The team opens the Checkout tab and hides Phone, Address Line 1, Address Line 2, City, State, ZIP, and Country. They keep First Name, Last Name, and Email — all required. The new checkout is a three-field form. Customers complete it in fifteen seconds.
Example 3: UK storefront — localized labels
The UK team opens the Checkout tab on their UK store. They rename ZIP Code to Postcode, State to County, and City to Town. All fields stay visible and required. They click Save Changes and walk through the public checkout — every label reads in UK English. Shoppers no longer hit the friction of mentally translating "ZIP" to "postcode" mid-form.
Next steps
- Set up store basics — Store Status, Origin, Currency, and Units.
- Connect payment gateways — Stripe and PayPal so the checkout can charge.
- Configure purchase flow — cart behavior, coupon codes, and order flow settings.
- Custom Fields — add brand-specific inputs (company name, PO number, gift message) that are not on the standard nine-field list.