
Configure your store's payment methods
⏱ Quick answer below · full page ≈ 7 min · skim the bold lead-ins to move faster.
In short. The Payment Gateways tab under Store Configuration is where you enable Stripe and PayPal, switch between Test and Live mode, paste your API keys and webhook secrets, and write the bank-transfer instructions customers see on manual orders. Changes take effect on the next checkout after you save.
On this page: Fields · Steps: Payment System · Steps: Stripe · Steps: PayPal · Troubleshooting
How to enable Stripe, PayPal, and manual payments
The Payment Gateways tab under Store Configuration is the one place where you decide how customers pay on your store. From this screen you flip online payments on or off store-wide, enable Stripe and PayPal individually, switch either from Test mode to Live mode, and write the instructions shoppers see when they pick a manual (offline) payment method like bank transfer.
Scope
This doc covers the Payment Gateways tab under Store Configuration. It does not cover how to process refunds (that is Orders), how to look up individual transactions (that is your payment provider's own dashboard), or how to configure currency (that is Purchase Flow).
Fields
| Card | Field | What it does |
|---|---|---|
| Payment System | Enable Online Gateways | Master switch — off hides all online payment options at checkout |
| Payment System | Manual Payment Instructions | Text shown at checkout and on order confirmation when shopper picks manual payment |
| Stripe | Enable Stripe | Shows Stripe as a checkout option |
| Stripe | Mode | Test = test keys active; Live = live keys active |
| Stripe | Test / Live Publishable Key | Public-facing key; begins pk_test_ or pk_live_ |
| Stripe | Test / Live Secret Key | Private server-side key; begins sk_test_ or sk_live_ |
| Stripe | Webhook URL | Read-only; copy into your Stripe dashboard webhook config |
| Stripe | Webhook Secret (test / live) | Signing secret from your Stripe webhook; begins whsec_ |
| PayPal | Enable PayPal | Shows PayPal as a checkout option |
| PayPal | Mode | Sandbox = test; Live = real payments |
| PayPal | Sandbox / Live Client ID & Secret | From your PayPal developer app |
What is this for?
The Payment Gateways panel is your checkout-payment configuration screen. Reach for it when:
- Setting up payments for the first time — paste keys, pick a mode, save.
- Going live — flip from Test to Live mode and swap in your live keys.
- Adding a second option — enable PayPal alongside an existing Stripe setup, or vice versa.
- Updating manual-payment wording — your bank account changed, or you want to add pickup terms.
When you save, the changes apply on the next shopper's trip through checkout.
Preview: Payment Gateways overview — a screenshot of this screen will be added here.
Good use cases
| Scenario | What to do |
|---|---|
| First-time Stripe setup | Enable Online Gateways → Enable Stripe → paste test keys → copy Webhook URL into Stripe dashboard → paste signing secret → save → run a test card (4242 4242 4242 4242). When clean, flip Mode to Live and paste live keys. |
| Bank transfer only | Flip Enable Online Gateways off → fill Manual Payment Instructions with your account details → save. Checkout shows bank transfer as the sole option; instructions appear on the order-confirmation email. |
| PayPal alongside Stripe | Keep Enable Stripe on → flip Enable PayPal on → paste Sandbox credentials → test → flip PayPal Mode to Live → paste live credentials → save. Shoppers pick card or PayPal at checkout. |
| Pausing online payments | Flip Enable Online Gateways off → update Manual Payment Instructions to explain the pause → save. Flip it back on (and restore instructions) when ready. |
What NOT to use this for
- Do not use this panel to process a refund or look up a past transaction. That lives in Store Management → Orders.
- Do not paste Live keys while Mode is still set to Test. They are stored but inactive, and you will not catch a typo until you flip modes.
- Do not leave Manual Payment Instructions empty if online gateways are off — shoppers see "manual payment" with no guidance on how to pay.
- Do not edit the Webhook URL field. It is read-only and generated for your store; copy it into Stripe's dashboard as-is.
How this connects to other features
- Your public checkout — enabled gateways appear as shopper-selectable options at checkout. If no method is enabled, checkout shows an "online payment is unavailable" notice.
- Orders — every order records which payment method was used. The Manual Payment Instructions text is copied into the order-confirmation email.
- Stripe dashboard — Stripe sends webhook events (payment succeeded, refunded, disputed) to the Webhook URL shown here. Configure that URL in your Stripe dashboard once, paste back the signing secret, and save.
- Currency — payment processing currency is set in Currency settings under Store Configuration. Payment Gateways inherits that value. Refunds settle in the original transaction currency.
Before you start
- You are signed in to SGEN as an Administrator or Site Owner.
- For Stripe: you have a Stripe account with test keys (Developers → API keys, Test mode) and, for launch, live keys.
- For PayPal: you have Sandbox and Live developer apps at developer.paypal.com with their Client ID and Secret.
- For manual payments: you have the exact wording of your bank or payment instructions ready to paste.
Where to go
- Open the left navigation in your SGEN admin.
- Click Store Management → Configuration → Payment (or open
/sg-admin/ecommerce/configuration/paymentdirectly). - The Payment Gateways panel loads with three cards: Payment System, Stripe, PayPal.
Steps — Payment System
1. Flip the master Online Gateways switch
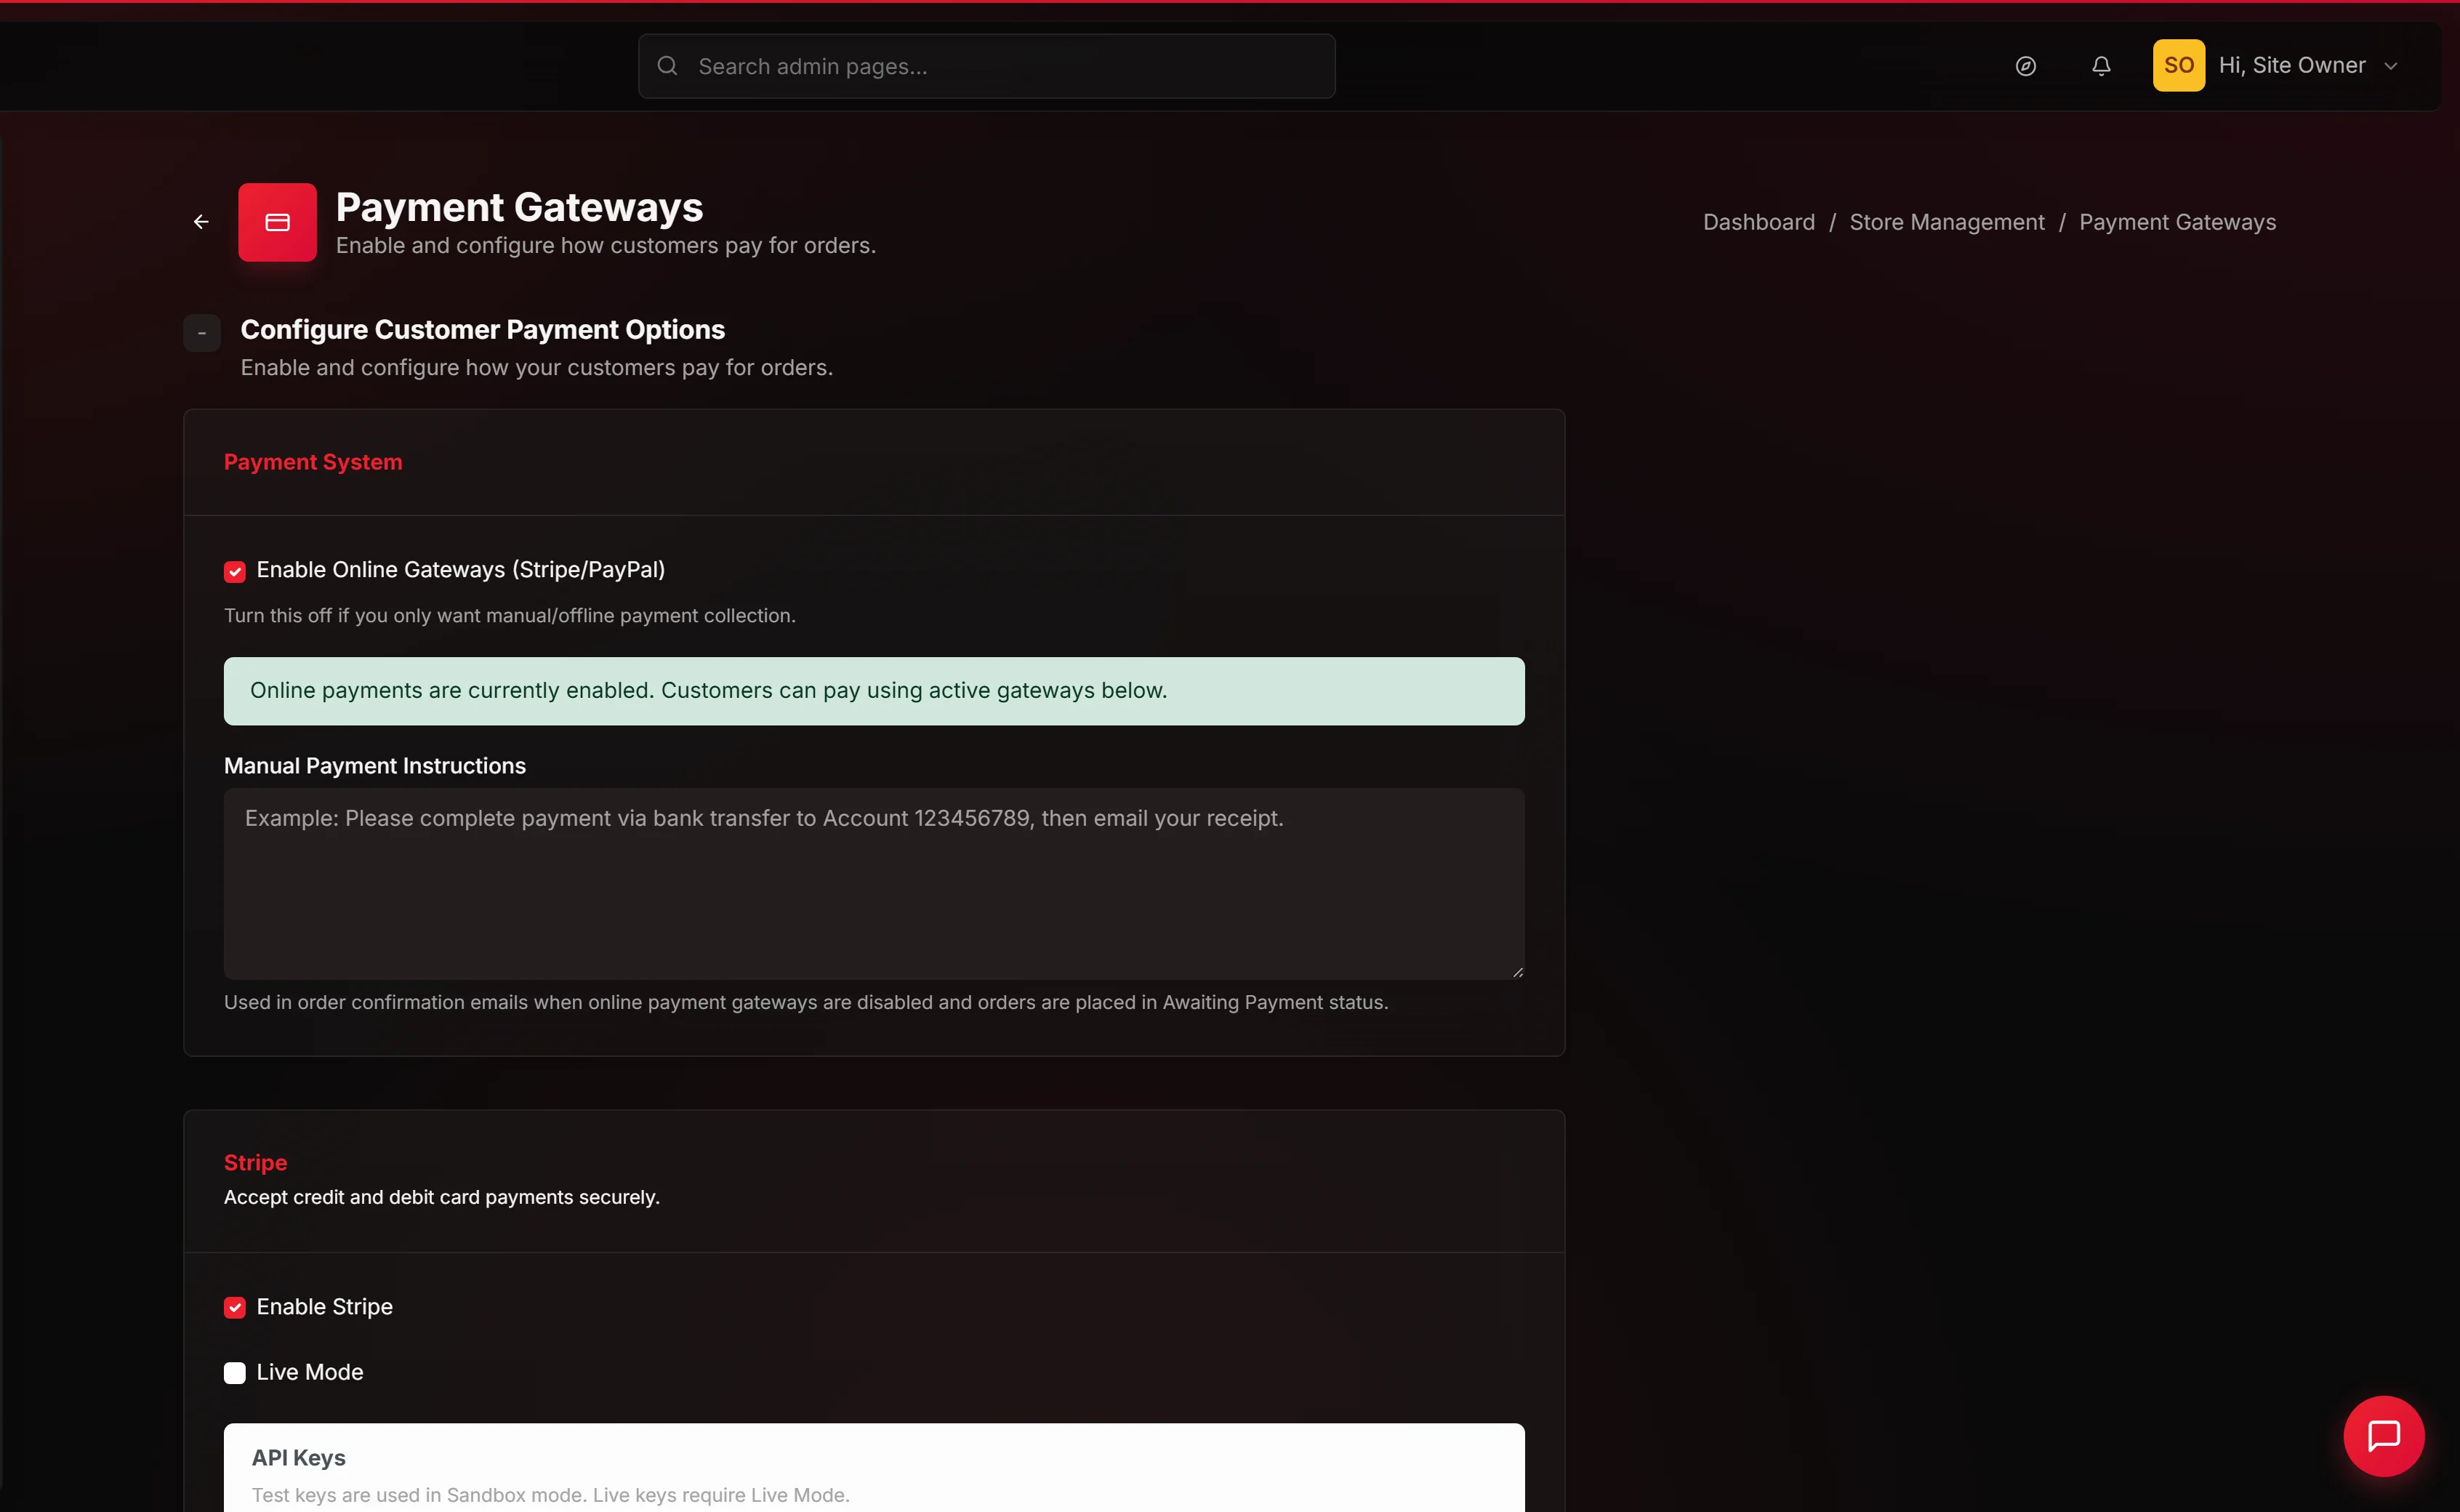
The Enable Online Gateways toggle is the master switch for Stripe and PayPal together. With it off, neither appears at checkout regardless of the individual toggles. Leave it on for any store that takes online payment; flip it off only for manual-payment-only operation.
A green banner reads "Online payments are currently enabled. Customers can pay using the active gateways below." when the switch is on.
2. Write your manual payment instructions
The Manual Payment Instructions textarea accepts multiple lines of plain text �� bank transfer details, cheque instructions, or pickup terms. These instructions appear on the checkout when a customer picks Manual Payment, and in the order-confirmation email so they have the details after closing their browser.
Steps — Stripe
3. Enable Stripe
Flip the Enable Stripe toggle on to show Stripe as a payment option at checkout. With it off, Stripe is hidden even if your keys are filled in.
4. Pick Test mode or Live mode
The Mode dropdown has two values: Test (uses your Stripe test keys) and Live (uses your Stripe live keys). Leave it on Test during setup and first-run testing; flip to Live when you have run at least one clean test order and are ready to accept real payments.
5. Paste your Stripe keys
Paste your Stripe Test Publishable Key (pk_test_) and Test Secret Key (sk_test_) from your Stripe dashboard. When ready to go live, paste your Live Publishable Key (pk_live_) and Live Secret Key (sk_live_) as well. You can have both Test and Live keys stored at the same time — only the keys matching your current Mode are active.
6. Copy the Webhook URL into your Stripe dashboard
The Webhook URL field shows a read-only URL specific to your store. Copy it. In your Stripe dashboard, go to Developers → Webhooks, click Add destination, paste this URL, and select the events you want to receive (at minimum payment_intent.succeeded and charge.refunded).
Stripe gives you a signing secret once the webhook is saved. Copy that secret and paste it into Webhook Secret (test) or Webhook Secret (live) here depending on which mode you are configuring.
7. Save
Click Save Settings in the sticky right-hand column. A green success message reads Ecommerce configuration has been successfully updated! at the top of the panel.
Steps — PayPal
8. Enable PayPal
Flip the Enable PayPal toggle on to show PayPal as a payment option at checkout.
9. Pick Sandbox or Live mode
The Mode dropdown offers Sandbox (PayPal's test environment) and Live (real PayPal). Leave on Sandbox during setup; flip to Live when you are ready.
10. Paste your PayPal credentials
Paste your Sandbox Client ID and Sandbox Secret from your PayPal Sandbox developer app. For launch, paste your Live Client ID and Live Secret from your PayPal Live developer app.
11. Save
Click Save Settings. The same success message appears.
Save and verify
12. Run a test purchase
Open your store in a private browsing window, add a product to your cart, and go to checkout. Confirm:
- The payment methods you enabled (Stripe / PayPal / Manual) appear as selectable options.
- Picking Stripe opens a card entry form; paying with Stripe test card
4242 4242 4242 4242(any future expiry, any CVC) completes the order. - Picking PayPal opens PayPal Sandbox; logging in with your sandbox buyer account completes the order.
- Picking Manual shows your Manual Payment Instructions on the final order-confirmation screen.
13. Verify the order appears in Orders and in your payment provider
Open Store Management → Orders — the test order is there. In your Stripe dashboard, the test charge is visible under Payments. In PayPal Sandbox, the activity shows in your account.
Examples
The save confirmation below shows what you see after switching Stripe from Test to Live mode and clicking Save Settings.
The manual payment instructions editor below shows a typical bank-transfer setup:
What success looks like
- The green
Ecommerce configuration has been successfully updated!message appears after clicking Save Settings. - Running a test purchase through each enabled gateway creates a matching order in Orders.
- Test Stripe charges appear in your Stripe dashboard under Payments.
- Test PayPal orders appear in your PayPal Sandbox dashboard.
- Manual-payment orders show your Manual Payment Instructions on the confirmation screen and in the confirmation email.
What to do if it does not work
- No payment options appear on checkout. Confirm Enable Online Gateways is on, then confirm at least one of Enable Stripe or Enable PayPal is on. Save after any toggle change.
- Stripe payment fails with "Invalid API Key." Confirm your Mode matches the keys you pasted —
pk_test_/sk_test_for Test,pk_live_/sk_live_for Live. Keys from the wrong mode will fail. - Test order goes through but Orders shows Pending forever. Your webhook is probably not configured. Revisit Step 6 — copy the Webhook URL into your Stripe dashboard, paste the signing secret back into Webhook Secret (test), and save.
- Stripe Live mode rejects every charge. Live keys are different from Test keys — not the same string with a flag flipped. Confirm you pasted the Live keys, not the Test keys.
- Stripe webhooks are not arriving. Copy the Webhook URL from this panel exactly into Stripe's dashboard webhook config. Stripe will not post to a URL it has not been configured for.
- PayPal Sandbox redirects but then errors on return. Confirm the Client ID and Secret match your Sandbox developer app (not a Live app). Recreate the app on developer.paypal.com if in doubt.
- Manual-payment instructions appear blank on order emails. Confirm the textarea has content, save, and place a new test order. Older orders keep the snapshot of instructions from when they were placed.
- I accidentally pasted live Stripe keys into the test fields. No harm done — the keys will not work in Test mode. Swap them to the Live fields.
Tips
- Run Test mode for a full week before going Live. Test mode catches misconfigured keys, currency mismatches, and webhook failures without taking real money.
- Document your gateway secrets out-of-band. Save your Stripe and PayPal keys to a credential manager separately from SGEN — the fields mask after save.
- Match currency to your bank account currency. Mismatched currency triggers FX fees on every order. Currency is set under Store Configuration → Currency settings.
Q: Can I run Stripe and PayPal at the same time? Yes. Both can be enabled and shoppers pick at checkout. Each is configured separately with its own keys.
Q: What happens to existing orders if I change the gateway? Orders already placed are settled by their original gateway. The change applies only to new orders.
Q: Where do I see refund history? Under Store Management → Orders. The Payment Gateways panel is configuration only.