
How to edit an existing page on your site
⏱ 30-second answer below · full page ≈ 5 min · skim the bold lead-ins to move faster.
In short. Open Pages in the sidebar, click Edit on the row you want, make your changes, and click Save. The same editor you used to create the page opens pre-filled with everything currently saved. You can change the title, body content, URL slug, SEO fields, featured image, template, and page status — all in one place. Save once; changes are live immediately. If anything goes wrong, View History at the top of the screen lets you roll back to any previous version.
On this page: Before you start · Where to go · Steps · What success looks like · Troubleshooting · Tips
What is this for?
The page editor lets you change any page that already exists on your site — rename it, rewrite the body, update the URL slug, flip it between Draft and Published, or update its SEO fields and template. Every content save creates a snapshot in the page's revision history, so you can always roll back.
When to use it: fixing copy on a live page, publishing a draft that's been approved, updating SEO metadata, swapping a page template, or temporarily taking a page offline without deleting it.
What NOT to use this for
- Bulk-updating many pages — bulk actions (status changes, moves to Trash) live on the Pages list, not on individual edit screens.
- Site-wide tracking codes — Google Analytics, Facebook Pixel, and similar scripts belong in Settings, not on a single page's head/foot script fields.
- Permanently deleting a page — move it to Trash from this screen first, then permanently delete from the Trash tab on the Pages list.
- Updating your site navigation menu — if a page is in your main menu, changing its title or slug here does NOT update the menu. Visit Appearance → Menu separately.
- Changing slugs right before a campaign — the old URL breaks the moment you save. Plan the redirect first.
Good use cases
| Situation | What to do |
|---|---|
| Fix a typo on a live page | Open page, edit body, save — next visitor sees corrected copy |
| Publish a draft that's been approved | Open page, switch Status to Published, save |
| Update SEO Title and Description | Open page, update SEO panel fields, save |
| Change a page slug (URL) | Update Slug field, save — then create a Redirect from the old URL |
| Roll back a bad edit | Click View History, pick earlier revision, restore |
| Test a template swap | Change Template selector, save, verify on public side |
How this connects to other features
The page editor is one stop in a larger set of surfaces. Knowing how they connect saves you from searching in the wrong place.
- Pages list — the list is your starting point. Click Edit on any row to reach this screen. Every title, status, or slug change you make here is reflected in the list the moment you save. The list also shows you the page's Modified date after a save.
- Page revisions — every time you save a page and the body content has changed, a snapshot is stored automatically. The View History button appears at the top of the edit screen when at least one revision exists. Use it when a recent save broke something. Full detail: View and restore page revisions.
- Templates — the Template selector on the right side of the edit screen lets you pick which theme template renders this page. Templates are defined in your theme and control the page's outer layout. Changing the template here applies to this page only; other pages on the site are not affected.
- SG-Builder — if a page was built using the visual page builder, an Edit with SG-Builder button appears at the top of the edit screen. Clicking it opens the visual drag-and-drop canvas rather than the text editor. Changes made in SG-Builder are saved back to the same page record.
- Redirects — changing a page's URL slug immediately breaks any existing links to the old URL, including links from external sites and search-engine index entries. Create a Redirect from the old slug to the new one before or right after saving the slug change. Full detail: How to add a redirect rule.
- Site navigation menu — if your page appears in the site's main navigation, changing its title or slug here does NOT update the menu automatically. Visit Appearance → Menu to update the menu entry separately. If you skip this step, visitors clicking the old menu link will land on a 404.
- SEO settings — the SEO Title and SEO Description fields on the edit screen are per-page overrides. They take precedence over site-wide SEO defaults. If you leave these fields blank on a page, the site-wide defaults from Settings → SEO apply instead.
- Media library — the Featured Image and Banner pickers on the edit screen open your site's Media library. Any image you upload while picking a featured image is also saved to the central Media area and available for other pages.
What the edit screen contains
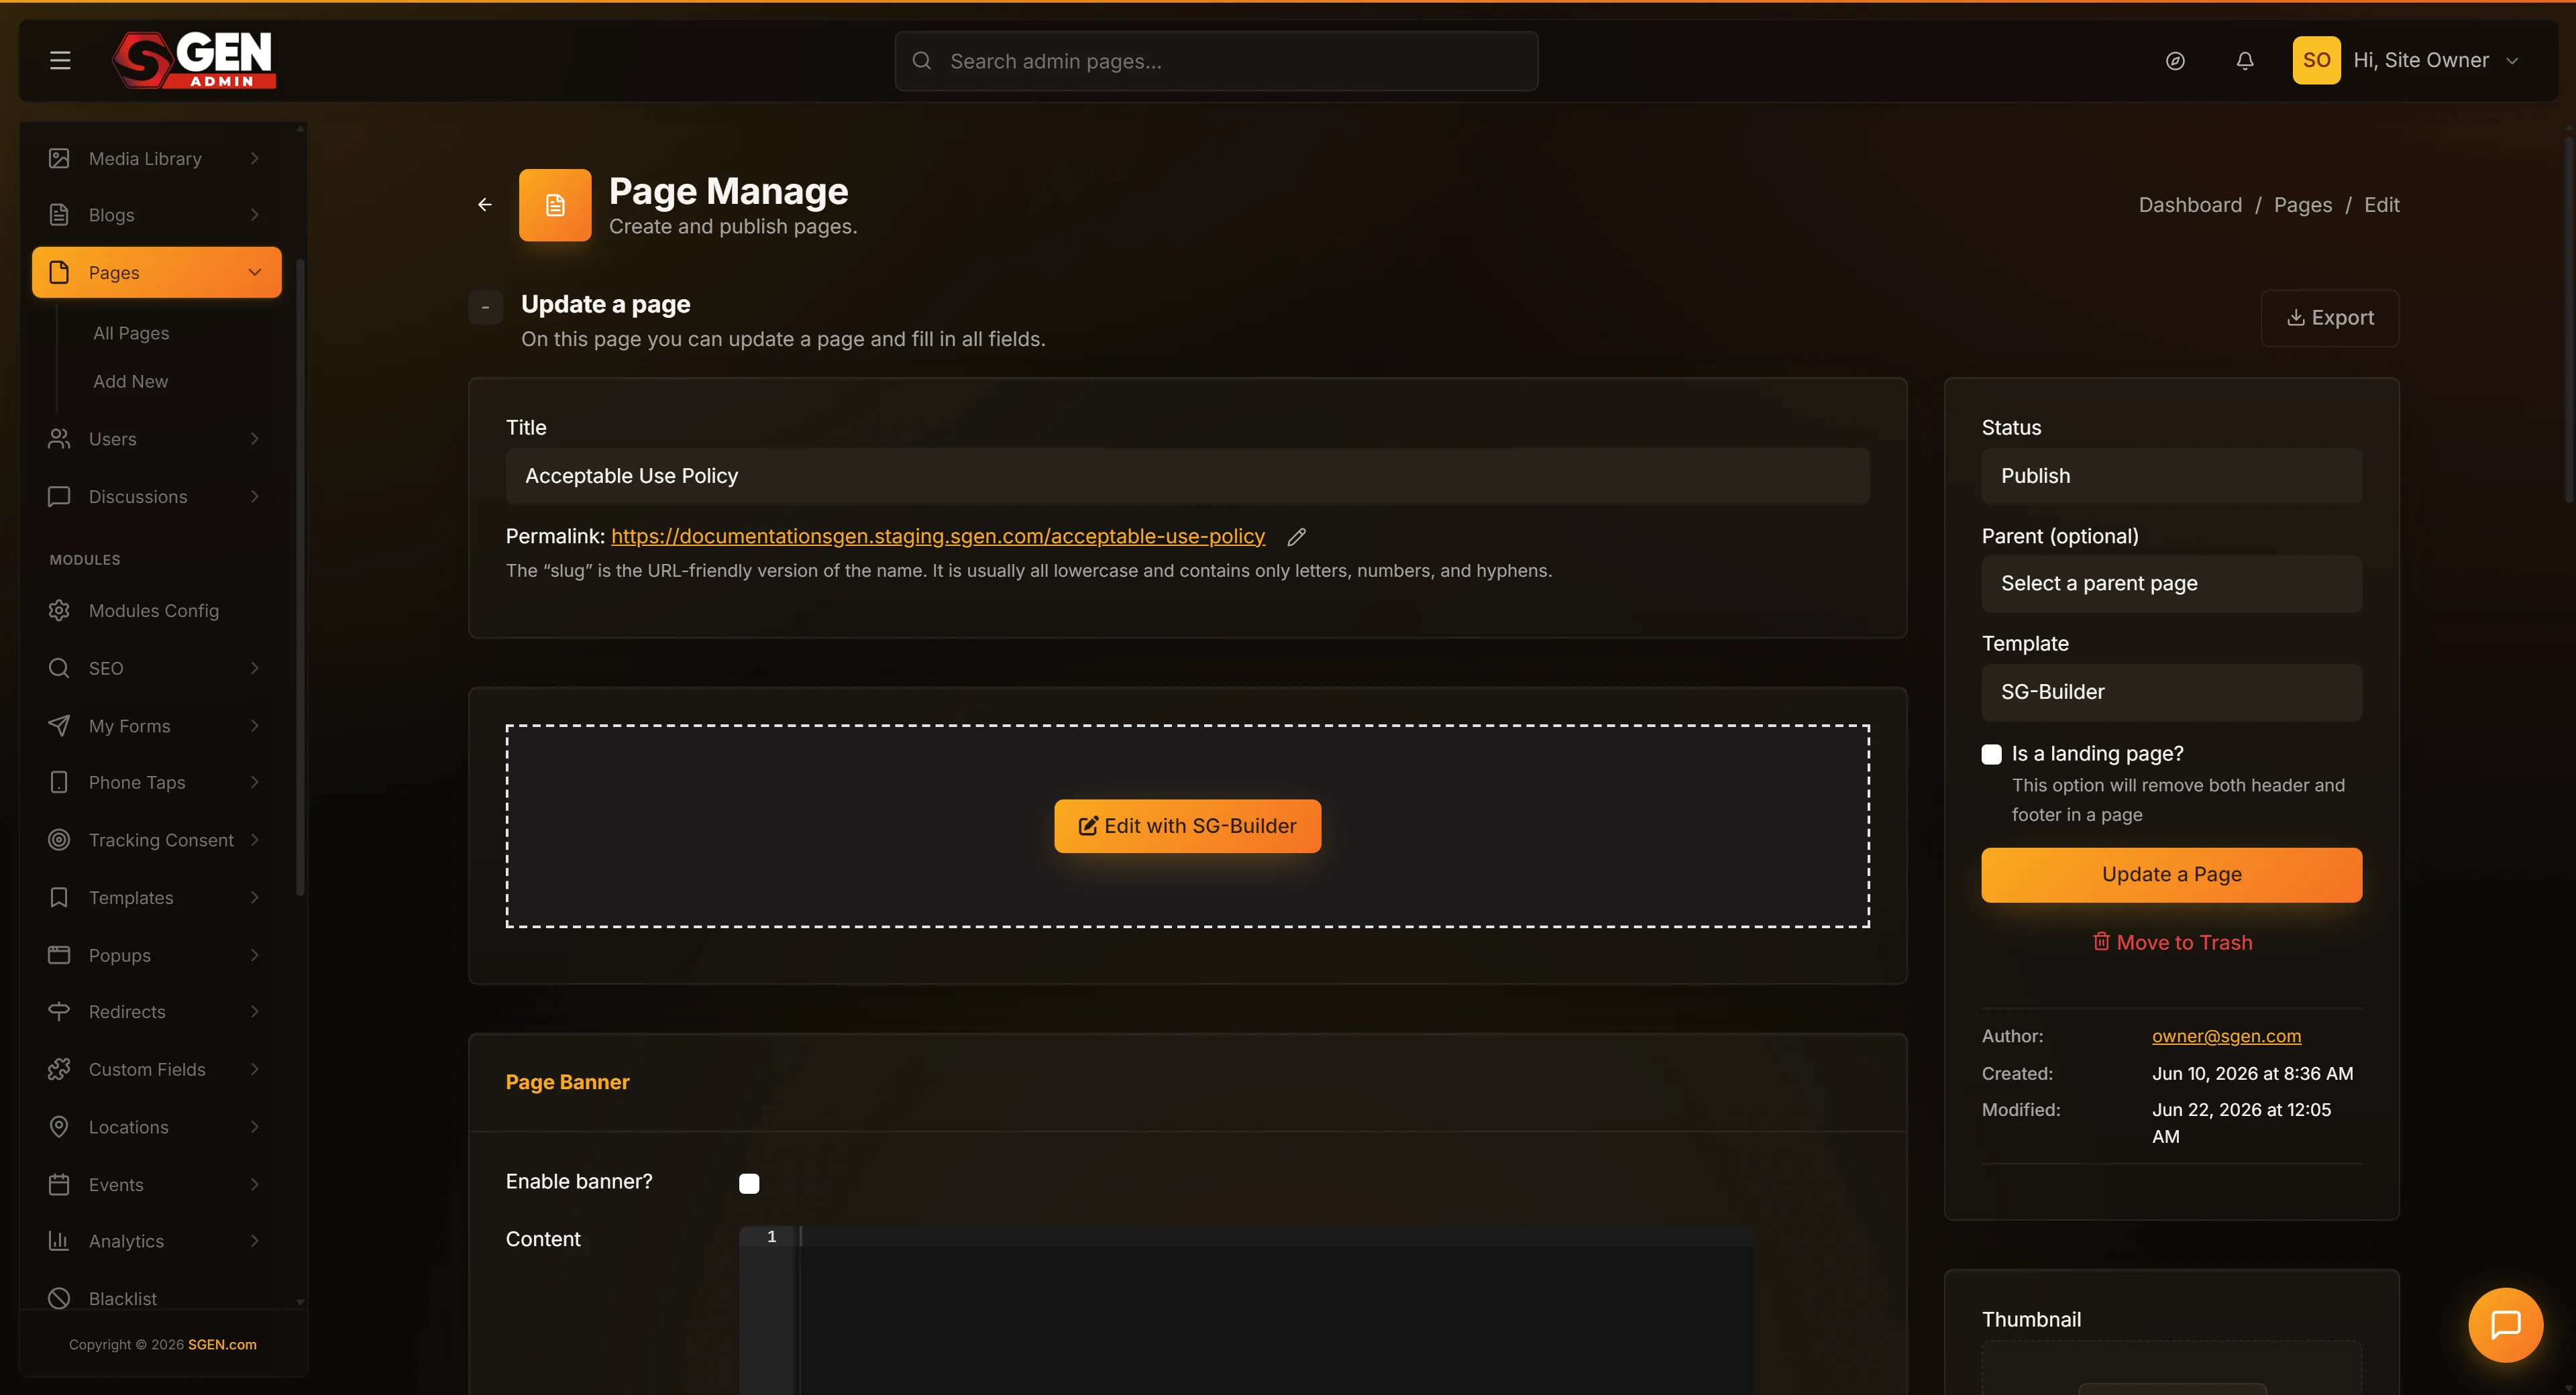
The edit screen is divided into a main content area and a right sidebar. Here is a quick map of where each control lives.
Main content area (left):
- Title field — at the top of the form. This is the page's heading and the name shown in the Pages list.
- Body content editor — the large editor area below the title. Use this to write and format the page's main content. If the page uses SG-Builder for layout, you'll see an "Edit with SG-Builder" button here instead.
- SEO panel — a collapsible panel below the body editor. Contains the SEO Title, SEO Description, and canonical URL override fields.
- Page Banner panel — appears below the SEO panel on templates that support a banner area.
- Head / Foot scripts — panels for page-level scripts. Site-wide scripts should go in Settings, not here.
- Custom fields — any custom field groups assigned to pages appear below the standard panels.
Right sidebar:
- Save button — the primary action. Orange. Click once to save all changes.
- Status dropdown — controls page visibility: Published, Draft, Private, or Password.
- Template selector — picks which theme template renders this page.
- Featured Image picker — sets the page's hero or thumbnail image.
- Slug field — the URL path for the page (
/your-slug). Updates the public URL when you save.
Top of screen (action bar):
- View History — appears when at least one revision exists. Click to browse and restore previous versions.
- Export — downloads a JSON backup of the current page state.
- Edit with SG-Builder — appears on pages that were built in the visual builder.
Before you start
- Sign in as an admin. The edit screen is admin-only.
- Know which page you want. If you are not sure, open the Pages list and filter by title.
- Open the live page in a second tab before editing — this lets you verify the public side immediately after saving.
- Slug changes break the old URL. If the page gets search traffic, plan to add a Redirect from the old slug to the new one before saving.
- Home page has a special permalink. Visitors reach it at the root of your domain — the slug field still exists but the homepage URL is always
/. - Stale sessions fail silently. If your tab has been open for a long time, refresh the edit screen before saving.
Where to go
Top sidebar → Pages → click the Edit action on the row of the page you want to edit.
If you don't see the page you're looking for, use the search box at the top of the Pages list to filter by title. You can also use the Status filter pills to narrow the list to Published, Draft, or Trash pages.
How to edit an existing page
Steps — Open and edit a page
1. Find the page in your Pages list
Open the top sidebar and click Pages. You see a list of every page on your site. Use the search box at the top to filter by title if your list is long. The Status filter pills at the top let you narrow to Published, Draft, or Trash. Click any column header to sort by Title, Status, Slug, or Modified date.
2. Click the Edit action on the page row
Hover the row for the page you want to edit. Inline action links appear on the right side of the row. Click Edit. You land on the edit screen with every field pre-filled with the values currently saved. The section header reads "Update a page" so you know you're editing, not creating. The page ID appears in the browser URL — it's the number at the end of the path.
3. Make your changes
Work through the fields you need to update:
- Title — change this to rename the page. The visible heading on the page updates when you save.
- Slug — change this to give the page a new URL. The old URL stops working the moment you save — set up a Redirect first if the page has search traffic or is linked externally.
- Body content — update the body using the text editor. If the page was built in SG-Builder, click Edit with SG-Builder instead of editing in the text editor.
- Status — use the dropdown on the right sidebar to flip between Draft, Published, Private, and Password-protected.
- SEO panel — open the collapsible SEO panel below the editor to update the SEO Title, SEO Description, and canonical URL. These override your site-wide SEO defaults for this page only.
- Template — the Template selector swaps which theme template renders this page. The change is scoped to this page; other pages are not affected.
- Featured Image / Banner — use the image pickers to set or change the page's hero image and banner area.
- Head / Foot scripts — if your template supports page-level scripts, you can add them here. Site-wide scripts belong in Settings instead.
| Field | What it controls | Notes |
|---|---|---|
| Title | Page heading + browser tab | Changing this does NOT auto-update your navigation menu |
| Slug | URL path (/your-slug) | Old URL breaks on save — redirect first |
| Status | Public visibility | Draft = hidden, Published = live, Private = admin-only |
| SEO Title | Search snippet title | Leave blank to inherit site default |
| SEO Description | Search snippet blurb | Keep under 160 characters |
| Template | Theme template used | This page only; other pages unchanged |
| Featured Image | Hero image | Opens the Media library picker |
4. Click the Save button
Click the orange Save button on the right sidebar (or scroll to the bottom of the page to find it). Click it once. The page reloads with a green "saved" banner at the top confirming success. The Modified date in the page metadata updates immediately. If you changed body content, a new revision is recorded and the View History button reflects it.
5. Verify on the public side
Open the public URL of the page in a new browser tab and confirm your changes appear. If you don't see them, hard-refresh the public page (Ctrl+Shift+R on Windows or Cmd+Shift+R on Mac) to bypass browser or CDN cache. If your site uses a CDN, the cache may take a few minutes to clear globally — wait before assuming the save failed. If the old version still appears after several minutes, log out of the admin and log back in to confirm you're editing on the correct site.
What success looks like
When the save succeeds, a green banner appears at the top of the edit screen confirming the update. The Modified date in the page metadata updates to right now. Visiting the public URL in a new browser tab shows your updated content.
Depending on what you changed, you may also see these additional signals:
- Slug changed — the old URL now returns a 404. This is expected. Set up a Redirect from the old URL to the new one to keep existing links working.
- Status changed from Draft to Published — the page becomes publicly reachable at its URL for the first time. Anyone with the URL can now reach it.
- Body content changed — a new revision row appears in the page's revision history. The View History button at the top of the edit screen shows the updated revision count.
- Featured image changed — the new image appears when you visit the public page and reload.
What to do if it does not work
No save banner appears
Scroll to the top of the screen. A red validation error may be highlighting a required field you missed. Fix the flagged field and try saving again. If no error is shown, your session may have expired silently — refresh the page, sign back in if prompted, and try again.
Screen flashes but no banner appears
Your session likely timed out. Refresh the edit page, sign back in if prompted, and save again.
Changes don't appear on the public side
Hard-refresh the public URL (Ctrl+Shift+R on Windows or Cmd+Shift+R on Mac) to bypass your browser cache. If you use a CDN, cached pages may take a few minutes to clear globally. If still unchanged after waiting, log out of the admin and log back in to confirm you're editing on the correct site.
Accidentally deleted or overwrote important content
Click View History at the top of the edit screen. Pick the revision from before the bad edit and click Restore. Then click Save on the edit screen to make the restored version live. The restore step does not auto-save — you must click Save after restoring.
Save spins forever without completing
The failure is likely server-side. Note any error message shown and contact your site administrator with the details.
Slug reverts to its old value after Save
The new slug you entered is probably already in use by another page on your site. Check the Pages list for any pages with a matching slug. Choose a unique slug and try saving again.
SEO Title not appearing in search results after a few days
This is expected. Google's recrawl schedule is independent of your site. Changes to SEO Title and Description take effect when Google next crawls the page. Submit the URL in Google Search Console to request a faster recrawl.
Example 1: Your Store — update About Us copy
The marketing team rewrote the About Us page copy after a brand refresh. The new copy is ready; the old version is still live. Open the Pages list, click Edit on the About Us row, and land on the pre-filled edit screen. Replace the body content with the new text, then click Save. The green banner confirms the save. Open the public About Us URL in a new tab — the updated copy is live immediately.
Example 2: Your Store — change a page slug
The About page is at /about-our-online-store but the team wants the cleaner /about. Before making any changes, go to Redirects and add a rule that forwards /about-our-online-store to /about. With the redirect in place, open the page, change the Slug field from about-our-online-store to about, and save. Visit https://yoursite.com/about in a new tab to confirm the page loads at the new URL. Visit the old URL to confirm the redirect sends visitors to the new one.
Example 3: Your Store — re-publish a draft after team review
A landing page for the winter promotion has been in Draft for a week while the team reviewed the copy. The team gave final approval this morning and the page needs to go live before the promotional email sends. Filter the Pages list by Draft, click Edit on the Winter Promo row, and switch the Status dropdown from Draft to Published. Click Save. Visit https://yoursite.com/winter-promo in a new tab — the page is now publicly reachable at its URL.
Example 4: Your Store — restore from page revision history
Yesterday's edit to the About Us page accidentally pasted the wrong text block into the body, and it's been live for several hours. Open the Pages list, click Edit on About Us, and look for the View History button at the top of the edit screen. Click it. A list of saved revisions appears with timestamps and the name of who made each save. Pick the revision from before yesterday's bad edit, click Restore, then click Save on the edit screen to make it live. The green banner confirms. The About Us page on the public site is back to the correct text.
Slug best practices
The slug is the part of the URL that identifies the page — everything after your domain name. For example, if your site is https://yoursite.com, a page with the slug contact is reached at https://yoursite.com/contact.
Rules for slugs:
- Use lowercase letters, numbers, and hyphens only. No spaces, underscores, or special characters.
- Keep slugs short and meaningful:
our-storyis better thanabout-us-our-company-story-page. - Avoid changing slugs on pages that already get search traffic. The old URL breaks the moment you save the new slug, and any external links or bookmarks using the old URL will land on a 404.
- If you must change a slug on a live page, create a Redirect from the old slug to the new one first — or immediately after saving. See How to add a redirect rule.
- The home page is a special case. Your site's home page is reached at the root of your domain (
https://yoursite.com/). The slug field still exists for the home page record in the admin, but the homepage URL is always the root — the slug is not used in the public URL.
| Good slug | Bad slug | Why |
|---|---|---|
contact | Contact-Us-Page | Lowercase, no capitals |
our-story | our_story | Hyphens, not underscores |
pricing | pricing-page-2026-final | Short and meaningful |
services/web-design | services web design | No spaces |
Page status reference
The Status dropdown controls who can reach the page on your public site.
| Status | Who can see it | Typical use |
|---|---|---|
| Published | Everyone | Live, publicly reachable pages |
| Draft | Admins only (not public) | Work in progress; take a page offline temporarily |
| Private | Logged-in admins only | Internal pages you never want public |
| Password | Anyone with the password | Gated content — press previews, client proofs |
| Trash | Not visible | Soft-delete; page is recoverable until permanently deleted |
Switching a Published page to Draft removes it from the public site immediately on save. The page stays editable in the admin and can be re-published at any time.
SEO fields reference
The SEO panel on the edit screen contains per-page overrides for the fields that search engines and social platforms use when displaying your page.
| Field | What it controls | Character limit | Notes |
|---|---|---|---|
| SEO Title | Title shown in search results | ~60 characters | Leave blank to inherit site-wide default |
| SEO Description | Snippet text under the title in search results | ~160 characters | Leave blank to inherit site-wide default |
| Canonical URL | Tells search engines which URL is the authoritative version | — | Use only if you need to override the default canonical |
When to fill in the SEO Title: fill it in when the SEO-optimised title should be different from the visible page heading. For example, a page headed "About" might have an SEO Title of "About Your Store — Everyday Essentials Shop."
When to fill in the SEO Description: fill it in for any page that matters for search traffic. A good description summarises the page's content in one or two sentences and includes the words a searcher would use. Keep it under 160 characters or it will be cut off in search results.
Canonical URL: leave this blank unless you have a specific reason to override the default. The default canonical URL is the page's own public URL. You would override it if the same content exists at multiple URLs and you want search engines to credit only one of them.
Revisions reference
Every time you save a page and the body content has changed, SGEN records a revision. Title-only or status-only saves do not create a new revision.
| Revision detail | Behaviour |
|---|---|
| When created | Every save where body content changes |
| What is saved | Full page content snapshot at save time |
| Who created it | The admin user who clicked Save |
| Retention | All revisions kept indefinitely |
| How to access | View History button at the top of the edit screen |
| How to restore | Pick a revision row, click Restore, then click Save |
Revisions are per-page and per-site. They are not shared across sites in your account.
Tips
- Save often. SGEN does not auto-save the text editor — unsaved edits are lost if your session times out or your browser crashes.
- Draft = offline, not deleted. Switching Status to Draft hides the page from visitors but keeps it editable here. You can re-publish at any time.
- Slugs: lowercase + hyphens. Use
our-storyformat. Avoid underscores (our_story) and spaces — they make URLs harder to share and read. - SEO Title ≠ page title. The SEO Title field controls search-result snippets; the visible on-page heading can be richer and longer. Keep SEO Description under 160 characters — search engines truncate longer descriptions.
- Redirect before slug changes. The old URL returns a 404 the moment you save a new slug — even if you change it back immediately. Plan the Redirect first.
- Export before big changes. The Export button at the top of the edit screen downloads a JSON backup of the page — a safety net beyond revision history. Use it before large copy rewrites or template swaps.
- Use a second browser tab for verification. Keep the live public page open in a second tab before editing. After saving, reload that tab to see the change in context.
Next steps
Once you're comfortable editing individual pages, these guides cover the surrounding workflows:
- Create a new page — start from scratch instead of editing.
- Bulk manage pages — bulk actions, sorting, and filtering on the Pages list.
- Add a redirect rule — keep the old URL working after a slug change.
- View and restore page revisions — full revision-restore walkthrough.
- Page editor fields explained — reference for every field and tab on the edit screen.
Page status reference
| Status | Who can see it | Typical use |
|---|---|---|
| Published | Everyone | Live, publicly reachable pages |
| Draft | Admins only (not public) | Work in progress; take a page offline temporarily |
| Private | Logged-in admins only | Internal pages you never want public |
| Password | Anyone with the password | Gated content — press previews, client proofs |
| Trash | Not visible | Soft-delete; page is recoverable until permanently deleted |