
How to bulk-manage your pages
⏱ 30-second answer below · full page ≈ 6 min · skim the bold lead-ins to move faster.
In short. Go to Dashboard → Pages. Tick the rows you want. Pick an action from the Apply dropdown — Publish, Move to Draft, Move to Trash, or (from the Trash tab only) Delete Permanently. Click Apply. The list reloads and every selected page updates in one shot. The same dropdown works identically on your Blog and Events lists.
On this page: What this is for · What NOT to use it for · Steps · What success looks like · Common scenarios · Troubleshooting
How to bulk-manage your pages
The All Pages list is the working table for every page on your site. When you need to act on more than one page at once — publish a batch, trash a set of old drafts, or restore pages trashed by mistake — the bulk-action dropdown is how you do it.
You tick the rows you want, pick an action from the Apply dropdown, and click Apply. The system updates every selected page in one shot. No opening each page one at a time.
The same dropdown appears at the top of your Blog list and your Events list, with the same four actions. Learn it once for Pages and it works across all three.
The four actions available are Publish, Move to Draft, Move to Trash, and Delete Permanently. The first three are available from any filter tab; Delete Permanently is only available from the Trash tab — a deliberate two-step design to prevent accidental hard-deletion of live content.
What is this for?
The bulk-action dropdown is the fast lane for status changes across many pages at once.
A page on your site has one of four states:
| Status | What it means |
|---|---|
| Published | Visible to your visitors and indexed in search. |
| Draft | Saved but hidden from visitors and search engines. |
| Trash | Invisible to visitors — tucked into the Trash filter tab, still in your editor, and recoverable. |
| Permanently deleted | Gone — the database row is removed and there is no undo from inside the admin. |
The Apply dropdown moves your selected pages between those four states in one click. You reach for it whenever a single change should land on more than one page at the same time — or whenever a one-by-one walk would be tedious.
The four bulk actions and when each one appears:
| Action | Available on tabs | What it does |
|---|---|---|
| Publish | All, Published, Draft | Makes pages live and visible to visitors. |
| Move to Draft | All, Published, Draft, Trash | Pulls pages off the public site; keeps them in your editor. |
| Move to Trash | All, Published, Draft | Moves pages to the Trash tab; invisible but recoverable. |
| Delete Permanently | Trash only | Removes the database row. No undo from inside the admin. |
Delete Permanently only appears on the Trash tab. This is by design — it forces a deliberate two-step (Trash first, then delete) so you cannot accidentally hard-delete a live or draft page. If you see Delete Permanently in the dropdown, you are already on the Trash tab and the selected rows are already out of circulation on your public site.
Good use cases
- Launching a content batch. You kept a set of pages as Draft while an editor or stakeholder reviewed them. When approvals come in, switch to the Draft tab, tick all the approved rows, pick Publish, click Apply. All pages go live in a single action.
- Clearing out old drafts before a new quarter. Campaigns get cancelled, redirected, or replaced. Switch to the Draft tab, tick the rows you no longer need, pick Move to Trash, and click Apply. They move to Trash without touching anything on your live site — and they remain recoverable if someone asks for them back.
- Restoring pages trashed by mistake. Switch to the Trash tab, tick the rows that should not be there, pick Move to Draft, and click Apply. The pages come back as Draft — not immediately live — so you can verify the list before running a second Publish.
- Quarterly or annual housekeeping. Once a year (or whenever your Trash tab fills up with campaign remnants you are sure you no longer need), switch to Trash, scan the rows carefully, tick the master checkbox, pick Delete Permanently, and click Apply. Storage frees up and the list stays clean.
These are the most common patterns, but any scenario where you need the same status change on more than one page at once is a valid use case for the bulk-action dropdown.
If you need to make different changes to different pages — some publish, some trash, some draft — you run the bulk-action twice from two different tabs.
What NOT to use this for
- Editing page content in bulk. The bulk-action dropdown changes status only — Published, Draft, Trash, Deleted. To edit the title, body, or metadata of multiple pages, you still open each one in the editor individually.
- Changing page templates in bulk. Templates are a per-page setting inside the editor. The bulk dropdown does not expose them.
- Changing URL slugs in bulk. Slugs are set per page inside the editor. Changing a live page's slug creates a broken link at the old URL unless you also add a redirect — the bulk dropdown does not handle that.
- Permanently deleting a page from the Published or Draft tab directly. Delete Permanently is intentionally only available from the Trash tab. This design enforces a deliberate two-step before a hard delete — you must Trash the page first, then switch to the Trash tab to see the permanent-delete option.
- Recovering a page you have already permanently deleted. Permanent deletion is final from inside the admin. There is no undo button. Recovery requires your platform administrator to restore the page from a database backup — a separate process from anything on the Pages list.
- Reordering pages in bulk. Page order (for custom menu or navigation sequencing) is managed in Menu Builder or through individual page settings, not the bulk dropdown.
How this connects to other features
- The page editor — where individual pages are created and edited. The bulk-action dropdown is the multi-row counterpart to the per-page Save Changes and Move to Trash buttons in the editor. Bulk actions change status only — they do not open the editor or change content.
- The page History panel — every status change made via a bulk action writes to each affected page's revision history. If a bulk Publish surprised you, open that page's History panel and roll the status back individually.
- Site search visibility — Published pages appear in your sitemap and on the public site. Draft, Trash, and permanently deleted pages do not appear in search results or sitemaps. A bulk Move to Trash pulls every selected page out of search instantly — the same as a one-by-one Trash.
- Blog and Events bulk lists — the same four-action dropdown appears at the top of your Blog list and your Events list. The shape, tab behavior, and available actions are identical to the Pages list. Learning the flow once covers all three surfaces.
- Backup and restore — permanently deleted pages cannot be recovered from inside the admin. Recovery requires a database backup restore via your platform administrator. If you use bulk actions regularly for housekeeping, make sure a recent backup exists before running Delete Permanently on a large batch.
Before you start
Confirm these before you tick any rows:
- You are on the right list. Navigate to Dashboard → Pages. The bulk-action dropdown only appears on your Pages list (and on your Blog and Events lists — not inside the page editor itself).
- You are on the right filter tab. The tab you are on controls both which rows you see and which actions are available in the Apply dropdown. Switching tabs changes the available actions — Trash tab adds Delete Permanently; other tabs show Publish, Move to Draft, and Move to Trash.
- You know which rows you want. The master checkbox selects every row on the current page only — not rows on other pages in a paginated list. If your list spans multiple pages, work page by page or raise the per-page count first.
- You have thought about whether Delete Permanently is right. It is the one action you cannot undo from inside the admin. If you are at all uncertain, choose Move to Trash — that keeps the pages in the Trash tab where you can review and recover them before committing to deletion. Recovery from a permanently deleted state requires a database backup restore.
Where to go
Go to Dashboard → Pages.
The list opens with all your pages and the Apply dropdown sitting just above the rows. The dropdown itself is a two-part control: a selector showing the current action and an Apply button that commits it.
Filter tabs across the top — All, Published, Draft, Trash — switch the rows you see and the actions Apply offers.
Tab and action matrix — what you can do from each tab:
| Tab | Rows shown | Available actions |
|---|---|---|
| All | Every page regardless of status | Publish · Move to Draft · Move to Trash |
| Published | Live pages only | Publish · Move to Draft · Move to Trash |
| Draft | Draft pages only | Publish · Move to Draft · Move to Trash |
| Trash | Trashed pages only | Publish · Move to Draft · Move to Trash · Delete Permanently |
Start on the tab that contains the rows you want to change. If you are working across statuses — for example, publishing some drafts and trashing others — you will need two separate Apply runs on two different tabs.
Steps — Apply a bulk action
The full sequence is four steps: pick your tab, tick your rows, pick your action, and click Apply. The steps below walk each one in detail.
1. Choose the filter tab that matches your goal
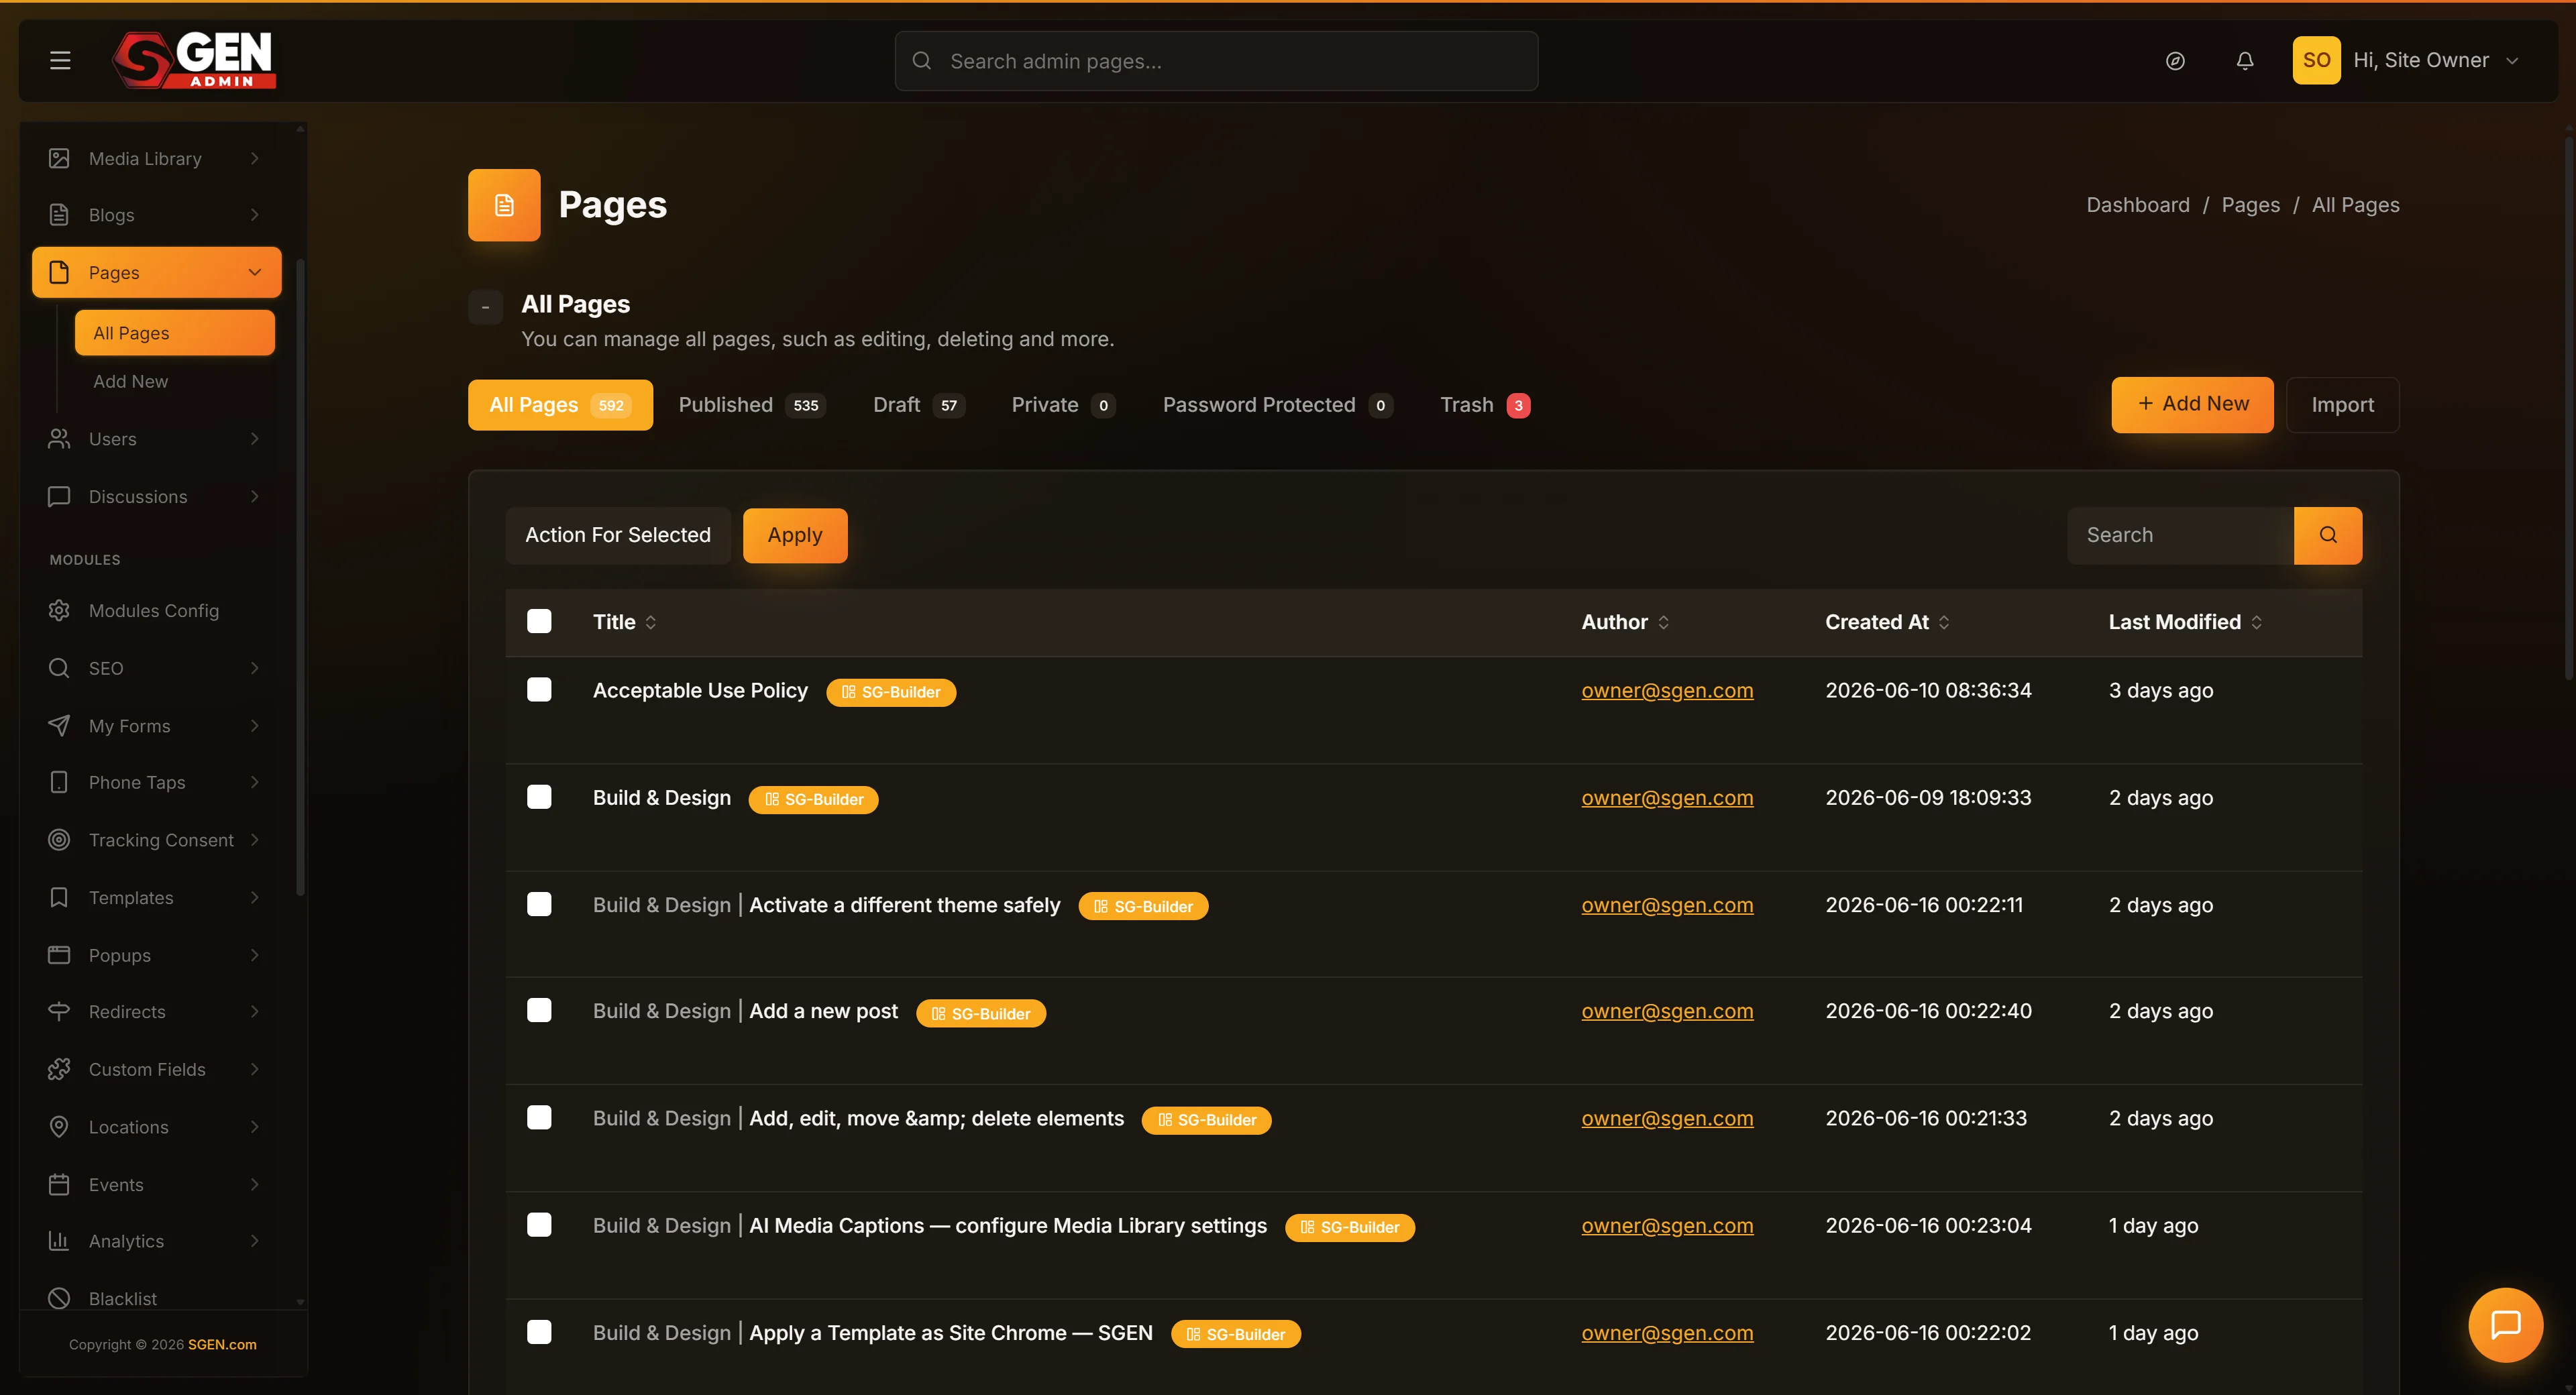
Click the tab across the top of the list — All, Published, Draft, or Trash — that contains the rows you want to act on.
The tab is more than a filter for what you see. It also controls which actions appear in the Apply dropdown.
If you switch to the Trash tab, the dropdown gains a Delete Permanently option.
If you start on Published and want to permanently delete a page, you have to first Trash it, then switch to the Trash tab to permanently delete from there.
That is by design — it puts a deliberate two-step between you and a hard delete.
So pick the tab carefully before you tick any rows.
2. Tick the rows you want to act on
Each row in the table has a checkbox in its leftmost cell.
Tick the rows you want included in the bulk action. You can tick individual rows or use the master checkbox.
If you want every row on the current tab, tick the master checkbox in the column header — it selects every row visible on this filter tab in one click.
If your list is long enough to paginate, the master checkbox only selects rows on the current page; rows on other pages are not affected by the bulk action you are about to run. To include more pages, either move to the next page and repeat, or raise the per-page display count if your list settings allow it.
Take a moment to confirm the checked rows match exactly what you intended before you move to the dropdown. It is easy to miss a row or accidentally include one you did not mean to select.
3. Pick an action from the dropdown
Click the Apply dropdown above the rows.
You will see Publish, Move to Draft, and Move to Trash on every tab.
On the Trash tab you will also see Delete Permanently.
Pick the action that matches your goal. The dropdown does not commit anything yet — it only sets your intent. Nothing happens to your pages until you click the Apply button.
If you change your mind before clicking Apply, open the dropdown again and pick a different action. No rows have been affected yet.
4. Click Apply and wait for the page to reload
Click the Apply button next to the dropdown.
The list page submits your selection to the system, processes every ticked row in sequence, and then reloads.
You land on the filter tab matching the action you just performed.
If you ran Move to Trash, you arrive on the Trash tab. If you ran Publish, you arrive on the Published tab. The rows you acted on appear at the top of the list.
That landing confirms the action took. If a row you expected is not visible on that tab, use the search bar or look at the other tabs — the row may have already been in that status, or it may have failed to move.
The success banner at the top of the reloaded list shows how many rows were affected.
What success looks like
After you click Apply, the list submits and reloads. The reload is your primary success signal — the page refreshing means the action ran.
Where you land after the reload:
- Publish → you land on the Published tab; your rows are at the top.
- Move to Draft → you land on the Draft tab; your rows are at the top.
- Move to Trash → you land on the Trash tab; your rows are at the top.
- Delete Permanently ��� you stay on the Trash tab; the rows are gone from the list.
A success banner at the top of the list shows how many rows were affected. If the count matches what you expected, the action completed cleanly. If the count is lower than expected, some rows may have failed — check the other tabs for any stragglers, then tick and rerun on just those rows.
What this means for your public site:
| Action | Visitor experience | Search visibility |
|---|---|---|
| Publish | Page is reachable at its URL | Indexed in your sitemap |
| Move to Draft | "Page not found" | Removed from sitemap |
| Move to Trash | "Page not found" | Removed from sitemap |
| Delete Permanently | "Page not found" — permanently | Removed from sitemap — permanently |
What to do if it does not work
- Apply did nothing — the list looks the same after clicking. You may not have ticked any rows, or you may have clicked Apply without selecting an action first. Re-check the checkboxes in the leftmost column, confirm an action is selected in the dropdown, and click Apply again.
- Some rows did not move but most did. A bulk action processes rows one after another. If a few rows failed silently, the rest will still complete. Tick only the rows that did not move and run the action a second time.
- The action ran but a row I expected is missing. Look across all filter tabs — the row may have moved to a different tab than you expected. Use the search bar to find the page by title.
- I clicked Delete Permanently and now the page is gone — I want it back. Permanent deletion is final from inside the admin. There is no undo button. Contact your platform administrator for backup-restore options — recovery requires restoring the database to a point before the deletion.
- The Apply button is greyed out. No rows are ticked, or you are looking at an empty filter tab. Tick at least one row to enable the Apply button.
- The Delete Permanently option is missing from the dropdown. It only appears when the Trash tab is active. Switch to the Trash tab and the option will appear.
- The list reloaded but I landed on a different tab than I expected. After Apply, the list shifts you to the tab that matches the action you ran. For example, after Move to Trash you land on the Trash tab; after Publish you land on Published. This is the intended behavior — not a bug.
Common scenarios
Bulk-publishing a content batch. You kept four pages as Draft while an editor reviewed them. Approvals come in — open Dashboard → Pages, switch to the Draft tab, tick the four rows, pick Publish, click Apply.
The list reloads on Published with all four at the top.
Cleaning up old drafts. Campaigns get cancelled, timelines shift, and test pages accumulate. Switch to the Draft tab, tick the master checkbox to select every row on the current page, pick Move to Trash, click Apply.
All rows drop into Trash — not gone, but out of the way. They stay there, recoverable to Draft if anyone needs them back, until you permanently delete them.
Restoring a batch trashed by mistake. A team member ticked the master checkbox on the Published tab and clicked Move to Trash, intending to trash only one page but taking 23 live pages offline. Visitors started seeing "page not found" on all of them.
Open Dashboard → Pages, switch to the Trash tab, tick every freshly-trashed row, pick Move to Draft, click Apply.
The pages come back as Draft — not immediately live — so you can review the list before running a second bulk-Publish pass to confirm everything looks right.
Emptying Trash before a quarterly audit. Switch to the Trash tab, scroll through the rows to confirm nothing on the list is still needed, tick the master checkbox, pick Delete Permanently from the Apply dropdown, and click Apply.
The rows disappear from the Trash tab. The database rows are removed. Storage usage drops on the next Reports refresh. The Trash tab reads empty — the clean state a quarterly checklist looks for.
Tips
- Move to Trash is the safest first move. It is reversible. You can always come back later and either restore to Draft or permanently delete. When in doubt, Trash — do not Delete Permanently.
- Restore from Trash always lands in Draft, not Published. This is by design. If you want the pages live again after restoring, run a second bulk action: switch to the Draft tab, tick the restored rows, pick Publish, and click Apply.
- Delete Permanently is only available from the Trash tab. The system enforces a two-step process — Trash first, then delete — so you cannot accidentally hard-delete a live or draft page in one action.
- Pagination matters. The master checkbox selects only the rows visible on the current page of the list. If your pages list is paginated, work one page at a time or raise the per-page count (if your list settings allow it) before selecting all.
- The same dropdown works identically on Blog and Events. Same four actions, same tab behavior, same Apply button. Once you have learned it for Pages, you do not need to relearn it.
- A bulk action processes every selected row in sequence. If one row fails silently, the others still run. After the reload, scan the result tab — any row missing from the expected tab may have failed. Tick just that row and run the action again.
- Check the filter tab before you run any action. The tab controls what you see and what you can do. Running Move to Trash from the Published tab will send live pages to Trash. Running Move to Draft from the Trash tab will restore them as drafts. Read the tab label before you click Apply.
- Take a deliberate pause before Delete Permanently. It is the only one of the four actions you cannot undo from inside the admin. Permanent deletion is final — recovery requires a database backup restore.
Next steps
Once you have run a bulk action, here is where to go next depending on what you did:
- If you bulk-published — visit your public site and confirm the pages are reachable. If a page looks wrong, open it in the editor to review its content and settings before the next visitor arrives.
- If you moved pages to Draft — they are still in your editor. When you are ready to republish any of them, tick them on the Draft tab and run Publish.
- If you moved pages to Trash — you have time to review. Scan the Trash tab over the next few days and either restore or permanently delete. Pages in Trash do not appear on your public site.
- If you permanently deleted — nothing further to do unless you need to recover a page, which requires a backup restore via your platform administrator.
Related docs:
- Page editor — fields and tabs explained — individual page settings, status field, and editor controls.
- How to restore a trashed page — recover a single page from Trash.
- How to view and restore page revisions — roll back content changes after a bulk action.
- How to save changes to a page — the per-page Save button and Status field.
Bulk actions and the tabs they appear on
| Action | Available on tabs | What it does |
|---|---|---|
| Publish | All, Published, Draft | Makes pages live and visible to visitors. |
| Move to Draft | All, Published, Draft, Trash | Pulls pages off the public site; keeps them in your editor. |
| Move to Trash | All, Published, Draft | Moves pages to the Trash tab; invisible but recoverable. |
| Delete Permanently | Trash only | Removes the database row. No undo from inside the admin. |