
Getting Started with SGEN
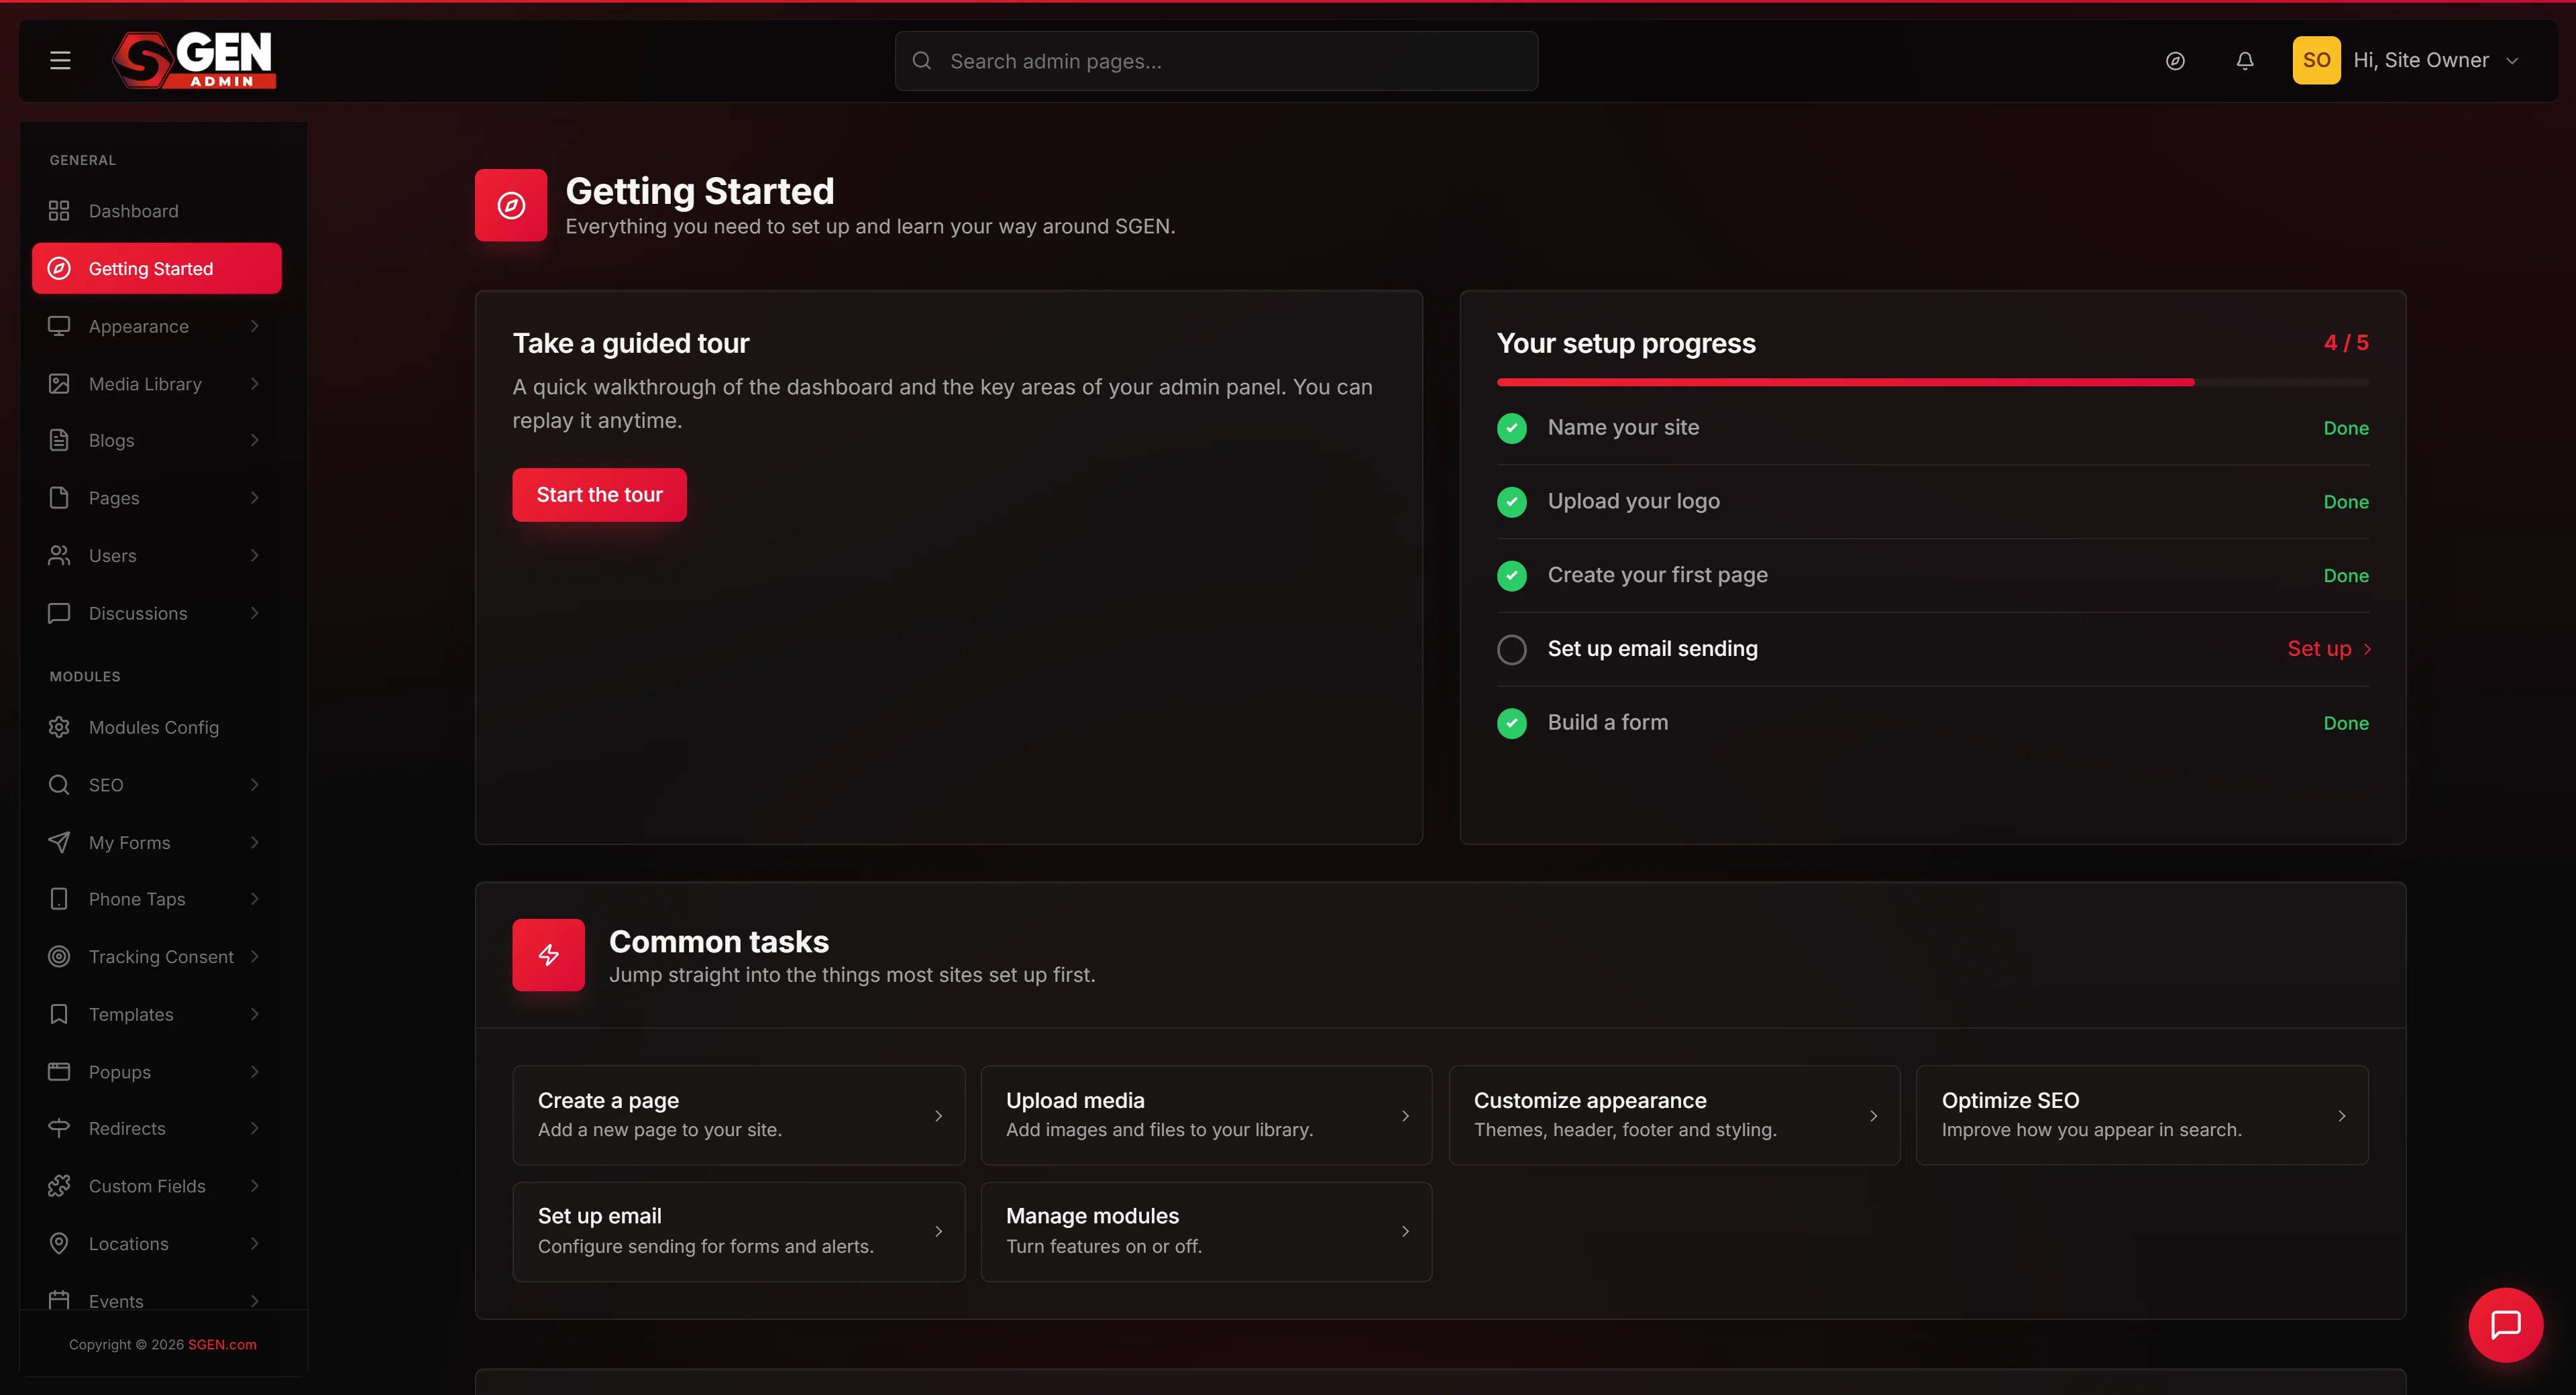
The Getting Started hub is your first stop after you log in. It gives you a guided tour of the admin panel, a five-step setup checklist that tracks your real site progress, and one-click tiles to the panels most sites reach for first. You can return to it any time from the sidebar — it is always there, even after your checklist is complete.
One hub, three tools
A replayable guided tour, a five-step progress checklist, and six permanent shortcut tiles — all on a single page under the GENERAL pillar of your sidebar.
Progress is automatic
The checklist reads your site's real state. Complete a task in its own panel and the checklist item flips to Done on its own — no manual marking needed.
Navigation hub, not a config tool
Getting Started links you to the right panel. All configuration — site name, logo, email, forms — happens inside those dedicated panels, not here.
Where to find it
Open your admin panel and look for the GENERAL pillar in the left sidebar. Getting Started is the second entry, directly below Dashboard. The URL path is /sg-admin/getting_started. No special role or permission is required — every admin user can access it.
Preview: Getting Started — sidebar location — a screenshot of this screen will be added here.
What the page contains
The Getting Started page loads with four sections. Each serves a distinct purpose in your onboarding.
Preview: Getting Started — full page overview — a screenshot of this screen will be added here.
Preview: Take a guided tour card — a screenshot of this screen will be added here.
Tour
Take a guided tour
A replayable walkthrough of the dashboard and key admin areas. Click Start the tour to begin. Press Esc to exit at any time. The button is always present so you can replay it whenever you need a refresher.
Checklist
Your setup progress
Five items that reflect your site's real state. Each shows Done or Set up. Click any Set up item to open the panel where you complete that task. Items flip automatically — you do not mark them manually.
Shortcuts
Common tasks
Six permanent tiles that link to the panels most admins use in the first weeks of running a site. They are always available regardless of your checklist progress.
Help
Need a hand?
Points you to the persistent help button in the bottom-right corner of every admin page. That button opens three options: ask the help bot, contact support, or replay a guided tour of the current page.
The five setup checklist items
Work through the checklist to give your site the foundations it needs before publishing content. Each item links to its dedicated panel — you do the work there, then come back to see it marked Done.
Preview: Setup progress checklist — mixed states — a screenshot of this screen will be added here.
1
Name your site
Tracks whether your site title is set. Designed to open General Settings, where you set the site title and description.
2
Upload your logo
Tracks whether a logo is uploaded. Designed to open the settings where you add a logo (for example, General Settings).
3
Create your first page
Tracks whether a published page exists. Designed to open the Pages panel to create a published page.
4
Set up email sending
Tracks whether a sending address is configured. Designed to open the email settings, where you configure your from address and optional outgoing mail details.
5
Build a form
Tracks whether a published form exists. Designed to open the Forms panel, where you can create and publish contact, lead, or registration forms.
Common tasks tiles
Six permanent shortcut tiles below the checklist. They are always present whether or not your checklist is complete. Click any tile to jump to its panel.
Preview: Common tasks tile grid — a screenshot of this screen will be added here.
Create a page
Add a new page to your site. Designed to open the Pages panel.
Upload media
Add images and files to your library. Designed to open the Media Library.
Customize appearance
Themes, header, footer and styling. Designed to open the appearance settings.
Optimize SEO
Improve how you appear in search. Designed to open the SEO Manager.
Set up email
Configure sending for forms and alerts. Designed to open the email settings.
Manage modules
Turn features on or off. Confirmed to open Modules Config at /sg-admin/modules.
Getting help at any time
The Need a hand? card at the bottom of the page points you to the persistent help button in the bottom-right corner of every admin page — not only on Getting Started. That button opens three options: ask the help bot, contact support, or replay a guided tour of the current page.
Preview: Need a hand card and persistent help button — a screenshot of this screen will be added here.
What completion looks like
After completing all five checklist items, the progress indicator reads 5 / 5 and every item shows Done. The checklist continues to reflect your site's real state any time you return — if something changes, it updates automatically.
Preview: Completed setup checklist — all 5 done — a screenshot of this screen will be added here.
Element reference
Every interactive element on the Getting Started page — its label as it appears in the UI, what it does, and where it is designed to take you. Element labels and behaviors were observed live. Only the Manage modules tile had its destination directly confirmed; all other intended destinations exist in your admin but were not individually confirmed in the same walkthrough.
Start the tour
Launches the guided admin walkthrough. Begins on the Dashboard. Press Esc to exit at any time.
Name your site
Checklist item 1. Tracks whether site title is set. Intended destination: General Settings.
Upload your logo
Checklist item 2. Tracks whether a logo is uploaded. Intended destination: General Settings.
Create your first page
Checklist item 3. Tracks whether a published page exists. Intended destination: Pages panel.
Set up email sending
Checklist item 4. Tracks whether from-email is configured. Intended destination: Email settings.
Build a form
Checklist item 5. Tracks whether a published form exists. Intended destination: Forms panel.
If something does not work
Most issues on the Getting Started page have straightforward fixes.
Access
The page does not load
Confirm you are logged in to your admin. Navigate to /sg-admin/getting_started directly. If it still does not load, refresh and try again. If the problem persists, use the help button on any other admin page to contact support.
Checklist
An item stays on "Set up" after you completed the task
The checklist reads real site state. Confirm the save completed in the panel (look for a confirmation message). Return to Getting Started and reload the page.
Tour
"Start the tour" does not respond
The guided tour requires JavaScript. Confirm your browser has JavaScript enabled and is not blocking scripts from the admin domain. Try a different browser if the button does not respond.
Tiles
A tile opens an unexpected page
If a panel is not accessible, the feature may be disabled in Modules Config. Open Manage modules from the Common tasks section and confirm the relevant module is enabled.
Heads up Getting Started does not configure anything itself — it is a navigation hub. All configuration happens inside the specific panels each item links to. If you landed here looking for a setting, click the relevant tile or checklist item to go directly to the right panel.