
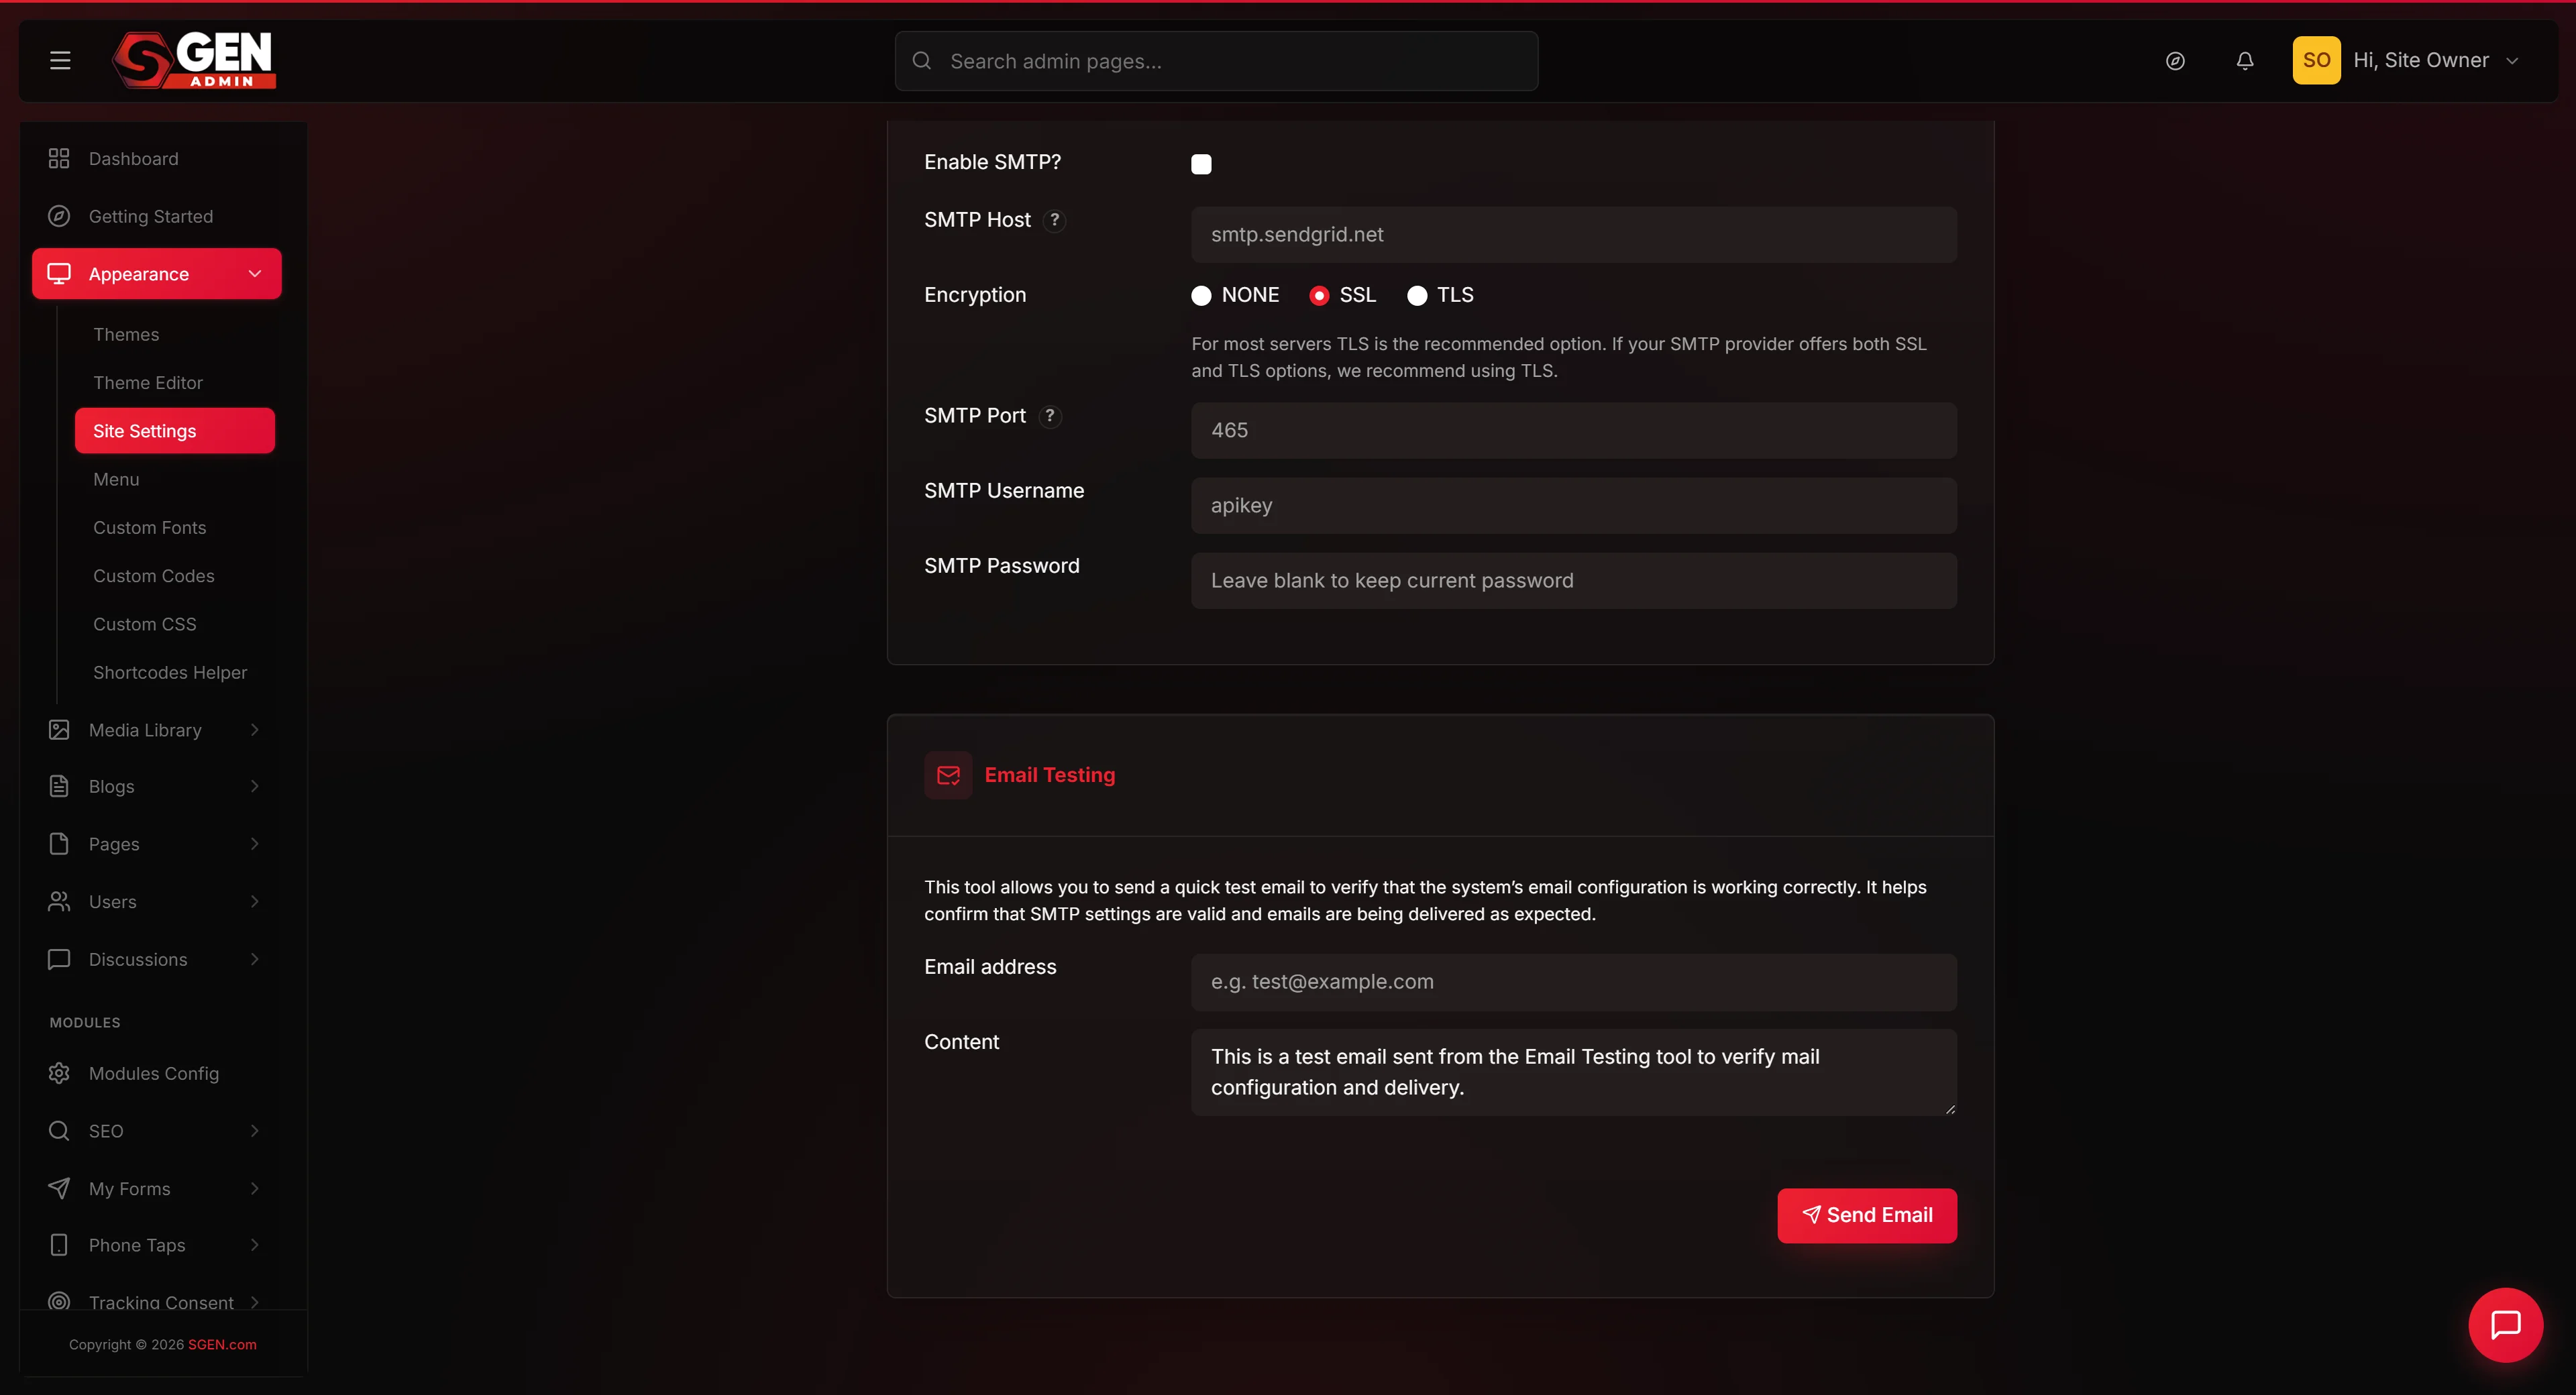
How to send a test email from your site
⏱ Quick answer below · full page ≈ 6 min · skim the bold lead-ins to move faster.
In short. Go to Settings → Email Settings, scroll to the Email Testing card at the bottom, fill in your own address and a short note, and click Send Email. If your SMTP credentials are correct, a green banner appears and the message lands in your inbox within seconds. If a red banner appears instead, the error message tells you exactly what failed.
On this page: What this tool is for · Where to go · Steps · What success looks like · Troubleshooting · FAQ
Your site sends real emails every day — welcome messages, order receipts, password resets, contact-form notifications. The Send Test Email tool is the fastest way to confirm that email path is working. Fill in your own address, add a short message, click Send, and within seconds you either see the message arrive or a specific error pointing to what went wrong. The whole loop takes under a minute.
When to run it: after initial SMTP setup, after any change to the Email Settings page (even renaming the From Name can silently wipe the password), or whenever customers report missing emails.
How to send a test email from your site
What is this for?
The Send Test Email tool sends one diagnostic message from your site's current mail configuration to a recipient address you choose. It exercises the same sending path as every transactional email — registration confirmations, order receipts, password resets, contact-form notifications — so if the test arrives, real emails will arrive too.
What it covers: validating SMTP credentials, confirming the From Name and From Email display correctly, and verifying the mail path is live before or after a credential change.
What it does not cover: bulk send, actual customer notification templates, or DNS authentication records (SPF/DKIM/DMARC).
Scope
| Field | Required | Notes |
|---|---|---|
| Yes | The address that receives the test. Use your own inbox — confirm delivery yourself. | |
| Content | Yes | Body of the test message. Minimum 5 characters. Keep it short and self-descriptive. |
The tool sends one message per click. No scheduling or batching. The From Name and From Email on the test message are the values currently saved in Settings → Email.
Options
Good use cases:
- First-time SMTP setup. Confirm credentials work before going live.
- Missing customer emails. A test send quickly confirms whether the issue is sitewide (test fails) or isolated to one delivery (test succeeds).
- After any Email Settings change. Saving the page can silently clear the SMTP password if you forgot to retype it — a test catches that immediately.
- Pre-launch deliverability check. Send to Gmail, Outlook, and Yahoo to see how each treats the message before a big event.
- Quarterly health check. Catches silent credential failures before customers notice.
Do not use this tool to:
- Send marketing emails or newsletters — the subject is hardcoded as "This is just a test email."
- Send to a real customer's address — they will receive a confusing message.
- Preview a specific email template — the test sends raw text, not your welcome or receipt template.
- Test DNS authentication (SPF/DKIM/DMARC) — a successful test does not confirm those records are in place.
Examples
Verify setup after initial SMTP configuration. Your site owner finished saving SendGrid credentials for the first time. They open Email Testing, fill in admin@yoursite.com, add "Pre-launch verification — Your Store", and click Send. A green banner appears. The message arrives within 12 seconds with From: Your Store. SMTP is working. Total time: 90 seconds.
Diagnose missing order receipts. A customer reports not receiving their receipt. The site owner runs a test — a red banner appears: "SMTP authentication failed." They re-open Email Settings, retype the SMTP password (wiped in an earlier save), and run the test again. It arrives. Receipts resume immediately. The note to add to your process: always retype the SMTP password when saving Email Settings, no matter what else changed.
How this connects to other features
- Email Settings (Settings → Email). The tool reads the credentials saved on this page. Change the SMTP host or password, save, then test.
- Notifications. Actual customer-email wording lives here, not in the test tool. If tests arrive but real emails look wrong, the issue is in Notifications.
- Forms. Contact-form notifications ride the same credentials. If they stop arriving, run a test send first.
- Ecommerce order receipts. Every receipt and shipping email uses these credentials. A test send is the fastest first-line diagnostic when receipts stop arriving.
- Password resets. Reset links arrive via these credentials. Sitewide password-reset failure → run the test send first.
Full detail: Configure email sending · Save mail settings
Before you start
Confirm your SMTP credentials are already saved in Settings → Email — the test tool reads from those saved values and cannot accept ad-hoc credentials. Pick a recipient address you can check right now. Note that each test sends a real email through your provider; some providers count it against your monthly quota.
Where to go
In the admin sidebar, click Settings, then Email Settings.
Scroll to the bottom of the page. The Email Testing card has two fields — Email and Content — and a single Send Email button.
Steps — Send a test email to verify your setup
1. Open the Email Settings page
Click Settings in the main admin sidebar, then click Email Settings.
You land on the Email Settings page with three cards: Email Setup, SMTP Configuration, and Email Testing.
If you have not yet configured SMTP credentials, scroll up and do that first — the test tool only works with saved credentials.
2. Scroll to the Email Testing card
The Email Testing card is the third one on the page, at the bottom. It has two fields (Email and Content) and a single Send Email button.
3. Fill in your own email address
Click the Email field and fill in the address you want the test to land in. Use your own personal address — the point is for you to verify the message arrives.
4. Add a short message to Content
Click the Content field and add a short message (minimum five characters). Include something recognizable as a test, for example:
Verification — Your Store launch checklist, 2026-06-15.Post-credentials-rotation test send.Quarterly health check.
5. Click Send Email
Click the Send Email button. The page submits and reloads.
- Green banner ("Test email sent successfully!") — credentials are valid, the message is on its way.
- Red banner — the provider's error message explains what failed.
6. Check your inbox
Switch to your email tab and check the inbox for the address you specified. The message should arrive within a few seconds with the subject line This is just a test email and a body containing the text you typed.
If it has not arrived in two minutes, check your spam folder. A message landing in spam means the credentials are working but DNS authentication (SPF/DKIM) is missing or incomplete.
What success looks like
You clicked Send Email and saw a green banner reading Test email sent successfully!
A new message arrived in your inbox within seconds. The From name matches what you configured on Email Settings. The subject line is This is just a test email. The body is the text you typed into Content. The message landed in your main inbox, not spam.
What to do if it does not work
- Green banner appeared but no email arrived. Check spam first. If not there, re-open Email Settings, retype the SMTP password, save, and test again.
- "Could not authenticate" / "Authentication failed." You are likely using a regular login password instead of an app password. Generate a fresh app password in your provider's account settings, paste it into SMTP Password, save, and test again.
- "Could not connect to host." The SMTP host, port, or encryption is wrong. Common working combinations:
smtp.gmail.comport 465 SSL;smtp.office365.comport 587 TLS;smtp.sendgrid.netport 587 TLS. - Connection timeout. Your environment may be blocking the outbound SMTP port. Try switching between port 465 and port 587.
- Send Email button does nothing. Both the Email and Content fields must be filled in (Content requires at least five characters).
- Test arrives but lands in spam. Add SPF and DKIM records at your DNS provider. Most providers have a domain-authentication wizard with the exact records to add.
- From name shows as a raw email address. Re-open Email Settings, retype the From Name field and the SMTP password, save, and test again.
Tips
- Pick an address you are watching right now. Sending to an unmonitored address defeats the purpose.
- Label your tests. Include the date and a short reason in the Content field so you can find the message later.
- Run a test after every Email Settings save, no matter how small — even changing the From Name can accidentally wipe the password.
- Pre-launch: test across providers. Send to Gmail, Outlook, and Yahoo — they each have different spam filters.
- Avoid rapid-fire testing. Some providers rate-limit short bursts and may count tests against your monthly quota.
Frequently asked questions
Why is the subject line hardcoded? The subject line "This is just a test email" is hardcoded so the recipient understands the message is a test, not a real site email. You cannot change it for test sends.
Can I send to multiple addresses at once? No — the Email field accepts a single address. Run the test once per address.
Why did the success banner appear but no email arrived? Most likely the message landed in spam. Check there first. If it is not in spam either, the credentials may have been silently rejected after the SMTP handshake — re-open Email Settings, retype the SMTP password, save, and test again.
Can I see a log of test sends? Not within SGEN. Check your provider's send history. Including a short note in Content (date, reason) gives you searchable context in your own inbox.
Why do my tests work but real customers say emails are missing? A successful test confirms credentials, not deliverability for all customers. Recipients may be on providers with stricter spam filters, or their inboxes may be full. Ask the customer to check spam first.
Will a test send count against my provider's quota? Yes — it sends a real email through your provider, the same as any other automatic send.
Can I test without configuring SMTP first? The form will accept a submission without configured SMTP, but it falls back to your hosting environment's default mail function, which is rarely reliable. Configure SMTP first, then test.
Next steps
- After a successful test, customize customer-facing email wording under Settings → Notifications.
- Set up SPF and DKIM records at your DNS provider to improve deliverability.
- Add a calendar reminder for a quarterly test send so silent credential failures are caught before customers notice.
- If you switch providers, re-run a test send immediately after saving the new credentials.
- Visit Settings → General to confirm your Admin email is set to an address you check regularly.