
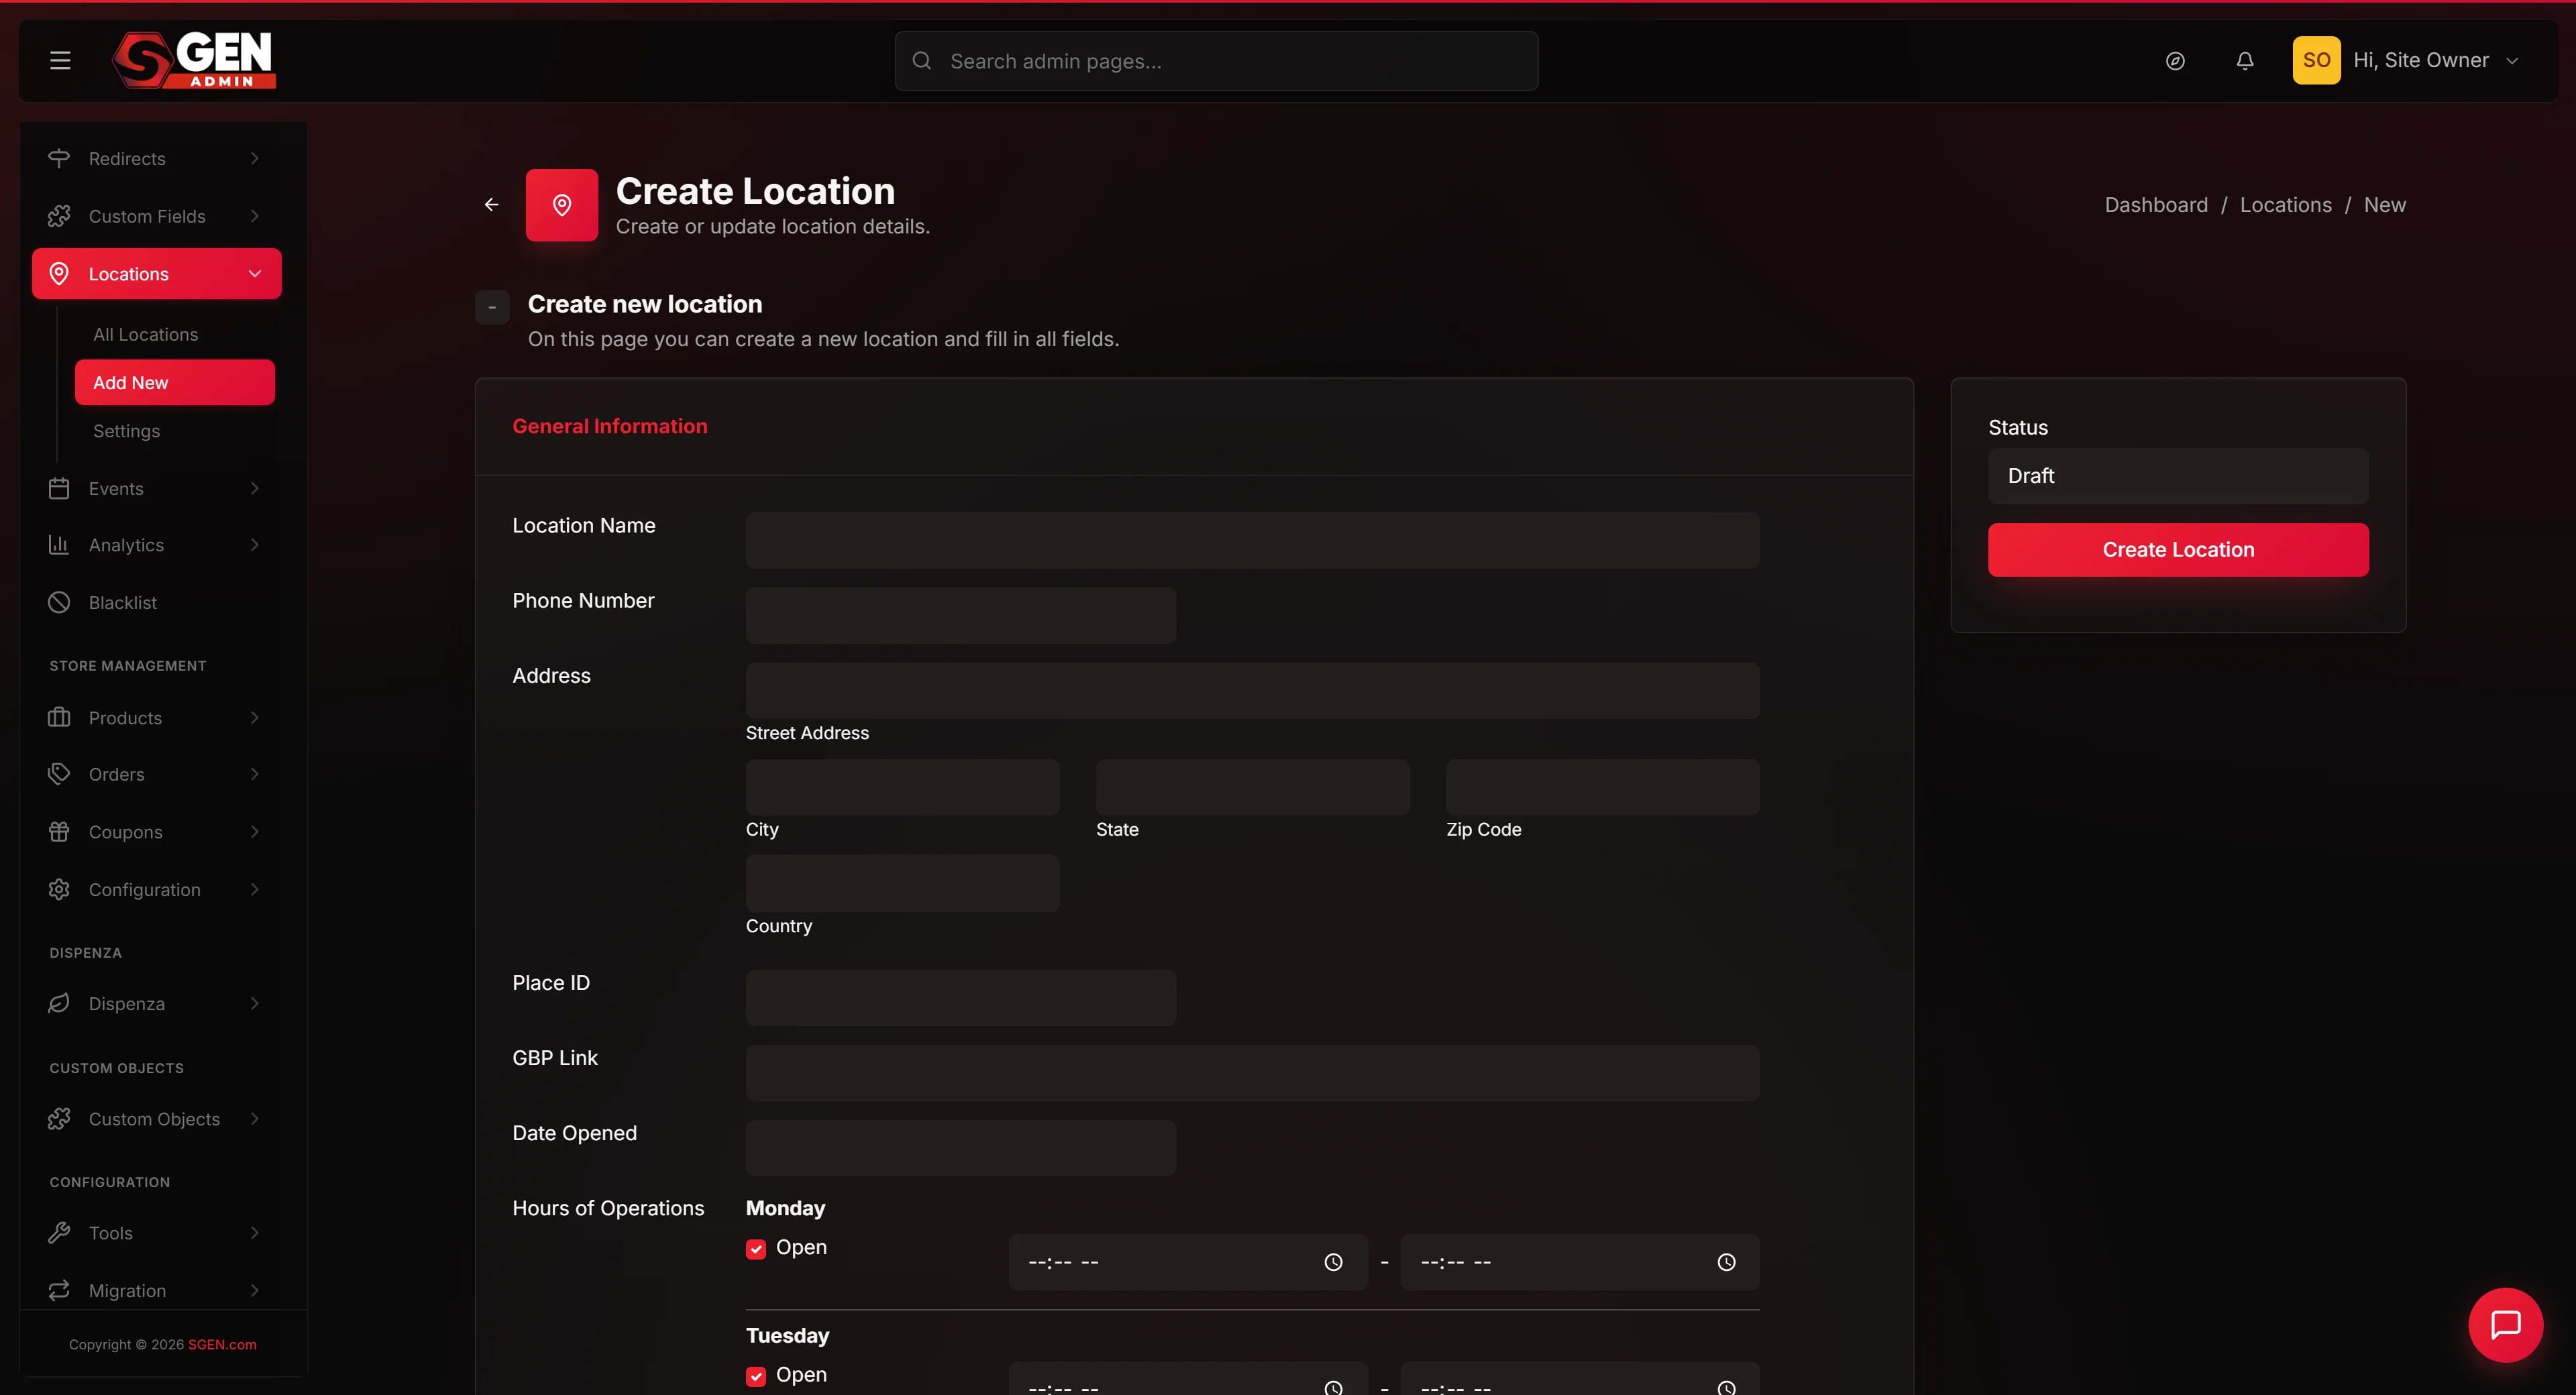
Add a new location to your store directory
⏱ ~9 min read · quick answer above the fold · full reference below.
In short. Go to Dashboard → Locations → Add New (or /sg-admin/locations/create). Fill in three cards: General Information (name, address, hours), Additional Details (email, photos, links), and GMB Attributes (accessibility/amenity flags). Set Status to Draft to save without going live, or Published to appear on the public store-finder map immediately. Click Create Location. The whole flow takes about three minutes per location once you have your address, hours, and photos ready.On this page: What this form is for · Before you start · Steps · Examples · Tips for higher-quality entries · Troubleshooting
What is this for?
The Add New Location form is the front door for listing every physical place your customers can find you — a flagship store, a showroom, a downtown shop, a pop-up at the farmer's market every Saturday.
You fill in three short sections — General Information, Additional Details, and GMB Attributes — click Create Location, and the entry is saved. After save, the location is queryable from any page on the public site that uses a locations template. Find-a-store finders, location detail pages, contact-page address blocks — all of them read from the same locations table, so adding the location once means every public surface picks it up automatically.
You can save a location as Draft and refine it over multiple sessions. Draft entries are invisible to customers but show up to admins exactly like Published entries on the All Locations page. When the data is right, switch the status to Published.
Scope
| In scope | Out of scope |
|---|---|
| Filling in the three-section Create Location form | Editing or updating an existing location record |
| Setting status to Draft or Published on creation | Syncing location data from Google Business Profile |
| Uploading a hero image and gallery on a new entry | Configuring public map or store-finder templates |
| Adding GMB Attributes to a new entry | Managing multiple locations in bulk |
| Using Draft status for pre-launch entries | Deleting or trashing existing entries |
Reference
| Form section | Fields covered | Notes |
|---|---|---|
| General Information | Name, Phone, Address, City, State, ZIP, Country, Hours | Name is the only required field (min 2 chars) |
| Additional Details | Email, Location URL, Shop URL, Hero Image, Gallery | All optional; images come from your media library |
| GMB Attributes | Configurable attribute groups (accessibility, services) | Driven by your Locations Settings defaults |
| Status | Draft (default) or Published | Draft is invisible to customers |
Good use cases
- First physical store. Fill in address, hours, and a storefront photo — your contact page gains a structured address block that populates Schema.org markup for search results.
- Seasonal pop-ups. Create the entry in Draft before launch; switch to Published on opening day; switch back to Draft when it closes. The record survives for reuse next season.
- Wholesale partners. One entry per partner location so your "Where to find us" page maps every store without code changes.
- Multi-region rollouts. Save with status Published and the find-a-store map auto-includes the new pin — no template edits required.
- Pre-launching a signed lease. Create in Draft months ahead; refine details and swap in photos as the buildout progresses; flip to Published on opening day.
- One-time SEO capture. A single fully-filled entry emits Schema.org LocalBusiness markup for every public template that reads from the Locations table.
What NOT to use this for
- Online-only businesses. No physical address to visit = no Locations entry needed. Fake address data corrupts store-finder templates and local-search SEO.
- Customer shipping addresses. Those live on order records, not here.
- One-off event venues. A trade-show booth is not a location — use a blog post or event entry instead.
- Internal-only addresses. Every Published entry is visible on the public site. Keep addresses you do not want public in Draft or omit them.
- Contact forms. A Locations entry shows address, hours, phone, and photos — it does not collect messages. Pair it with a contact form for inbound enquiries.
How this connects to other features
- All Locations list — as soon as you click Create Location, the new entry appears on the All Locations table. See Browse, search, and manage all your locations.
- Locations Settings (GMB Attributes) — the checkbox list at the bottom of the Create form is populated by the master GMB Attributes configuration under Settings. Add or remove items there to control what appears on every location's Create / Edit form.
- Sync from Google Business Profile — if you connect a GBP, the Sync button on the All Locations page pulls down location records and creates entries automatically. Synced entries display a small External badge.
- Media Library — the hero image and gallery fields use the standard media picker. Images you upload here are available everywhere, and previously uploaded images can be reused without re-uploading.
- Pages — use the page builder's storefront block to render your locations on a public-facing find-a-store page. The block reads from the Locations table directly.
- SEO defaults — Schema.org LocalBusiness markup is generated from the General Information you fill in here. Empty fields produce empty markup — fill the address fields completely.
Before you start
Gather these before clicking Add New:
- Customer-facing name — the name customers recognize ("Your Store — Downtown", not "Internal Loc #4").
- Full street address — number, street, city, state, ZIP, country. Omitting country breaks international search results.
- One or two storefront photos — you can save without them and add later, but the public listing looks incomplete without images.
- Hours of operation — one row per weekday; a checkbox marks the day open, two time pickers set the window.
- Per-location phone number — if each site has its own line, enter it here rather than a central number.
- Applicable GMB attributes — skim the list (wheelchair access, outdoor seating, Wi-Fi) and note which apply.
Where to go
Sidebar path: Dashboard → Locations → Add New. Direct URL: /sg-admin/locations/create.
You will land on the Create Location form. Three cards stack vertically: General Information at the top, Additional Details below it, and GMB Attributes at the bottom. The right sidebar has a status select (Draft / Published) and a single submit button labelled Create Location.
Steps — Create a new location from a blank form
1. Open the Create form
Click + Add New from the All Locations page header, or use the sidebar shortcut Locations → Add New. Either path lands you on the same blank form. The status defaults to Draft so anything you save here is invisible to customers until you explicitly publish.
2. Fill in the General Information card
Location Name is the customer-facing label — use the name customers will see on the store-finder map. Move down through Phone Number, Street Address, City, State, ZIP, and Country. Use the Country field even if you only operate in one country.
The Hours of Operation block has one row per weekday. Each row has a checkbox to mark the day open, and two time pickers for the open / close window. Monday through Friday are checked by default; tick Saturday and Sunday on if the location is open weekends.
If you have a Google Business Profile Place ID or public GBP listing URL, paste them into the Place ID and GBP Link fields (both optional — they help search engines connect your location to its GBP).
Skim the whole card before moving on. A common mistake is typing a city without a state, or filling in a ZIP that doesn't match the city — search engines flag these mismatches.
3. Fill in the Additional Details card
- Email Address — the public email for THIS location.
- Location URL — a direct URL to a per-location page on your site, if you have one.
- Shop URL — URL of an external page if THIS location has its own online store. Most operations leave this blank.
- Shop Main Image — click Choose Image to open the Media Library picker. This is the hero photo used as the thumbnail on the find-a-store map.
- Shop Gallery — click Choose Images to open the picker in multi-select mode. Add 3–8 photos showing the interior, a signature menu item, the storefront, and any details that help a customer recognize the space when they arrive.
If you do not have photos yet, save the location without them — you can attach photos later from the All Locations page.
4. Tick the GMB Attributes that apply
This card lists every GMB Attribute group your Settings page has configured. Tick the boxes that describe THIS location.
Common picks: "Wheelchair accessible", "Free Wi-Fi", "Outdoor seating", "Restroom available", "Pet friendly". Each tick is saved as a per-location flag — different locations can have different attributes.
If the attribute list looks wrong, update the master GMB Attributes configuration under Locations → Settings.
5. Set the status and submit
The right sidebar has a single Status select.
- Leave Draft if you are still writing or want to come back with photos.
- Switch to Published when the entry is complete and ready for customers.
Click the red Create Location button. The form posts; the page refreshes; you land on the new location's edit page with a green flash banner reading "Location has been successfully created!"
6. (Optional) Verify the entry on the public site
If you saved as Published, open the public-site find-a-store page in a new tab. The map pin should drop in the right place; the address block should match what you typed; photos should load. If something looks off, return to the edit form and correct it — saves are instant.
What success looks like
Immediately after submit, three things happen:
- Green confirmation banner. A "Location has been successfully created!" flash sits at the top of the page.
- You land on the edit form. The URL changes from
/sg-admin/locations/createto/sg-admin/locations/edit/, and every field you filled in is now populated with the saved values. - The All Locations list shows the new row. If you saved as Published, it sits under the Published tab; if Draft, under Draft.
If you saved as Published, the public-site listing pages now include the location. Draft entries are filtered out automatically by the public-site queries.
Examples
Example 1: A new store launching in two weeks.
Fill in the name, address, hours, photos (construction shots to start), and GMB attributes. Status: Draft. Swap in real photos as the buildout finishes. On launch morning, switch Status to Published — the pin appears on the public find-a-store map within seconds.
Example 2: Twenty wholesale partners across five cities.
Open Locations → Add New once per partner. Fill in each partner's address, phone, and hours. Status: Published immediately (the stores already exist). After saving all twenty, the public page renders a map with twenty pins. The whole rollout takes an afternoon; maintenance is a few minutes per quarter.
Example 3: A six-week pop-up.
Create the entry in Draft a week before opening. On opening day, switch to Published. On closing day, switch back to Draft — the entry is preserved for reuse if the pop-up returns next year.
Example 4: One flagship store, SEO focus.
Fill every field: name, full address, hours, date opened, hero photo, six gallery photos, all applicable GMB attributes. Status: Published. The structured data from the entry enriches the search result with correct hours and photos, helping the location appear for "store near me" searches.
What to do if it does not work
- Form rejects with red flash "Required field missing". The Location Name is required. Re-check the Name field at the top, fill it in, click Create Location again.
- Form submits but no green banner appears. Refresh the page. If the URL is still
/create, the submit silently failed — check your browser console and report it to support with the exact time. If the URL changed to/edit/, the save succeeded and you missed the banner. - Saved entry does not appear on the public site. Confirm status is Published — open the entry from All Locations and look at the right sidebar status select. If status is Published and the entry is still missing, ask your support team to confirm the public-side template is using the latest data (CDN cache can delay first appearance by a minute or two).
- Image picker uploads fail. The Media Library accepts PNG, JPG, and WEBP; SVG and other formats are rejected. Re-export your image as JPG or PNG and try again.
- Hours of Operation rows do not save the time you typed. The time pickers expect a 24-hour or AM/PM format depending on browser locale. Try clicking the clock icon to use the picker UI rather than typing free-form times.
- GMB Attributes card shows zero options. The default seed has nine attributes; if your card is empty, the Settings page's GMB Attributes configuration has been emptied. Open Locations → Settings, restore a valid configuration, save, and reload the Create form.
- Stuck or losing work. Status remains Draft until you explicitly Publish, so half-finished entries are safe to leave open in a tab — return tomorrow and your work is intact.
Tips for higher-quality location entries
- Photos — timing matters. Storefront shots at late-afternoon golden hour outperform midday glare. Interior shots early in the day (lights on, no customers) feel inviting without looking staged.
- Pick one aspect ratio and stick to it. Mixed hero-image ratios look inconsistent on the find-a-store grid. Decide on 16:9 (or your preferred ratio) before uploading the first location.
- Name the location the way customers say it. "Your Store Embarcadero" not "Loc-3-EMB" — the name field is the search-engine-facing label.
- Verify the map pin after saving. Click "View on site" from the All Locations row and check that the pin drops in the right place. If it is off, add a Place ID from Google's Place ID Finder to anchor it precisely.
- Keep hours current. The Locations module does not detect real-world drift — update the entry the same day hours change.
- Link your Google Business Profile. The GBP Link field tells search engines this entry and the GBP are the same entity, preventing conflicting hours from two sources.
Field-by-field: what each input does
| Field | Required? | What it does |
|---|---|---|
| Location Name | Yes | Customer-facing name. Appears on store-finder map, location detail page, search results. |
| Phone Number | No | Per-location phone. Appears as a click-to-call link on mobile. |
| Street Address | No (recommended) | Address line 1 — number and street. Used in Schema.org markup. |
| City / State / ZIP / Country | No (recommended) | Used together to render the full address block and in geocoding. |
| Place ID | No | Google's unique identifier for the location. Use Google's Place ID Finder. |
| GBP Link | No | Direct URL to your Google Business Profile. Helps search engines associate. |
| Date Opened | No | Display-only. Some templates show "Open since 2018" badges. |
| Hours of Operation | No | Per-day open / close window. Mon–Fri default-checked, Sat / Sun unchecked. |
| Email Address | No | Per-location email contact. Rendered as a clickable link. |
| Location URL | No | Slug for a per-location detail page. Leave blank if you do not have one. |
| Shop URL | No | External page URL if this location has its own online store. |
| Shop Main Image | No | Hero photo. Single image. |
| Shop Gallery | No | Multiple photos for a per-location carousel or grid. |
| GMB Attributes | No | Tick each that applies. The list is configured under Settings. |
| Status | Yes (default Draft) | Draft hides from public; Published shows. Switch any time. |
Next steps
- See Browse, search, and manage all your locations for how to filter, bulk-edit, and trash entries from the All Locations page.
- See Configure the GMB attribute list for your locations to control which checkboxes appear in the GMB Attributes card.
- See Reference: every field on the location form for a detailed breakdown of every input on the Create / Edit form, including formats and defaults.