
How to add a new blog post
⏱ 60-second answer below · full page ≈ 8 min · skim the bold lead-ins to move faster.
In short. Go to Blog → All Blogs, click + Add New in the top-right. Fill in Title (the Permalink auto-fills), write the body in the Content area, pick at least one Category and one Tag, choose a Status (Publish, Draft, Private, or Password Protected), then click Create a Post. That's it. The rest of this page covers every field in detail, common scenarios, and what to do when something goes wrong.
On this page: Before you start · Where to go · Steps · Status options · What success looks like · Troubleshooting
How to add a new blog post
What is this for?
Add New is the entry point for every fresh blog post — a product update, a customer story, an announcement, a how-to, or any time-stamped piece of writing that lives on your blog timeline.
Use the blog for dated content that will age ("We just launched…", "This week…"). For evergreen content that belongs at a stable URL (About, Contact, Services, legal pages), use Pages instead.
,{"text":"Product Updates","muted":true},{"text":"admin","muted":true},{"text":"2026-04-19 08:05","muted":true}]},{"cells":[{"html":"How to Style the Classic T-Shirt","badge":{"label":"Draft","tone":"draft"}},{"text":"How-to Guides","muted":true},{"text":"admin","muted":true},{"text":"2026-04-22 14:03","muted":true}]},{"cells":[{"html":"New Arrival: Canvas Tote Bag","badge":{"label":"Published","tone":"pub"}},{"text":"New Arrivals","muted":true},{"text":"admin","muted":true},{"text":"2026-04-23 10:30","muted":true}]},{"cells":[{"html":"Customer Spotlight: Internal Preview","badge":{"label":"Private","tone":"private"}},{"text":"Company","muted":true},{"text":"admin","muted":true},{"text":"2026-04-24 09:14","muted":true}]}]}}}
Good use cases
- Time-stamped news — product releases, price changes, announcements. The blog is where dated content lives; readers arriving months later understand it was current at that date.
- Tutorials and how-tos — tag them consistently (
Tutorial,How-To) so visitors can filter the archive. - Draft-then-publish workflow — save as Draft to collaborate and iterate without anything going public; flip to Publish when ready.
- Controlled previews — use Password Protected to share a URL with partners before public launch; use Private for internal team notes only (signed-in admins only, anonymous visitors get Not Found).
- Richly designed announcements — switch the Editor to SG-Builder to get sections, columns, hero banners, and CTA rows instead of plain prose.
What NOT to use this for
- Do not use Add New to edit an existing post. Add New always creates a new post. To update an existing one, hover its row on the Blog list and click Edit.
- Do not put evergreen content on the blog. About, Contact, legal, and services pages belong under Pages, not the blog.
- Do not skip categories and tags. Both are required. If your site has none yet, go to Blog → Categories and Blog → Tags first to set up at least one of each.
- Do not close the tab mid-form. SGEN does not auto-save the Create form. Click Create a Post (Status = Draft) to save progress before stepping away.
- Do not click Add New to duplicate. Hover an existing post row and click Duplicate instead — you get a pre-filled Draft copy without rekeying everything.
How this connects to other features
- Edit existing post — once created, use the Edit screen. Full details: blog-edit-existing-post.
- Post form fields — every field explained in depth: blog-post-form-fields-reference.
- Categories and Tags — manage groupings and keywords under Blog → Categories / Blog → Tags. Overview: 02-organize-with-categories-and-tags.
- Revision history — view and restore past versions: 03-review-blog-post-revisions.
- SEO — each post has its own SEO Title, Description, and Canonical URL on the form. Tokens like `
and` work in the SEO Title field. - Redirects — if you change a post's slug after publishing, add a 301 redirect in Redirects from the old URL to the new one.
- Custom Fields — if your site defines custom fields scoped to "blog" (under Custom Fields → Schema), a Custom Fields block appears on the post form automatically.
Before you start
- You are signed in as an admin with access to the Blog area.
- You have at least one Category and one Tag. Both pickers are required on the post form. On a brand-new site, go to Blog → Categories → Add Category first, then Blog → Tags → Add Tag, before returning here.
- You know the post Title — it auto-populates the Permalink slug.
- You have decided whether the post goes live immediately (Status = Publish) or stays hidden (Status = Draft).
- If the post needs a cover image, upload it to the Media Library first.
Where to go
- Open the left navigation in the SGEN admin.
- Select Blogs → All Blogs — you land on the Blog list.
- Top-right corner: click + Add New — you land on the Create Blog Post form.
Steps to add a new blog post
1. Click + Add New from the Blog list
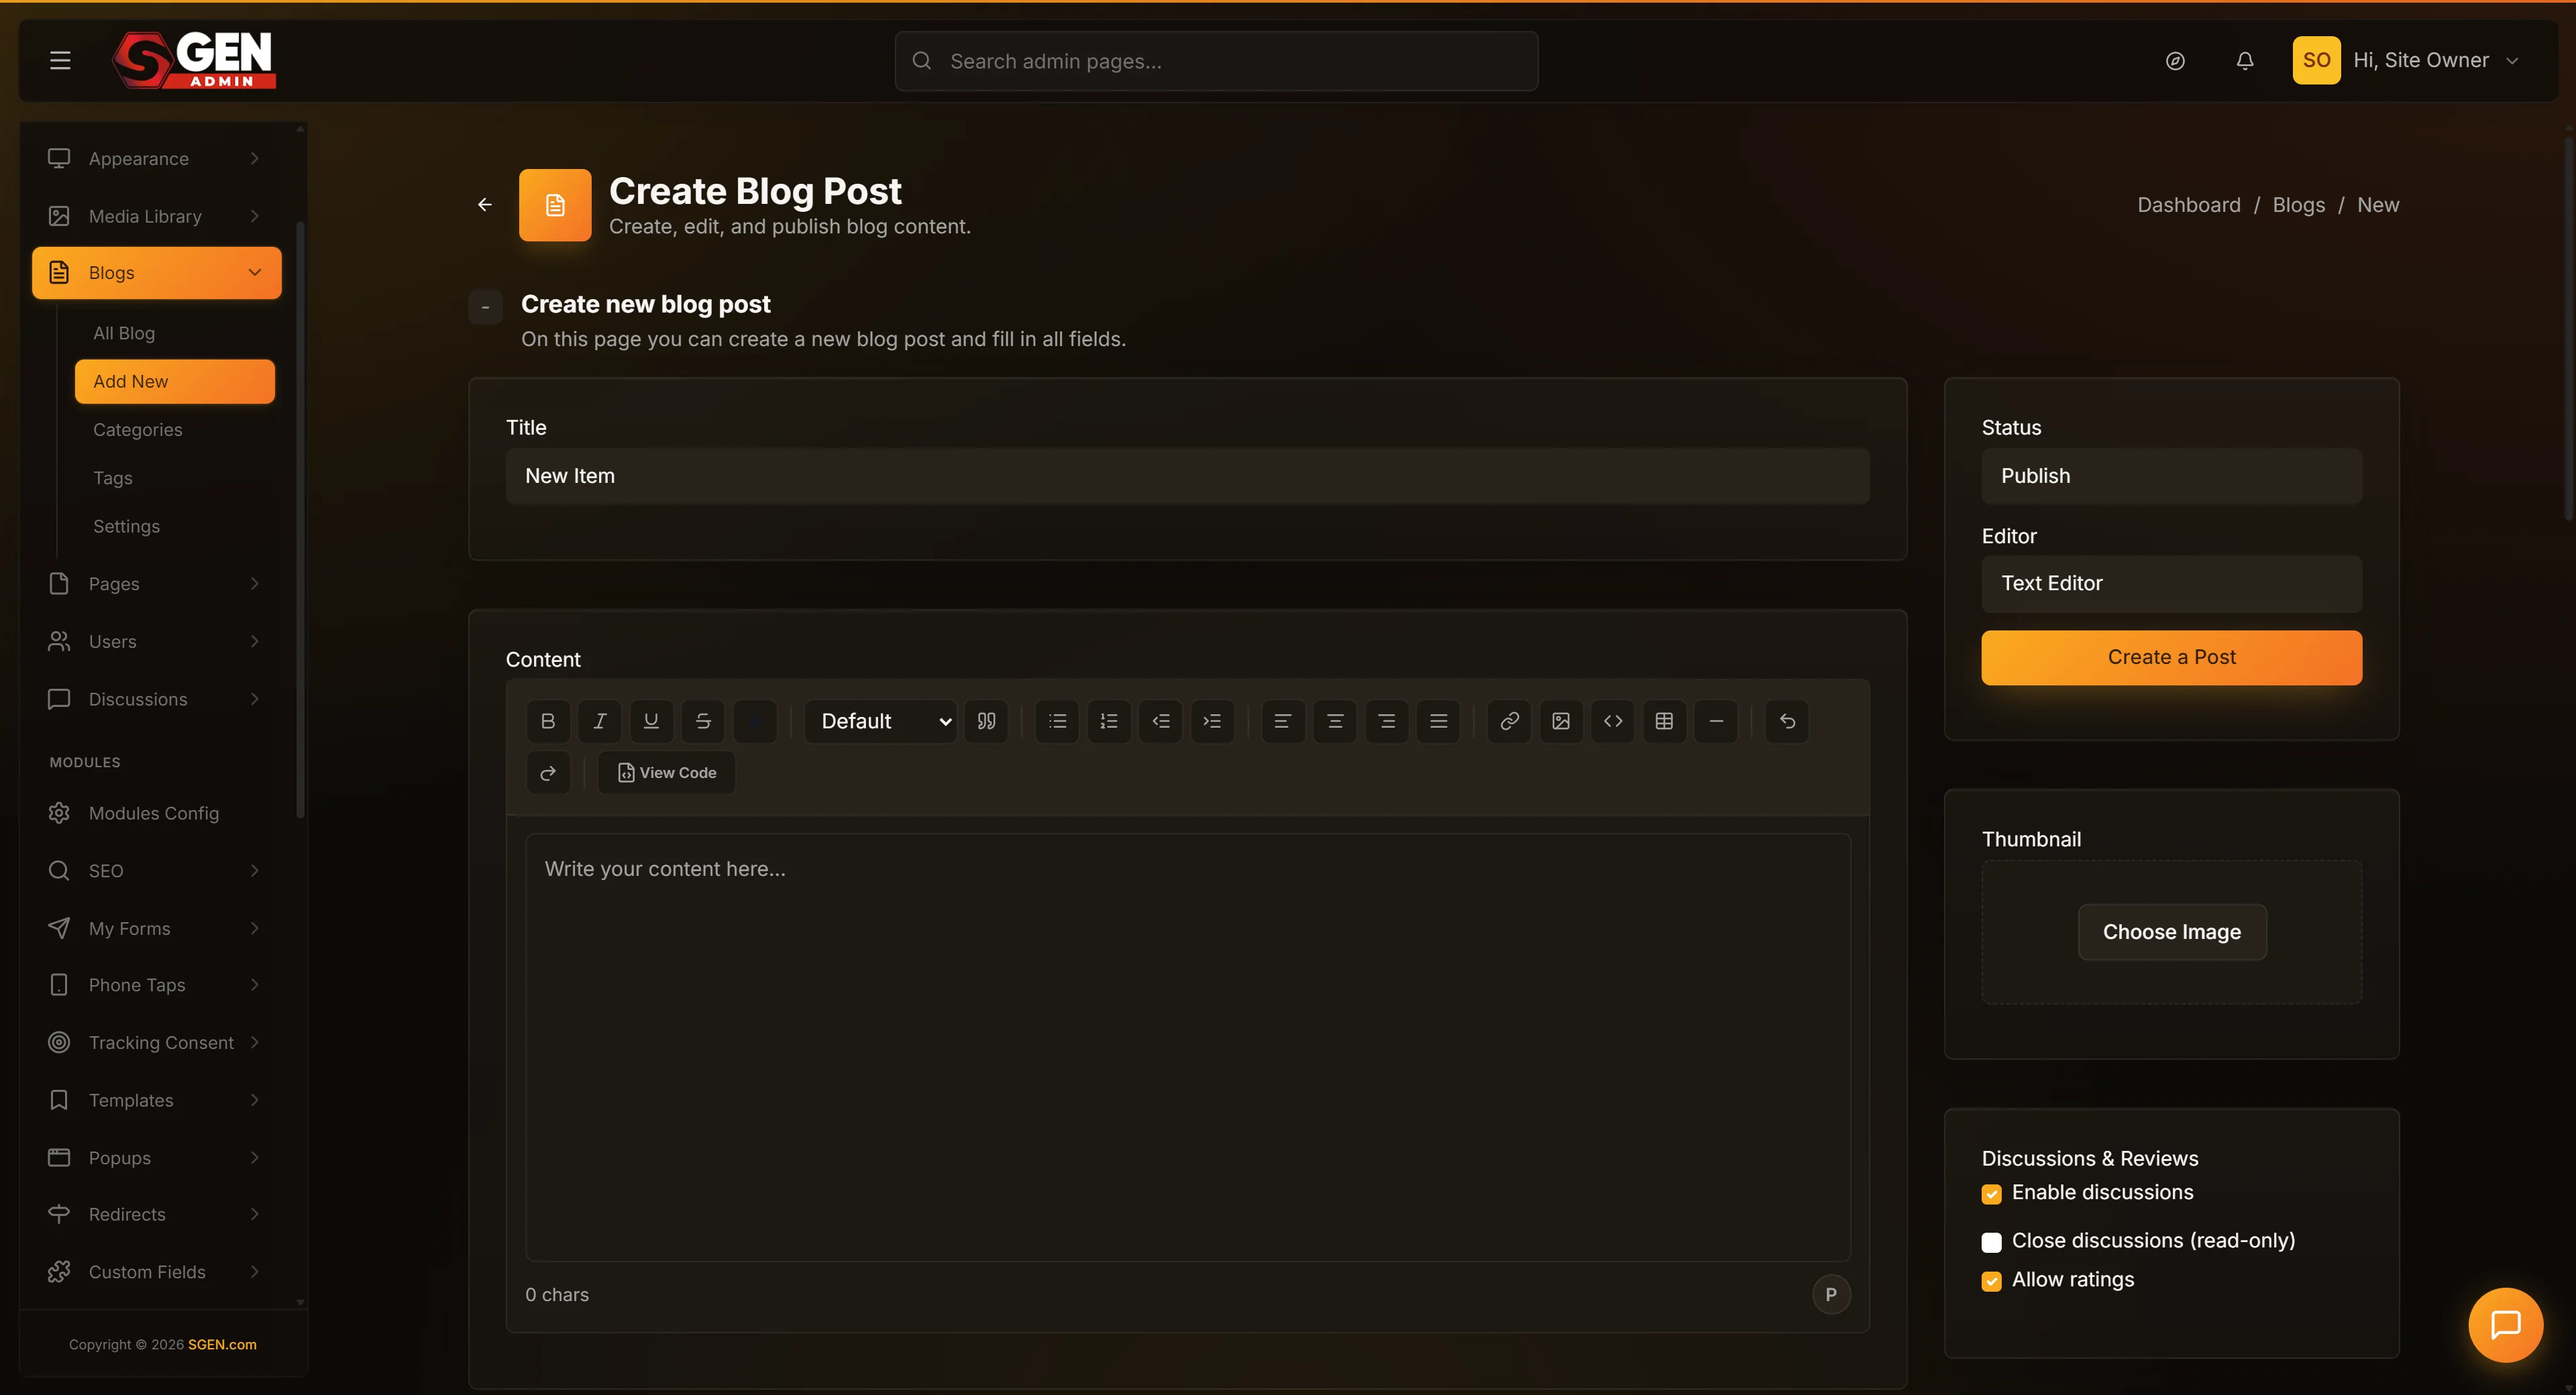
From the Blog list, look top-right for the red + Add New button. Click it. You land on a fresh, empty Create Blog Post form. The page header reads "Create Blog Post" and the breadcrumb shows Dashboard → Blogs → New.
The form has a two-column layout: the left column holds Title, Permalink, Content, Excerpt, Banner, Custom Fields, and SEO; the right column holds the metadata sidebar (Status, Editor select, Thumbnail, Discussions, Categories, Tags).
2. Fill in Title and Permalink
The Title is the headline readers see. Type your headline. As soon as you click out of the Title field, the Permalink below it auto-fills with a URL-friendly slug (for example, "Introducing SGEN 3.0: What's New" becomes introducing-sgen-30-whats-new). Click the slug text to edit it inline if needed.
Slug rules: 100-character limit; must be unique within its category — SGEN auto-appends -2, -3 for duplicates.
3. Choose your Editor in the right column
The Editor select controls how you author the body content.
- Text Editor (default) — rich text with bold, italic, headings, links, lists, and inline images. Best for most posts.
- SG-Builder — visual page-builder layout (sections, columns, image rows, CTA buttons). When selected, the Content area collapses into an Edit with SG-Builder button. The post saves as Draft and you drop into the builder.
Commit to a choice early. Switching from SG-Builder back to Text Editor discards your visual layout.
4. Fill in the body Content
Type or paste the post body into the Content area. The Excerpt below it is optional — it is the short blurb on the blog archive card. Leave it blank and SGEN auto-generates one from the first ~155 characters of Content. A custom two-to-three sentence Excerpt that hooks the reader works better for archive cards.
5. Add a cover image (optional)
Find the Thumbnail card in the right column. Click Select cover image to open the Media Library modal. The cover image appears:
- On the blog archive card for this post
- On post-card components that pull from the latest posts (recent posts widget, related posts row)
- As the OpenGraph image for social shares (unless you override it in the SEO block)
A good Thumbnail is a landscape image at 1200×675 or larger that reads well at small sizes. Avoid text in the image — it becomes illegible at archive-card size (~400px wide).
6. Choose at least one Category and at least one Tag
Both pickers are in the right column. Both are required.
- Categories — top-level groupings: "Product Updates," "Tutorials," "Company News." Categories appear in the URL (
/blog/product-updates/post-slug). - Tags — fine-grained keywords that cross-cut categories: "New Arrival," "Behind the Scenes," "Release Notes." Tags do not appear in the URL.
Type into either picker — SGEN suggests existing items. To create a new one inline, type a name that does not exist and click the create-new prompt. If both pickers are empty, you have not created any categories or tags yet — save your draft, create them under Blog → Categories / Blog → Tags, then return to assign them.
7. Pick a Status
The Status select controls visibility once you click Create a Post.
| Status | Who can see it |
|---|---|
| Publish | Everyone — post goes live immediately, appears on archive and category/tag pages |
| Draft | Signed-in admins only (via Preview row action) — never appears publicly |
| Private | Signed-in admins only — anonymous visitors get Not Found |
| Password Protected | Anyone who enters the password — a password field appears below the select |
You can change Status any time from the Edit screen. There is no scheduled publish — save as Draft and flip to Publish manually at your target time.
8. Click Create a Post
Click the primary red Create a Post button at the bottom of the right column. SGEN inserts the post and redirects you to the Edit screen with a green success flash.
What success looks like
After a successful save:
- The page reloads to the Edit screen — the header now reads "Update Blog Post" and the button reads "Update a Post."
- A green success flash appears near the top of the page.
- The right sidebar gains an Author / Created / Modified meta block and a Move-to-Trash link.
- If you set Status to Publish, open the post's public URL in a private/incognito window to confirm it loads.
What to do if it does not work
- Create a Post is greyed out or the form does not save. A required field is empty. Scroll the form for red required markers — usually Categories or Tags. Assign at least one of each.
- "No categories defined" in the picker. You have not created any categories yet. Save your draft, go to Blog → Categories → Add Category, create one. Repeat for Tags, then return to assign them.
- The Permalink slug looks wrong. Click the slug text below the Title field to edit it inline. Save.
- Post saved but does not appear on the public blog. Check Status — if it is Draft, Private, or Password Protected, it will not show on the public archive. Open Edit, change Status to Publish, click Update a Post.
- Cover image missing on the archive card. Make sure you selected a Thumbnail before saving. The archive card pulls from the Thumbnail field, not from inline body images.
- Picker shows a typed category but did not create it. The picker creates new categories only when you click the create-new prompt below your typed text. Typing and pressing Tab does not create the item.
- Post saved with
-2in the URL. Another post in the same category already holds that slug. SGEN auto-appends-2to keep slugs unique. Find the older post with the original slug, change it, then update yours. - Browser refreshed and the form was empty. Unsaved work on the Create form is lost on refresh. Click Create a Post with Status = Draft early — then iterate from the Edit screen where saves persist.
Worked example: scheduling a new product announcement
You want to announce a new product line. The post needs a cover image, goes into a specific category, and should go live immediately.
- Open Blog → All Blogs, click + Add New.
- Title:
New Arrival: Canvas Tote Bag. Permalink auto-fills — click it and shorten tocanvas-tote-bag. - Write the body in Content (product details, price, availability).
- On the Thumbnail card, click Select cover image and pick the product photo from the Media Library.
- In Categories, pick New Arrivals. In Tags, add
AccessoriesandBags. - Set Status = Publish.
- Click Create a Post.
The post lands at yoursite.com/blog/new-arrivals/canvas-tote-bag immediately and appears at the top of the blog archive.
Common scenario variations:
| Goal | What to do differently |
|---|---|
| Need review before going live | Status = Draft; flip to Publish after approval |
| Share with partners before public launch | Status = Password Protected; enter a password; share URL + password |
| Internal team notes only | Status = Private; only signed-in admins see it |
| Magazine-style layout (columns, hero, CTA rows) | Change Editor to SG-Builder before clicking Create a Post |
| Teammate already drafted the post | Do NOT click Add New — find the Draft on the Blog list and click Edit |
Next steps
- Edit a post you already created — blog-edit-existing-post
- Walk through every field on the post form — blog-post-form-fields-reference
- Review revision history — 03-review-blog-post-revisions
- Organize posts by topic — 02-organize-with-categories-and-tags