
How to edit an existing blog post
⏱ 60-second answer below · full page ≈ 8 min · skim the bold lead-ins to move faster.
In short. Go to Blogs → All Blogs, hover the row, click Edit. The Update Blog Post form loads with every field pre-filled. Change what you need — content, status, slug, thumbnail, SEO, banner, or discussions — then click Update a Post. For published posts, the change is live the moment the page reloads. SGEN does not auto-save; if you close without clicking Update, your edits are discarded. That's the core workflow — read on for common scenarios and edge cases.
On this page: What this is for · Common use cases · Steps · What success looks like · Troubleshooting · Edit vs Add New
How to edit an existing blog post
What is this for?
Edit is the entry point for changing anything about a blog post that already exists on your site — fix a typo, swap the cover image, change Status from Draft to Publish, update SEO metadata before a campaign, add a banner with a CTA, rename the slug, or retire the post by moving it to Trash.
Click Edit on any Blog list row (or click the post title) and you land on the Update Blog Post form. Every field is pre-filled with the current values. Change what you need, then click Update a Post.
The Edit screen is also where you access revision history, export a backup, switch to SG-Builder, or password-protect a published post.
Edit is distinct from Add New. Add New always creates a brand-new post. Edit always updates an existing one. They share a form layout, but the actions they perform are different.
Good use cases
Fix a typo or polish copy after publishing. Hover the row, click Edit, fix the text, click Update a Post. The change is live within seconds. No republish step needed.
Promote a draft to live. Open the post, change Status from Draft to Publish, click Update a Post. The post is immediately public.
Update SEO metadata before a campaign. Open Edit, scroll to the SEO block, update the SEO Title and Description, click Update a Post. Search engines pick up the new metadata on their next crawl.
Attach a banner to an existing post. Scroll to the Post Banner block, toggle Enable Banner, fill in headline / CTA / colors, click Update a Post. The banner appears on the public post immediately.
Swap the cover image. Click the Thumbnail card, pick a new image from the Media Library, click Update a Post. The new cover shows on the blog archive card and social shares.
Retire an outdated post without deleting it. Click the Move to Trash link in the right sidebar. The post moves to Trash — the public URL stops serving content and the post drops off the archive — but it can be restored at any time.
What NOT to use this for
- Do not use Edit to change the post type. A blog post stays a blog post forever. To "move" content to Pages, copy the body content out, create a new Page in Pages → Add New, paste it in, then trash the original blog post. There is no in-place migration.
- Do not change a published post's slug without a Redirect. Changing the Permalink slug changes the public URL. If the old URL is already shared, linked from other pages, or indexed by Google, it returns Not Found after the rename. Pair every slug change with a 301 redirect in Redirects from the old slug to the new.
- Do not edit a post and walk away without clicking Update a Post. SGEN does not auto-save mid-edit. If you close the tab without saving, your edits are gone — the post on the public site stays at its last saved state.
- Do not use Edit to adjust your site-wide blog defaults. Title prefix, archive title, items-per-page, footer template — those are in Blog → Settings, not on the per-post Edit screen.
- Do not use Edit to manage categories or tags. The Categories and Tags pickers on the Edit form let you assign categories/tags to this post, but to add, rename, or merge category/tag definitions across all posts, go to Blog → Categories or Blog → Tags.
- Do not use Edit to set up a brand-new post. Edit is always for an existing post. To create a new post, go back to the Blog list and click + Add New.
- Do not edit a post's Status to Trash and expect it permanently deleted. Trash is a soft delete. The post can be restored. To permanently delete a post, switch to the Trash tab and use Delete Permanently on the row.
How this connects to other features
- Add new post — Edit and Add New share the same form. The only difference is that Edit pre-fills the values from an existing post and Add New starts blank. See admin.admin_blog.add_new_post.
- Post create/edit form (the underlying screen) — every Edit click goes through the same Manage Post form documented in admin.admin_blog.manage_post.
- Post revision history — every time you click Update a Post on the Edit screen, SGEN snapshots the prior version of Title and Content. View those snapshots and roll back from the View History button on the Edit screen — see admin.admin_blog.history.
- Categories and Tags — same pickers as on the Add New form. To add brand-new categories/tags, either type a name into the picker or visit Blog → Categories / Blog → Tags.
- Media Library — the Thumbnail picker and any banner background image come from the Media Library. Replace cover images by clicking the Thumbnail card and picking a different file.
- Redirects — every time you change a published post's Permalink slug, set up a 301 redirect in Redirects before clicking Update a Post. Otherwise inbound links break.
- Discussions — the Edit form has a per-post Enable / Close / Allow Ratings panel for discussions. Toggle these on a per-post basis without changing your site-wide discussion defaults.
- Trash and Restore — moving a post to Trash from the Edit screen sends it to the Trash tab on the Blog list. Restore from there to bring it back as a Draft.
- Export — the section-actions row on Edit has an Export button that downloads a backup file of the current post state. Useful before big rewrites in case you need to roll back.
- SEO — every post has its own SEO Title, Description, and Canonical URL. Update these from the Edit form whenever you want search engines to see different metadata.
Before you start
- You are signed in to SGEN as an admin with access to the Blog area.
- The post you want to edit already exists. If it does not, you want Add New, not Edit.
- You know which field you intend to change. Reading the post's public URL first sometimes helps spot the typo or fact you wanted to fix.
- If you intend to change the Permalink slug on a published post, decide what the new slug will be and plan to set up a Redirect from the old slug to the new one.
- If you are about to do a big content rewrite, click the Export button at the top of the Edit screen first to download a backup of the current state. You can re-import it from your computer if you decide to roll back.
- If the change is for a Published post that gets a lot of traffic, do the edit in a quiet window — your changes are live the instant you click Update a Post.
Where to go
- Open the left navigation in the SGEN admin.
- Select Blogs → All Blogs. You land on the Blog list at
/sg-admin/blog. - Find the post you want to edit. Use the filter pills (All / Published / Draft / Private / Password Protected / Trash) or the search box if the list is long.
- Hover the row. Row actions appear under the title: View, Edit, Duplicate, Trash, Export.
- Click Edit (or click the post title — same destination).
You land on the Update Blog Post form at /sg-admin/blog/edit/.
Steps to edit a post
1. Open the post on the Blog list
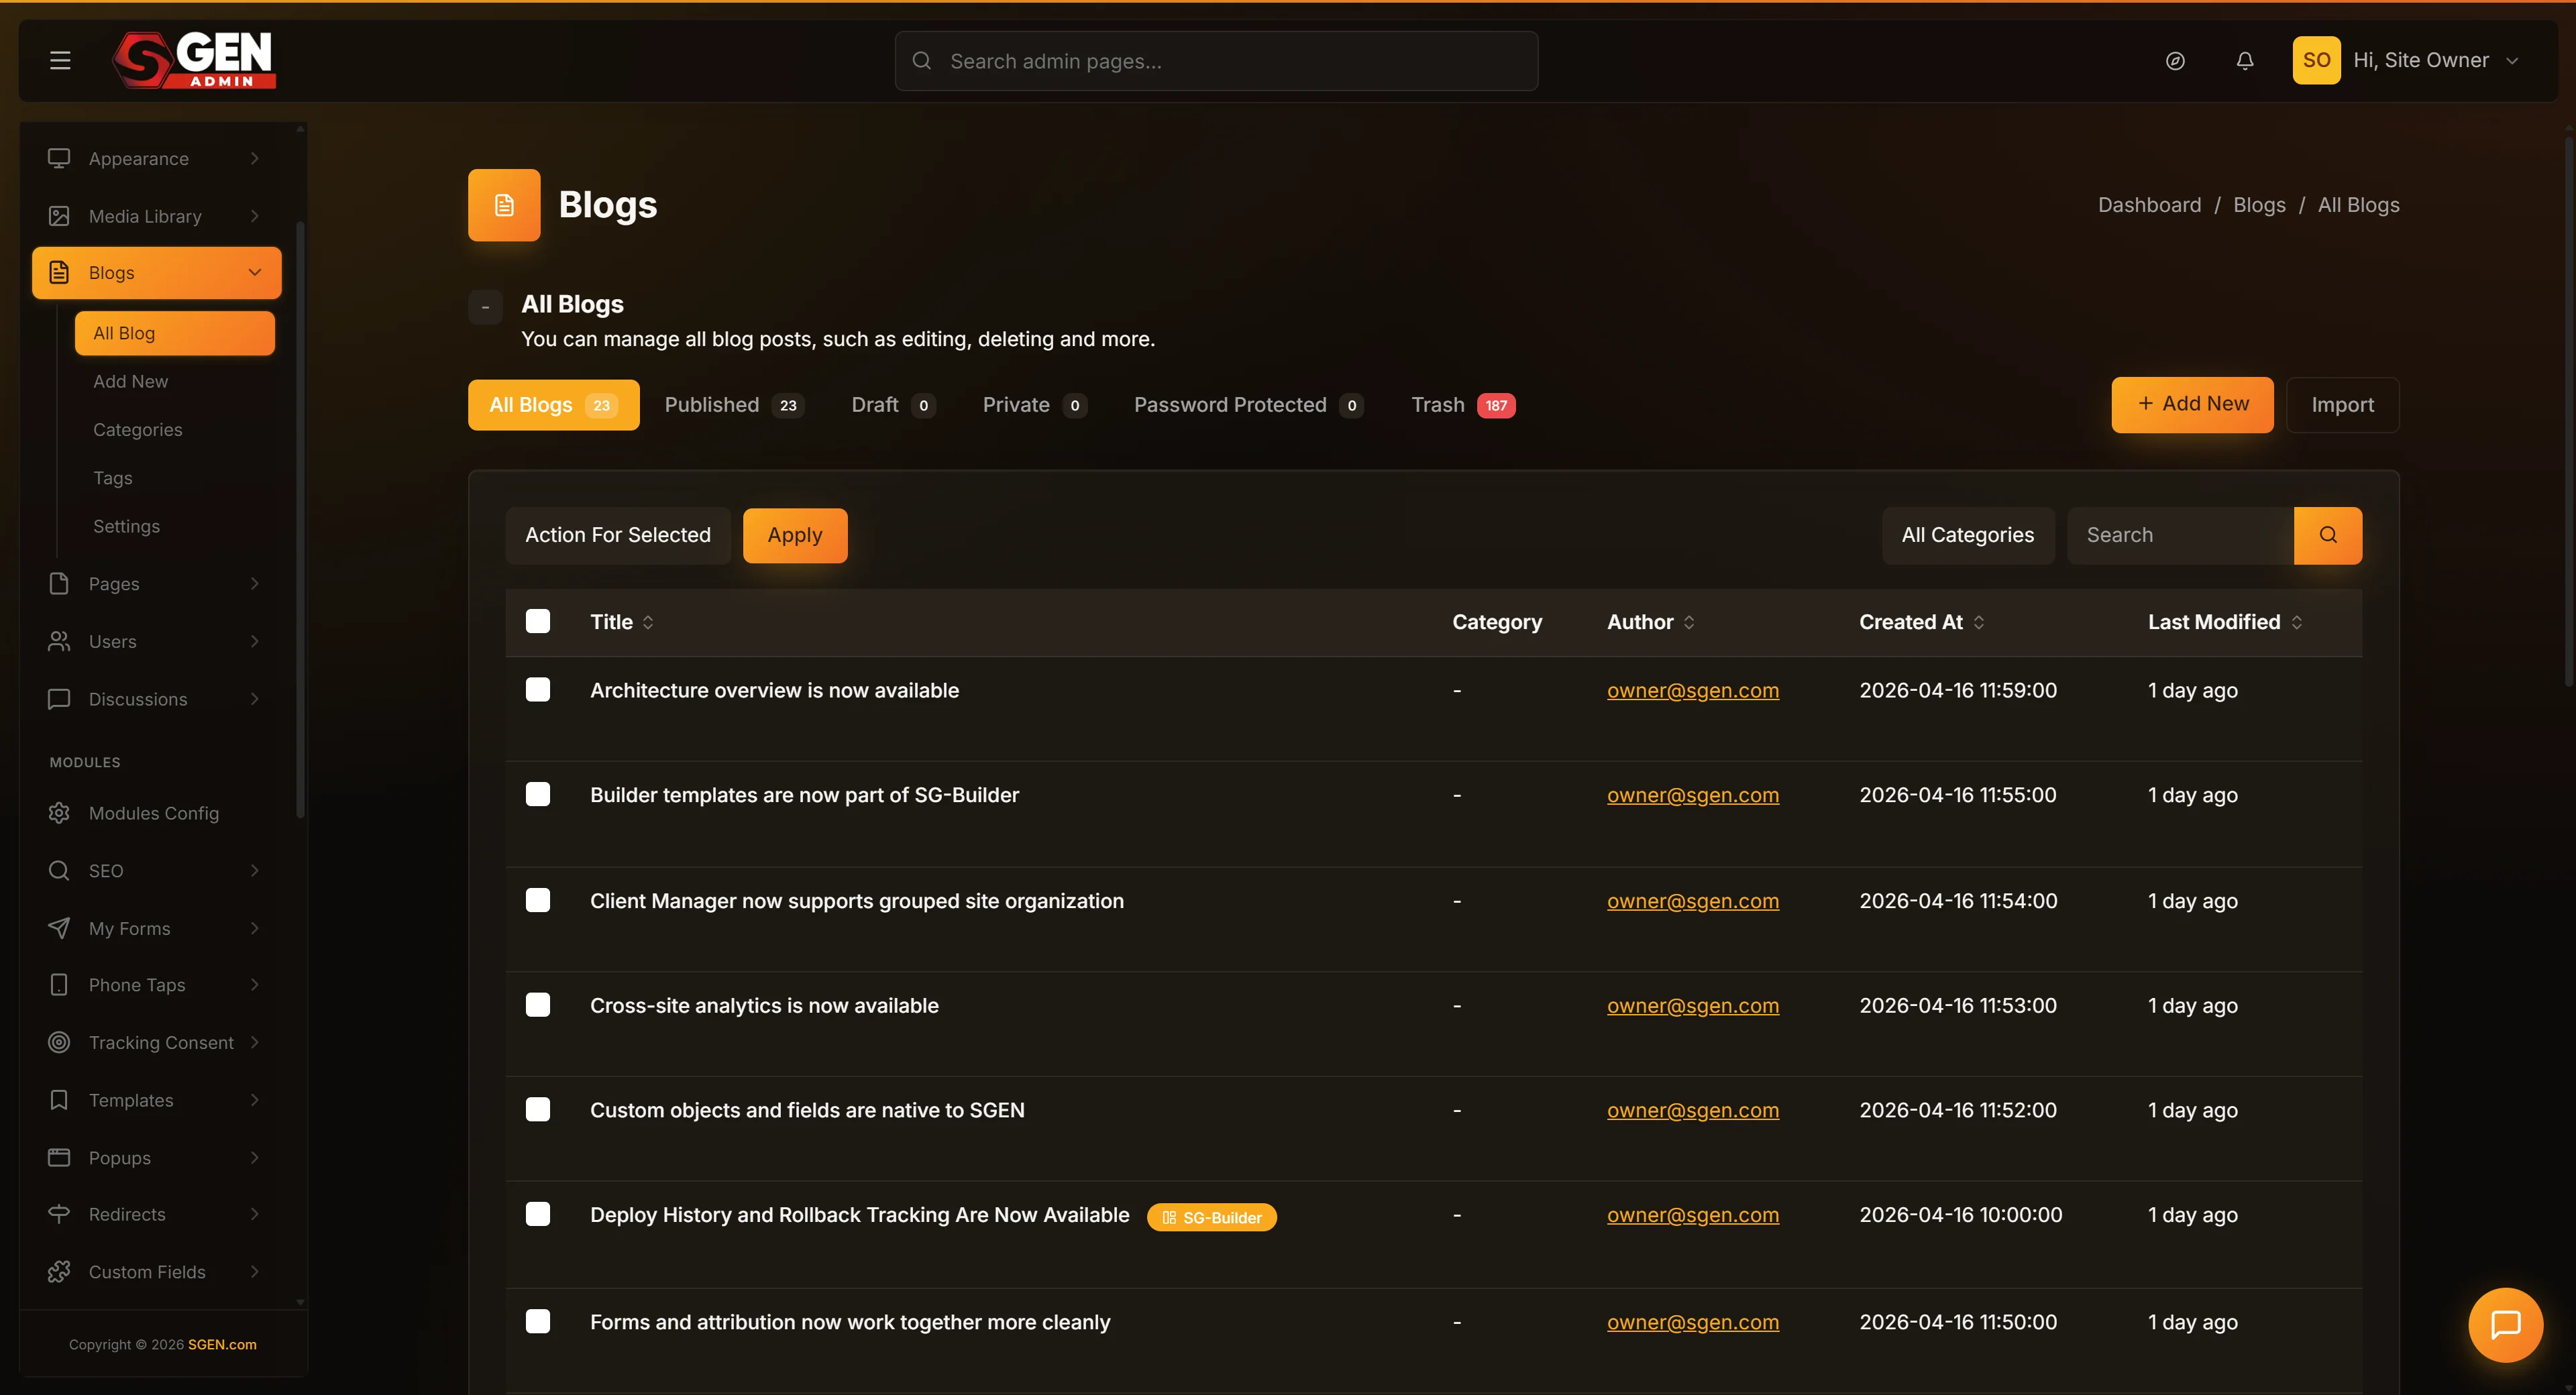
Hover the row of the post you want to edit. Click Edit in the row action strip below the title (or click the title — same effect). The page reloads to the Update Blog Post form.
The page header reads "Update Blog Post." The breadcrumb reads Dashboard → Blogs → Edit. The right sidebar shows an Author / Created / Modified meta block, a Move to Trash link, and a section-actions row above the form with Export and (when revisions exist) View History buttons.
2. Find the field you want to change
The form is the same two-column layout as Add New: left column for the body content (Title, Permalink, Content, Excerpt, Banner, Custom Fields, SEO), right column for metadata (Status, Editor, Thumbnail, Discussions, Categories, Tags). Every field is already filled with the post's current values.
To change Title, click into the Title field. To change Status, click the Status select in the right column. To replace the cover image, click the Thumbnail card. Each field's edit is independent — you can change one without touching the others.
3. Make your change
Type, click, pick. The form fields work like any web form. A few notes specific to Edit:
- Title and Permalink are linked only on Add New. On Edit, changing the Title does NOT auto-update the Permalink. The slug stays at whatever it was. Edit the slug by hand if you want it to match a new title.
- Content edits create a revision snapshot. SGEN saves the prior body content as a revision the moment you click Update a Post. You can view past versions and roll back from the View History button.
- Status changes take effect immediately. Flipping a Published post to Draft hides it instantly. Flipping a Draft to Publish makes it live instantly.
- Thumbnail changes are immediate too. Replacing the cover image swaps it on the blog archive card and on social shares the moment you save.
4. Click Update a Post
The primary red button at the bottom of the right column reads Update a Post. Click it. SGEN saves all your changes, writes a revision snapshot if Content changed, updates any associated metadata (SEO, Banner, Custom Fields), and reloads the Edit screen with a green success flash.
For Published posts, the change is live on the public site by the time the page reloads. Open the post's public URL in a private/incognito window to verify.
What success looks like
When the edit saves successfully:
- The page reloads to the same Edit screen.
- A green success flash appears near the top confirming the save.
- The Modified timestamp in the right sidebar updates to the current time.
- If Content changed, the View History button now shows in the section-actions row (or the revision count increases if it was already there).
- For Published posts, opening the post's public URL in a private/incognito window now shows the new content. Add
?cb=1to the URL to bypass any browser cache and force a fresh fetch.
If you flipped Status from Draft to Publish, the post immediately appears on the public blog archive, on its category and tag archive pages, and on any post-card components that pull from the latest posts.
If you flipped Status from Publish to Draft (or Trash), the public URL stops serving the content, the post drops off the archive, and post-card components no longer surface it.
What to do if it does not work
- Update a Post is greyed out. A required field is empty. The most common culprit is that you accidentally cleared the Categories or Tags picker. Re-assign at least one of each, then click Update.
- You see "404: Data not found" instead of the Edit form. The post ID in the URL does not match any post on this site. This happens if the post was deleted permanently while you had the link open, or if the URL was shared from a different site. Go back to the Blog list and click Edit on a current row.
- Your edit saved but the public site still shows the old content. Browser or upstream cache. Try a private/incognito window or append
?cb=1to the URL to force a fresh fetch. Most caches refresh within a minute or two anyway. - You changed the Permalink and the old URL now 404s. Expected — changing the slug changes the URL. Set up a 301 redirect in Redirects from the old slug to the new to preserve inbound links.
- You meant to update the post but accidentally clicked Move to Trash. Switch to the Trash tab on the Blog list. Hover the row. Click Restore. The post moves back to Draft status (not back to Publish — flip Status manually after restoring). The public URL starts serving the post again.
- The post status select is empty (no option selected). This can happen if the post was originally saved with a Status the form does not currently render (rare). Pick Publish or Draft from the select before clicking Update a Post — otherwise the post may flip to whichever option is first in the list.
- You changed the Editor from Text Editor to SG-Builder and lost your body content. SG-Builder uses a different content storage shape from Text Editor. Switch back to Text Editor (don't save), and your text content should still be there. To safely move from Text to SG-Builder, copy your body text first, switch the Editor, save, and rebuild the layout in SG-Builder, paste the copy into a Text component.
- Your edit went through but the View History button does not show. View History only appears once the post has at least one revision (i.e., once you have edited Content at least once after the initial save). For posts you just created and edited only one time, it shows only after the second save with Content changes.
- The post you opened in Edit is showing a banner you did not set up. A teammate added the banner. Check the Modified timestamp and the View History to see who made the change and when. Coordinate with them before turning the banner off — they may have set it up for a campaign you did not know about.
Example 1: Fixing a price typo
A customer flags that a published post says the wrong price. Open the Blog list, find the post, click Edit. Fix the value in the Content field. Open the SEO block and update the SEO Description if it also mentions the price. Click Update a Post. The page reloads with a green success flash — the corrected price is live on the public URL within seconds.
Example 2: Promoting a draft to live
Click the Draft pill on the Blog list. Find the post. Open Edit. Change Status from Draft to Publish. Click Update a Post. The post is immediately public and appears on the blog archive. There is no approval workflow — any admin can flip the status.
Example 3: Retiring a post with a redirect
Two-step process — redirect first, then trash.
Step A: Go to Redirects → Add New. Set Source to the old post URL, Destination to the replacement URL (e.g. your shop page), Type to 301 (Permanent). Save.
Step B: Open the post in Edit. Click Move to Trash in the right sidebar. Confirm.
Google's next crawl picks up the redirect. Anyone hitting the old link lands on the destination instead of a 404. Always pair a Trash with a Redirect when the URL has any inbound traffic.
Example 4: Switching from Text Editor to SG-Builder
SG-Builder uses a different content storage shape from Text Editor. Switching editors on an existing post requires a safe handoff:
Step A: Open the post in Edit. Click Export in the section-actions row to download a backup.
Step B: Copy the body content to a notepad as a plain-text reference.
Step C: Change the Editor select to SG-Builder. Click Update a Post. The Content area becomes an Edit-with-SG-Builder button.
Step D: Click Edit-with-SG-Builder. Build the new layout in the visual editor. Paste your content into a Text component.
Step E: Click Publish in SG-Builder. The post renders the new layout on the public URL. If anything goes wrong, the Export file from Step A is your rollback.
Example 5: Updating SEO before a press cycle
Open the post in Edit. Scroll to the SEO block. Update the SEO Title and Description. Click Update a Post. Search engines pick up the new metadata on their next crawl. The post URL and body content are unchanged — only the metadata refreshes.
Example 6: Renaming a slug without breaking the URL
Two-step — redirect first, then rename.
Step A: Go to Redirects → Add New. Source: the current (old) post URL. Destination: the new URL. Type: 301. Save.
Step B: Open the post in Edit. Click into the Permalink field. Change the slug. Click Update a Post.
The post now lives at the new URL. Anyone hitting the old URL gets a 301 redirect. No lost link equity.
Example 7: Adding a banner to an existing post
Open the post in Edit. Scroll to the Post Banner collapsible on the left column. Toggle Enable Banner. Fill in the headline, subheadline, CTA button label and URL, and background/text colors. Click Update a Post. The banner appears above the article body on the public post immediately. It is per-post — no other posts are affected. Toggle it off the same way.
Example 8: Closing comments on a single post
Open the post in Edit. Find the Discussions & Reviews card in the right column. Toggle Close discussions (read-only) ON while leaving Enable discussions ON. Click Update a Post. Existing comments remain visible on the public post, but the comment form is hidden and no new replies can be submitted. This is a per-post setting — site-wide discussion defaults are unaffected.
Reading the right-sidebar meta block
When you open Edit, the right sidebar shows a small read-only meta block above Status with three rows:
- Author — who originally created the post. Defaults to whoever clicked Add New. Cannot be changed from Edit (would require a separate admin permission).
- Created — the timestamp when the post was inserted. Set on Add New, never updated by Edit.
- Modified — the timestamp of the most recent Update a Post click. Updates every time you save.
Use the Modified timestamp to know if a teammate edited the post since you last looked. If Modified shows yesterday at 3pm and you saved last week, someone else saved between then and now — open View History to see what changed.
Section-actions row above the form
The Edit screen has a thin section-actions row above the form that does not appear on the Add New form. It can include:
- Export — always shown. Click to download a JSON backup of the current post. Save this file before any big rewrite as a safety net.
- View History — shown only when the post has revisions. Click to open the revisions list for this post. From there you can preview prior versions and restore.
The section-actions row is small but worth scrolling up to before any major edit. Click Export to grab a backup; click View History to see the trail of who-changed-what.
Differences between Edit and Add New (cheat sheet)
| Field / Element | Add New form | Edit form |
|---|---|---|
| Page header | Create Blog Post | Update Blog Post |
| Submit button | Create a Post | Update a Post |
| Right-sidebar meta block | Hidden | Shown (Author / Created / Modified) |
| Move to Trash sidebar link | Hidden | Shown |
| Section-actions row | Hidden | Shown (Export, View History) |
| Title-Permalink link | Title auto-fills slug | Title does NOT auto-update slug |
| Content revision tracking | First save = original | Save with content change = revision snapshot |
Next steps
- Add a brand-new post — see admin.admin_blog.add_new_post.
- Walk through every field on the post form — see admin.admin_blog.manage_post.
- Roll back a content change — open the post in Edit and click View History. See admin.admin_blog.history.
- Set up a Redirect for a renamed post — open Redirects → Add New and pair with the slug change.
- Moderate reader comments — open Discussions in the left navigation.