
Publish Your First Blog Post on SGEN
Publishing a blog post in SGEN takes about ten minutes once you have something to say. This guide walks you through every step — from opening the editor to confirming the post is live on your public site — and covers categories, SEO fields, featured images, and URL slugs along the way.
One editor, all settings
Everything you need — title, content, category, SEO fields, and featured image — lives inside the post editor. No navigating away mid-publish.
SGEN steps take three minutes
Writing the post is the long part. Assigning a category, filling SEO fields, and clicking Publish adds three minutes at most.
Verify in a private window
Your admin session sees the site differently than a visitor does. Always confirm the live post in a private browser window before sharing the link.
What is a blog post for?
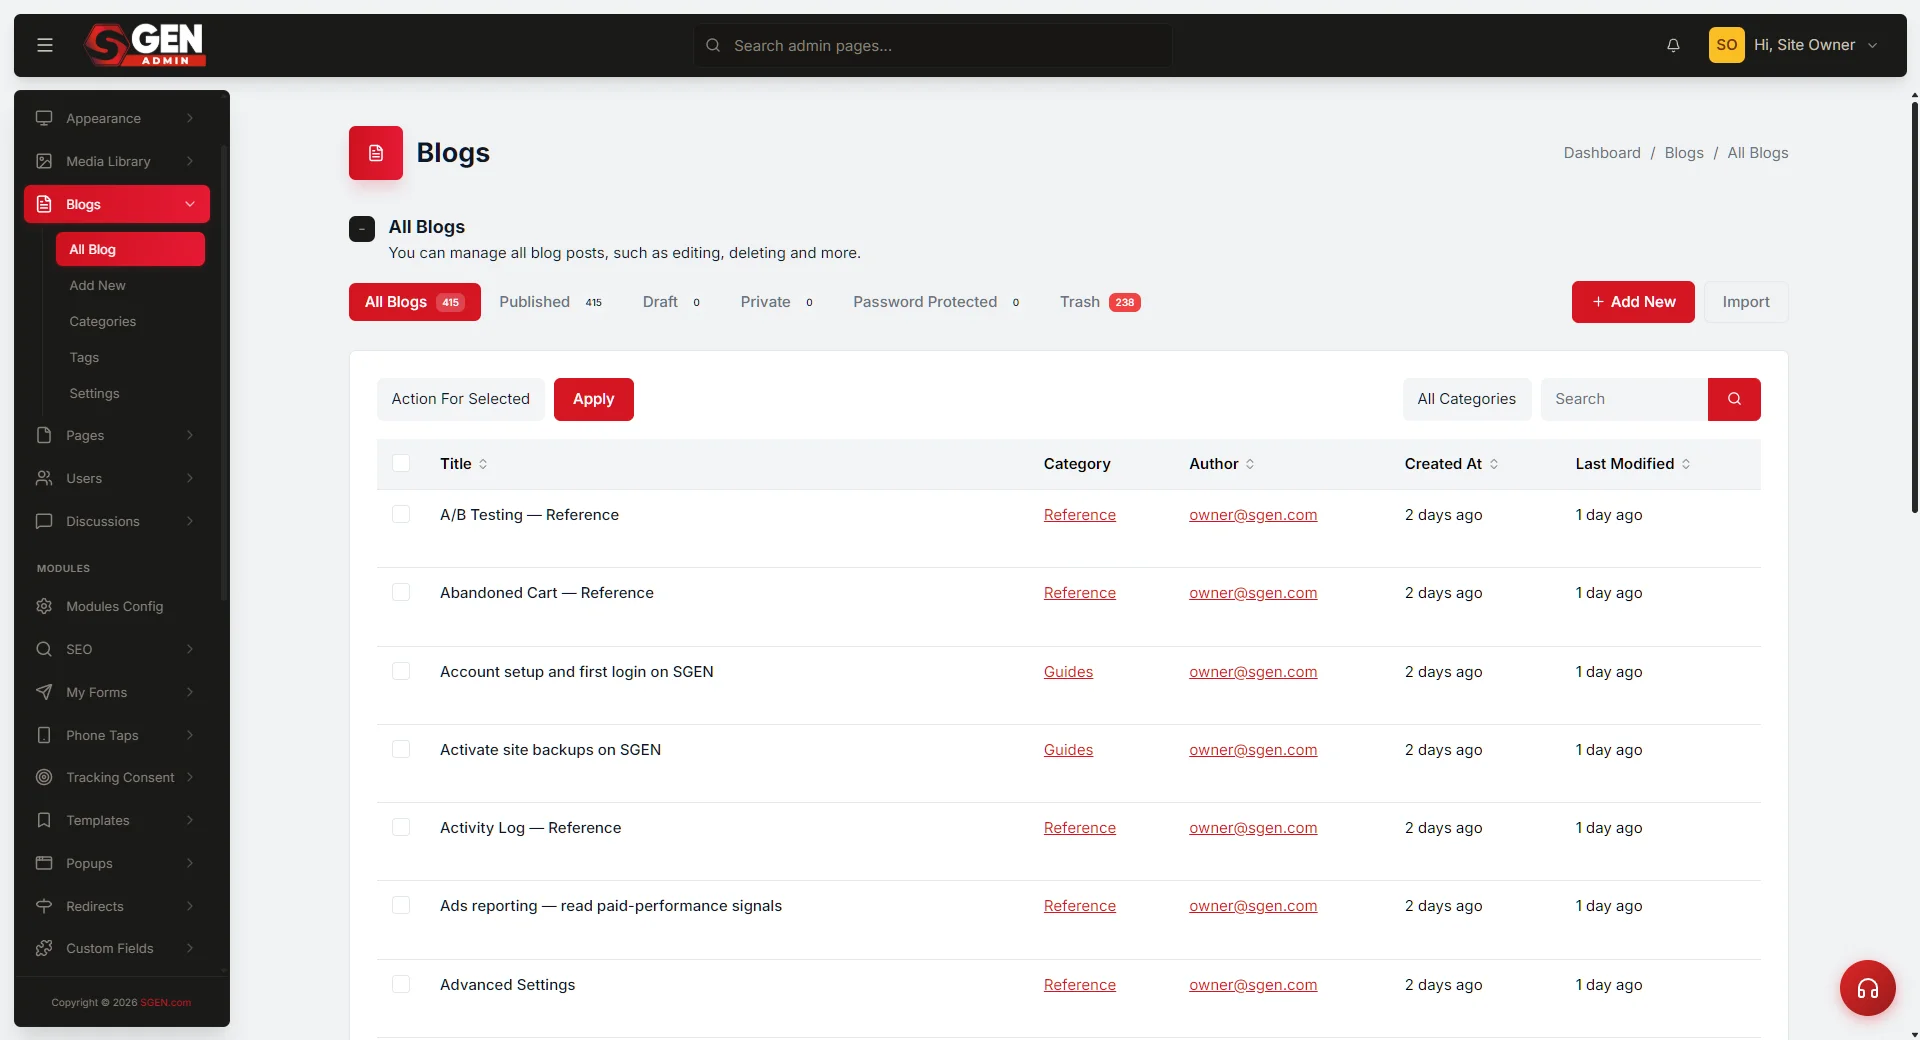
Blog posts in SGEN are dated, reverse-chronological content. They are different from Pages — they have a publication date, appear in your blog feed in order, and can be filtered by category. If you are publishing a news item, a product announcement, a how-to article, or a founder letter, a blog post is the right content type.
Good use cases for a blog post
Blog posts are the right content type in each of these situations.
Updates
Product updates and feature launches
Weekly product updates, feature launch announcements, and press mention recaps are all dated content that accumulates over time in the feed. The publication date tells the story of the platform's timeline.
Guides
How-to articles and evergreen guides
How-to guides — configuring category filtering, setting up shipping zones, inviting team members — are written once and remain useful. Evergreen content works as a blog post when it fits the blog's audience and a publication date does not undermine the content.
Events
Webinars and event announcements
Each event gets a blog post announcing the date, topic, and registration link. The post lives in an Events category. After the event, the post stays live as a record that the session happened.
Voice
Founder letters and team updates
An annual letter to the community — what the year was, where the product is going, what the team is grateful for — is a blog post. Dated, personal, and sitting in a category called From the Team.
What not to use a blog post for
Three things that do not belong in the blog feed.
Permanent navigation destinations
About, Contact, and similar pages are Pages, not Blog Posts. Blog posts live in the feed and are ordered by date. Permanent destinations do not belong in a dated feed.
Frequently-updated reference content
Pricing pages and current product catalogs need to stay current and will be rewritten regularly. Use a Page or Custom Object instead.
Posts with a blank category
Uncategorised posts are hard to find later and do not filter correctly on category pages. Every post should have at least one category assigned before it goes live.
Before you start
Have these four things ready before you open the post editor.
Content
Your post content or outline
The SGEN post editor is a writing environment, not a planning tool. Working from a document or notes rather than writing from scratch in the editor is faster for most people.
Category
Which category the post belongs to
Check your existing categories in Blog then Categories. If none fit, you can create one during the publish flow — this guide covers that step.
Image
Your featured image
A post without a featured image looks incomplete in the feed. Use a relevant photograph, screenshot, or illustration. High-resolution — SGEN will resize it for display but cannot improve a low-resolution original.
Slug
A short, clean URL slug
The editor auto-generates a slug from the title, but auto-generated slugs are often too long. Plan a short, descriptive slug before you start: for "New feature: multi-site analytics now in SG-Dashboard," a good slug is multi-site-analytics-may-2026.
Steps — write and publish your first blog post
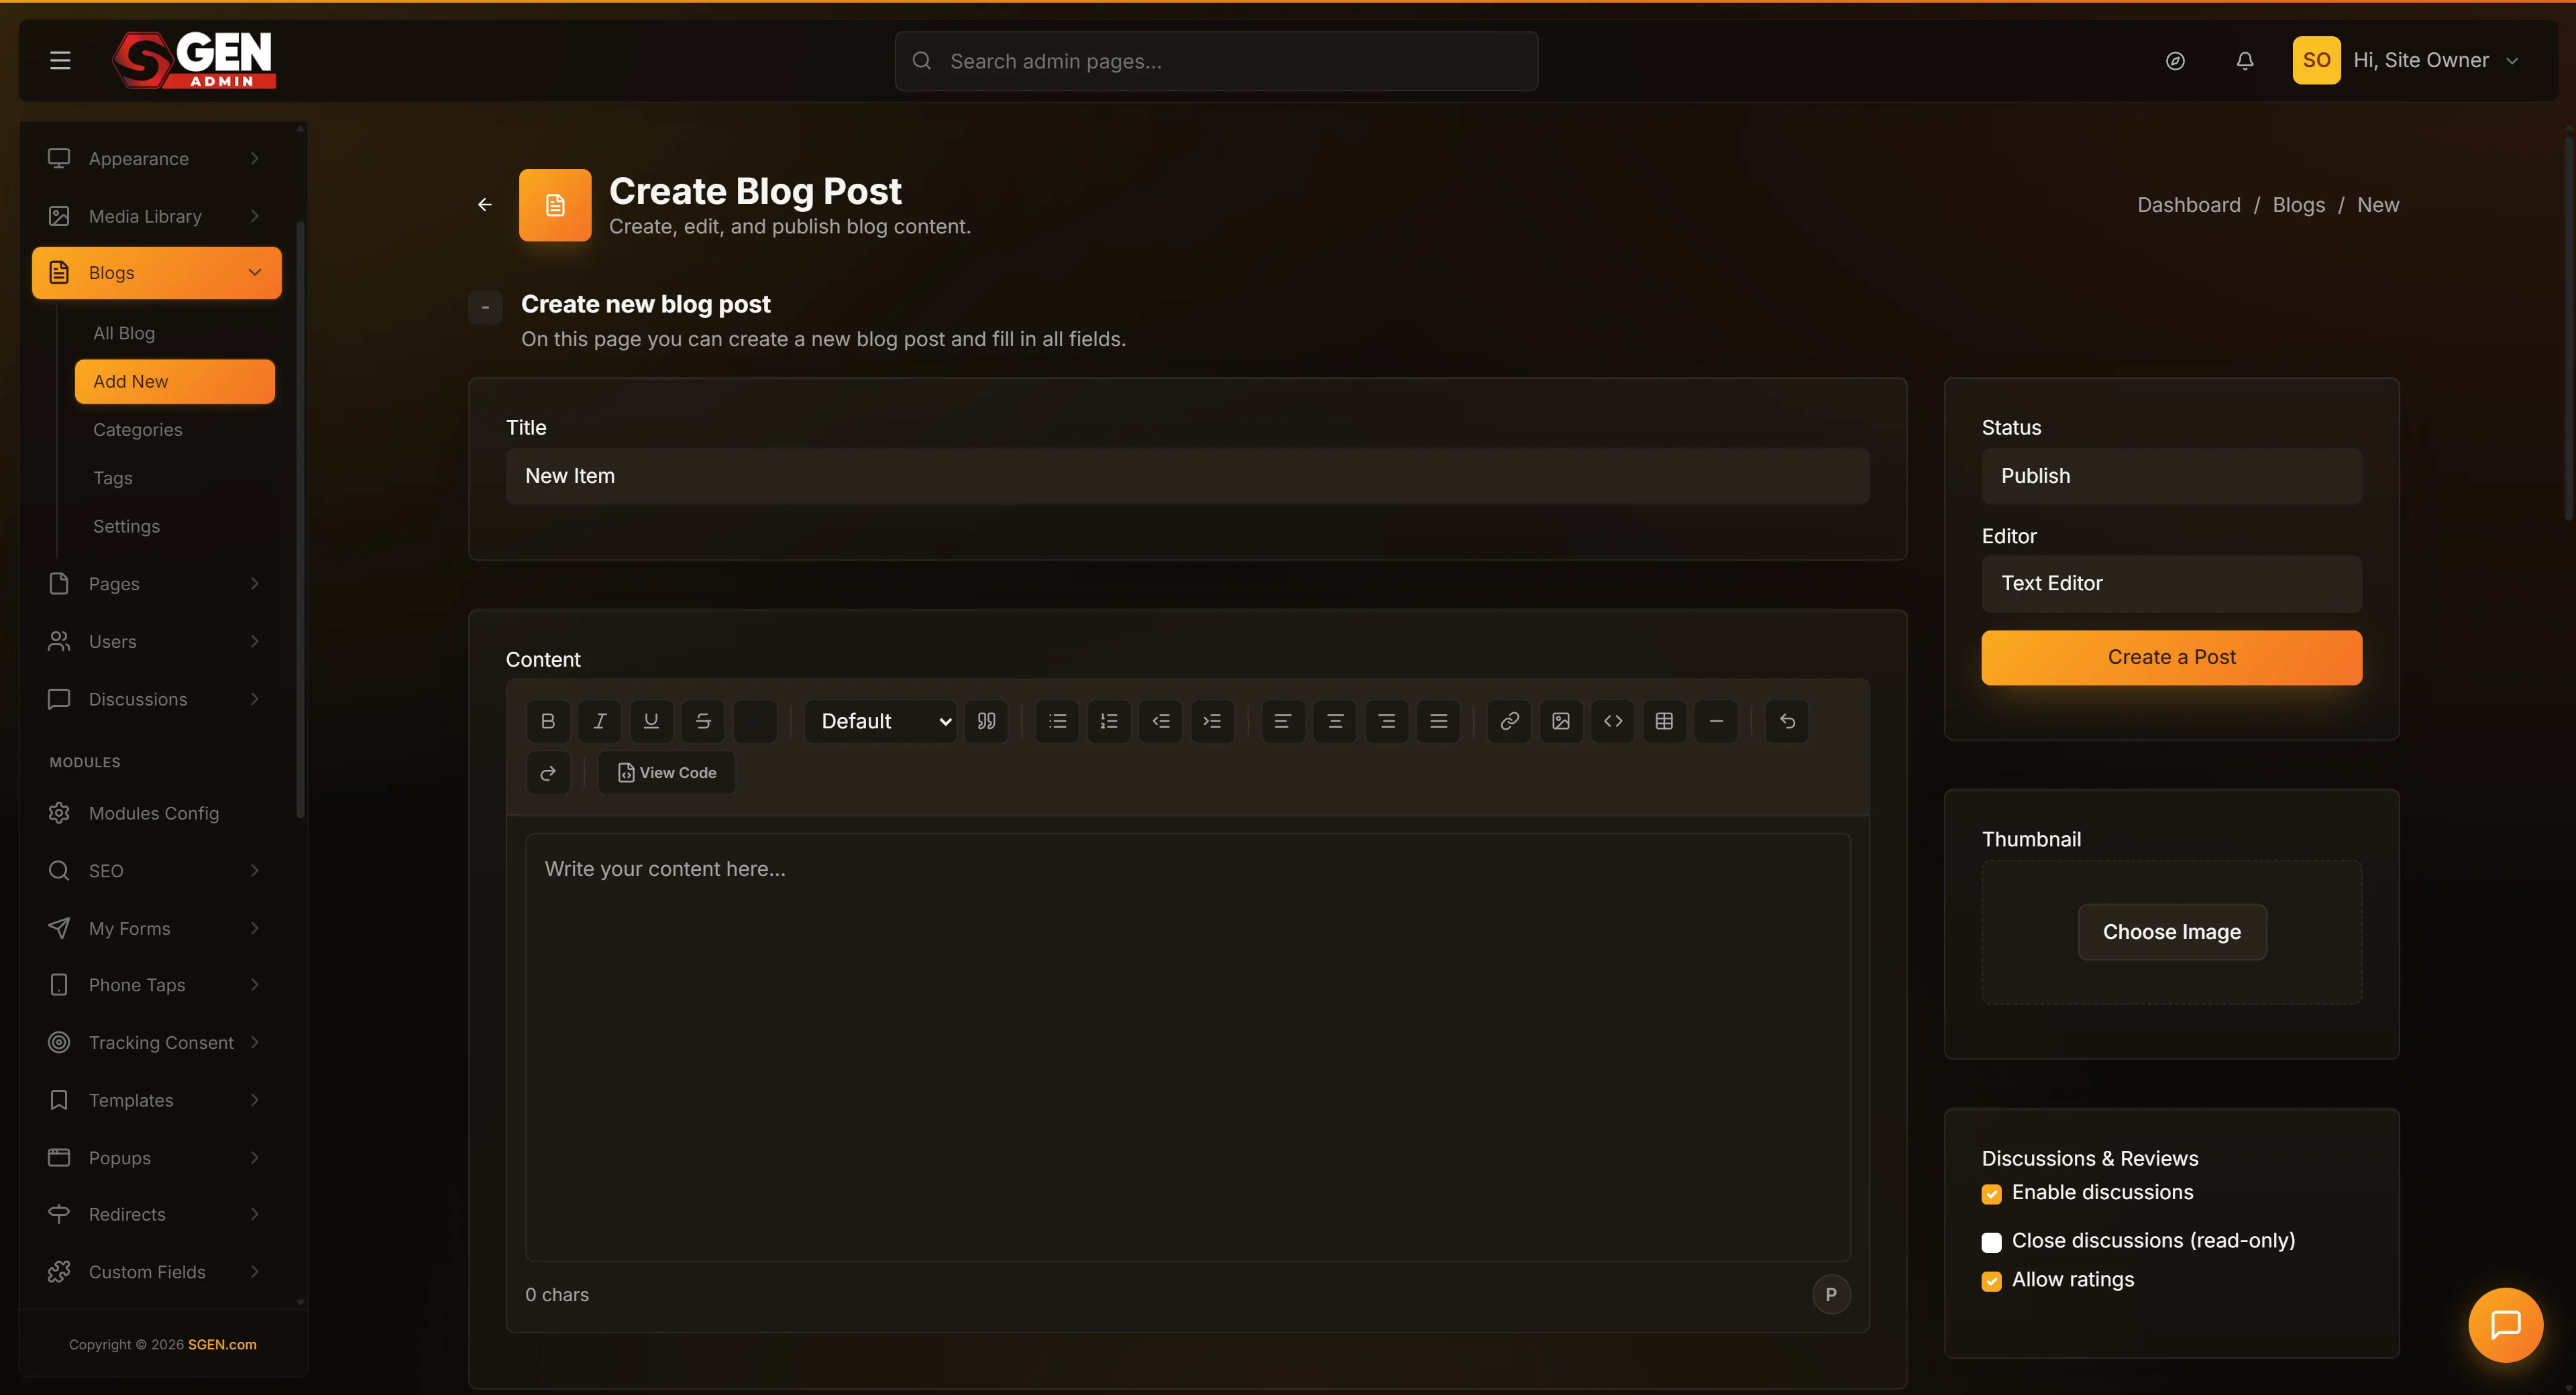
Go to Blog in the left sidebar and click Add New Post to open the editor. Then follow these steps.
1
Open the editor and write your title
In the Post Title field at the top, type the title of your post. Write it for your readers, not for SEO — the SEO Title is a separate field in the sidebar you will fill in later. A good title is specific and honest: "New feature: multi-site analytics now in SG-Dashboard" is better than "New feature!" If you are unsure, write a working title now and refine it before publishing.
2
Write or paste your post content
Click into the Content area and write or paste your post. Use the formatting toolbar to add headings, bold text, bullet lists, or embedded images. If pasting from a Google Doc or Word document, check the formatting after pasting — some formatting from external documents does not translate cleanly to the web editor. Fix any heading levels, broken lists, or extra line breaks before moving on.
3
Assign a category
In the right sidebar, find the Category panel. Check the box next to the category that fits this post. If none of your existing categories fit, click Add New Category, type the name, choose a parent category if needed, and click Add. The new category is immediately available. Every post should have at least one category — posts with no category assigned end up under Uncategorised, which makes them harder to find and filter later.
4
Upload the featured image
In the right sidebar, find the Featured Image panel. Click Set Featured Image. The Media area opens in a modal — upload a new image or select one already uploaded. Choose an image that represents the post's content clearly: a screenshot, illustration, or photograph specific to this post, not a generic filler image. After selecting, click the confirmation button to set it. The image preview appears in the sidebar.
5
Set the URL slug
In the SEO panel in the sidebar (or below the title field), find the URL Slug field. The editor generates a slug from the title automatically — edit it to something shorter and cleaner. For "New feature: multi-site analytics now in SG-Dashboard," a good slug is multi-site-analytics-may-2026. Short slugs are easier to share and perform better in search. Once a post is published and receiving traffic, changing the slug changes the URL — be careful about editing slugs on posts that already have inbound links.
6
Fill in the SEO Title and Meta Description
In the SEO panel in the sidebar, set two fields. SEO Title — write a title for search results, under 60 characters. It can match the post title or be a slightly different version optimised for search. Meta Description — write a one-or-two sentence summary of the post, under 155 characters. Write it so that someone reading it in a search result knows exactly what the post covers and wants to click through. Example: "SGEN's May 2026 release adds cross-site traffic and conversion analytics to SG-Dashboard. Here is what changed and how to use it."
7
Publish and verify on the public site
When the post is complete, the category assigned, the featured image set, the slug clean, and the SEO fields filled in — flip the Status to Published and click Publish. The post is now live. Open a private browser window and navigate to your blog index page. The new post should appear at the top of the feed. Click the post title and read through it as a visitor would. Confirm the title, content, featured image, and category are all correct.
What success looks like
When the post is published correctly, all of these are true.
Post appears at the top of the blog feed
In a private browser window at yoursite.com/blog, the new post is the first item listed, with the correct title, featured image, and category label visible.
Post opens at the slug you set
Clicking the post title opens the full post at the short, clean URL you set — not the auto-generated long slug.
Content and formatting are correct
Headings are the right size, images load, lists are formatted properly, and no draft placeholder text is visible anywhere.
SEO fields are saved
The SEO Title and Meta Description are visible in the page source's <title> and <meta name="description"> tags.
What to do if something goes wrong
Common issues and how to fix them.
Visibility
Post not appearing in the feed
Check that the post Status is Published, not Draft. Also check that the blog index page is configured to show the category you assigned — if the index filters by category and you assigned a different one, the post may not appear.
Image
Featured image not showing
Confirm the featured image was set — the sidebar should show a preview. If it was set but is not rendering, the file may be too large or in an unsupported format. Upload a JPG or PNG version via the Media area and re-assign it as the featured image.
URL
Slug returning a 404
The post may still be in Draft status, or the slug may not have been saved correctly. Open the post in the editor, confirm the slug in the settings panel, confirm the status is Published, save again, and try the URL.
Formatting
Content looks different on the public site
The editor preview does not always match the public site's styling exactly. If headings, fonts, or spacing look significantly off, a custom CSS rule may be affecting your blog post template. Contact your SGEN support team.
Tips for a strong first post
A few habits that make blog posts more effective from the start.
Write for a specific reader
The best posts are written with one reader type in mind — a marketing manager who wants to understand the new analytics, or a developer who needs to configure multi-site access. The more specific the audience in your mind, the more useful the post becomes for that reader.
Use a concrete, specific title
"New feature: multi-site analytics now in SG-Dashboard" outperforms "New feature!" every time. Specific titles give regular readers a reason to click and give search engines meaningful text to index.
Set the featured image before publishing
A post without a featured image is visually incomplete in the feed. Never publish without one — even a screenshot or simple illustration is better than the placeholder that appears when no image is set.
Fill SEO fields on every post
It takes two minutes and the compound effect over dozens of posts is meaningful search visibility you would not have otherwise. Make it a non-negotiable part of your publish checklist.
Heads up Search engines take time to re-index new content. A freshly published post may not appear in search results for several days — this is normal. If the post has been live for more than two weeks and the meta description still does not appear, confirm the SEO fields are saved correctly in the post editor.