
How to define a new product attribute or rename an existing one
⏱ 60-second answer below · full page ≈ 6 min · skim the bold lead-ins to move faster.
In short. A product attribute is the question you ask shoppers when there is more than one option — "What size?" "Which color?" You define it once at the store level and reuse it on every product. This page covers three tasks: creating a new attribute, renaming an existing one, and changing its display type (dropdown vs. radio buttons vs. color swatch). The create form has three fields: Attribute name, Slug, and Display type. Fill them in, click Save attribute, then add values on the next step. That's the core — read on for field reference, examples, and troubleshooting.
On this page: What this is · Scope · Options reference · Steps — Create · Steps — Rename · Examples · Troubleshooting
What is this for?
A product attribute is the label above a dropdown, swatch, or button row on a product page — "Color", "Size", "Material". Attributes are defined once at the store level and attached to as many products as you need.
Define attributes first, then add values inside them. "Size" is the attribute; Small, Medium, Large, and X-Large are the values that go inside it. This page covers the attribute itself. See Manage values inside a product attribute for the values step.
The two most common moments to use this page: launching a new store (set up your variation labels before adding products) and evolving your catalog (add a new attribute when a new product line arrives, rename one for a rebrand, or change the display type based on conversion data).
Why store-level attributes matter. Because attributes live at the store level, storefront filters populate from the same shared list automatically — customers can browse "all Black products" or "all Size: Large products" without you wiring anything per category. Order confirmation emails and sales reports also use the canonical attribute name, so keeping your attribute list clean keeps your operations tidy.
Attributes form a small shared dictionary. "Size" is the entry headword; Small, Medium, Large, and X-Large are the definitions inside it. Every product that needs a Size choice picks from the same shared list. Rename the headword ("Color" → "Colour") and every product that uses it instantly reflects the new wording — because they all reference the same entry by ID, not by copying the text.
Scope
What this covers:
- Creating a brand-new store-level attribute (Color, Size, Material, Style, etc.)
- Renaming an attribute or changing how its slug reads in URLs
- Switching an attribute's display type (dropdown → radio buttons → swatch)
What it does not cover:
- Adding values inside the attribute — that is a separate step after saving. See Manage values inside a product attribute.
- Attaching an attribute to a specific product — done on the product edit screen, Attributes panel.
- One-off product specs used by only one product — type the name directly on that product's edit screen instead of creating a store-wide attribute.
- Categories — "Apparel" vs. "Accessories" is a category, not an attribute.
- Pricing tiers or stock levels — those live on the variant row, not on the attribute.
Options reference
Attribute name — the customer-facing label. Required, 2–50 characters. Use wording your customers recognize ("Size" not "Available size options").
Slug — the URL-safe version (e.g. color). Auto-derived as you type the name; override only when you need a specific URL shape. Minimum 5 characters; lowercase letters, numbers, dashes, and underscores only.
Display type — how customers pick a value on the product page:
| Display type | When to use it |
|---|---|
| Dropdown | Many values (5+), or values that read clearly as text. The default. |
| Radio buttons | 2–4 values; show them all at once. Common for Size, Material. |
| Color swatch | The attribute IS color. Each value needs an associated hex color set on its values entry. |
| Image swatch | Material or pattern attributes where customers benefit from seeing a thumbnail. |
You can change the display type after saving — existing values stay intact.
Naming conventions: pick a consistent casing style across your whole catalog (Title Case or lowercase) and apply it from the start. Mixed conventions — "Size" on one product, "size" on another — create duplicate-looking entries in the storefront filter sidebar. A quarterly attribute hygiene review catches these before they spread.
How this connects to other features
- Attribute values — after saving the attribute, the next step is adding values (Small, Medium, Large for Size). See Manage values inside a product attribute.
- Product edit screen, Attributes panel — where you attach an attribute to a specific product and mark it as a variation axis. See "Add attributes to a product".
- Product variations — once an attribute is attached and marked as a variation axis, SGEN generates one variant per combination (Small/Black, Small/White, Large/Black, …). See "Set up product variations".
- Storefront filters — once attributes exist on products, configure shop listing-page filters. See "Set up shop filters".
- Redirects — if you rename an attribute and its slug changes, add a redirect from the old slug so external links stay live. See Manage site redirects.
- Cache — after a rename or display-type change, clear the site cache (Settings → Cache → Clear site cache) so the storefront rebuilds immediately.
- Order emails and reports — order confirmation emails and sales reports use the attribute name. Renaming updates future sends and next-run reports; prior emails and historical report rows are not retroactively changed.
- Discounts and coupons — coupons scoped to a specific attribute value (e.g. "all Black products") reference the attribute and value by ID. If you delete a value, those coupons stop applying. Clean up coupon rules before deleting attributes or values.
- Product import (Migration) — when you import products via the Migration tool, attribute names from the import file become store-wide attributes automatically. Review the Attributes list after import and rename any inconsistently-cased entries using this guide.
Where to go
Open your admin sidebar and click Ecommerce → Products → Attributes. The Attributes list shows every attribute defined for your store, with the values count and the number of products using each one.
Before you start:
- Confirm you have store admin permission — this panel is not visible to staff with limited roles.
- Decide on attribute names before creating products. Renaming is fully supported, but getting names right upfront avoids slug redirects and cache clears later.
- For product variations to work, you need at least two attributes (e.g. Size and Color). One attribute alone gives you a single dropdown, but it does not generate variants by itself.
- If you plan to use storefront filters, define attributes first — the filter UI reads from your store-wide attribute list automatically.
- Pick the right display type upfront. You can change it later, but choosing correctly from the start saves a cache-clear cycle.
Steps — Create a new attribute
1. Open the new-attribute form
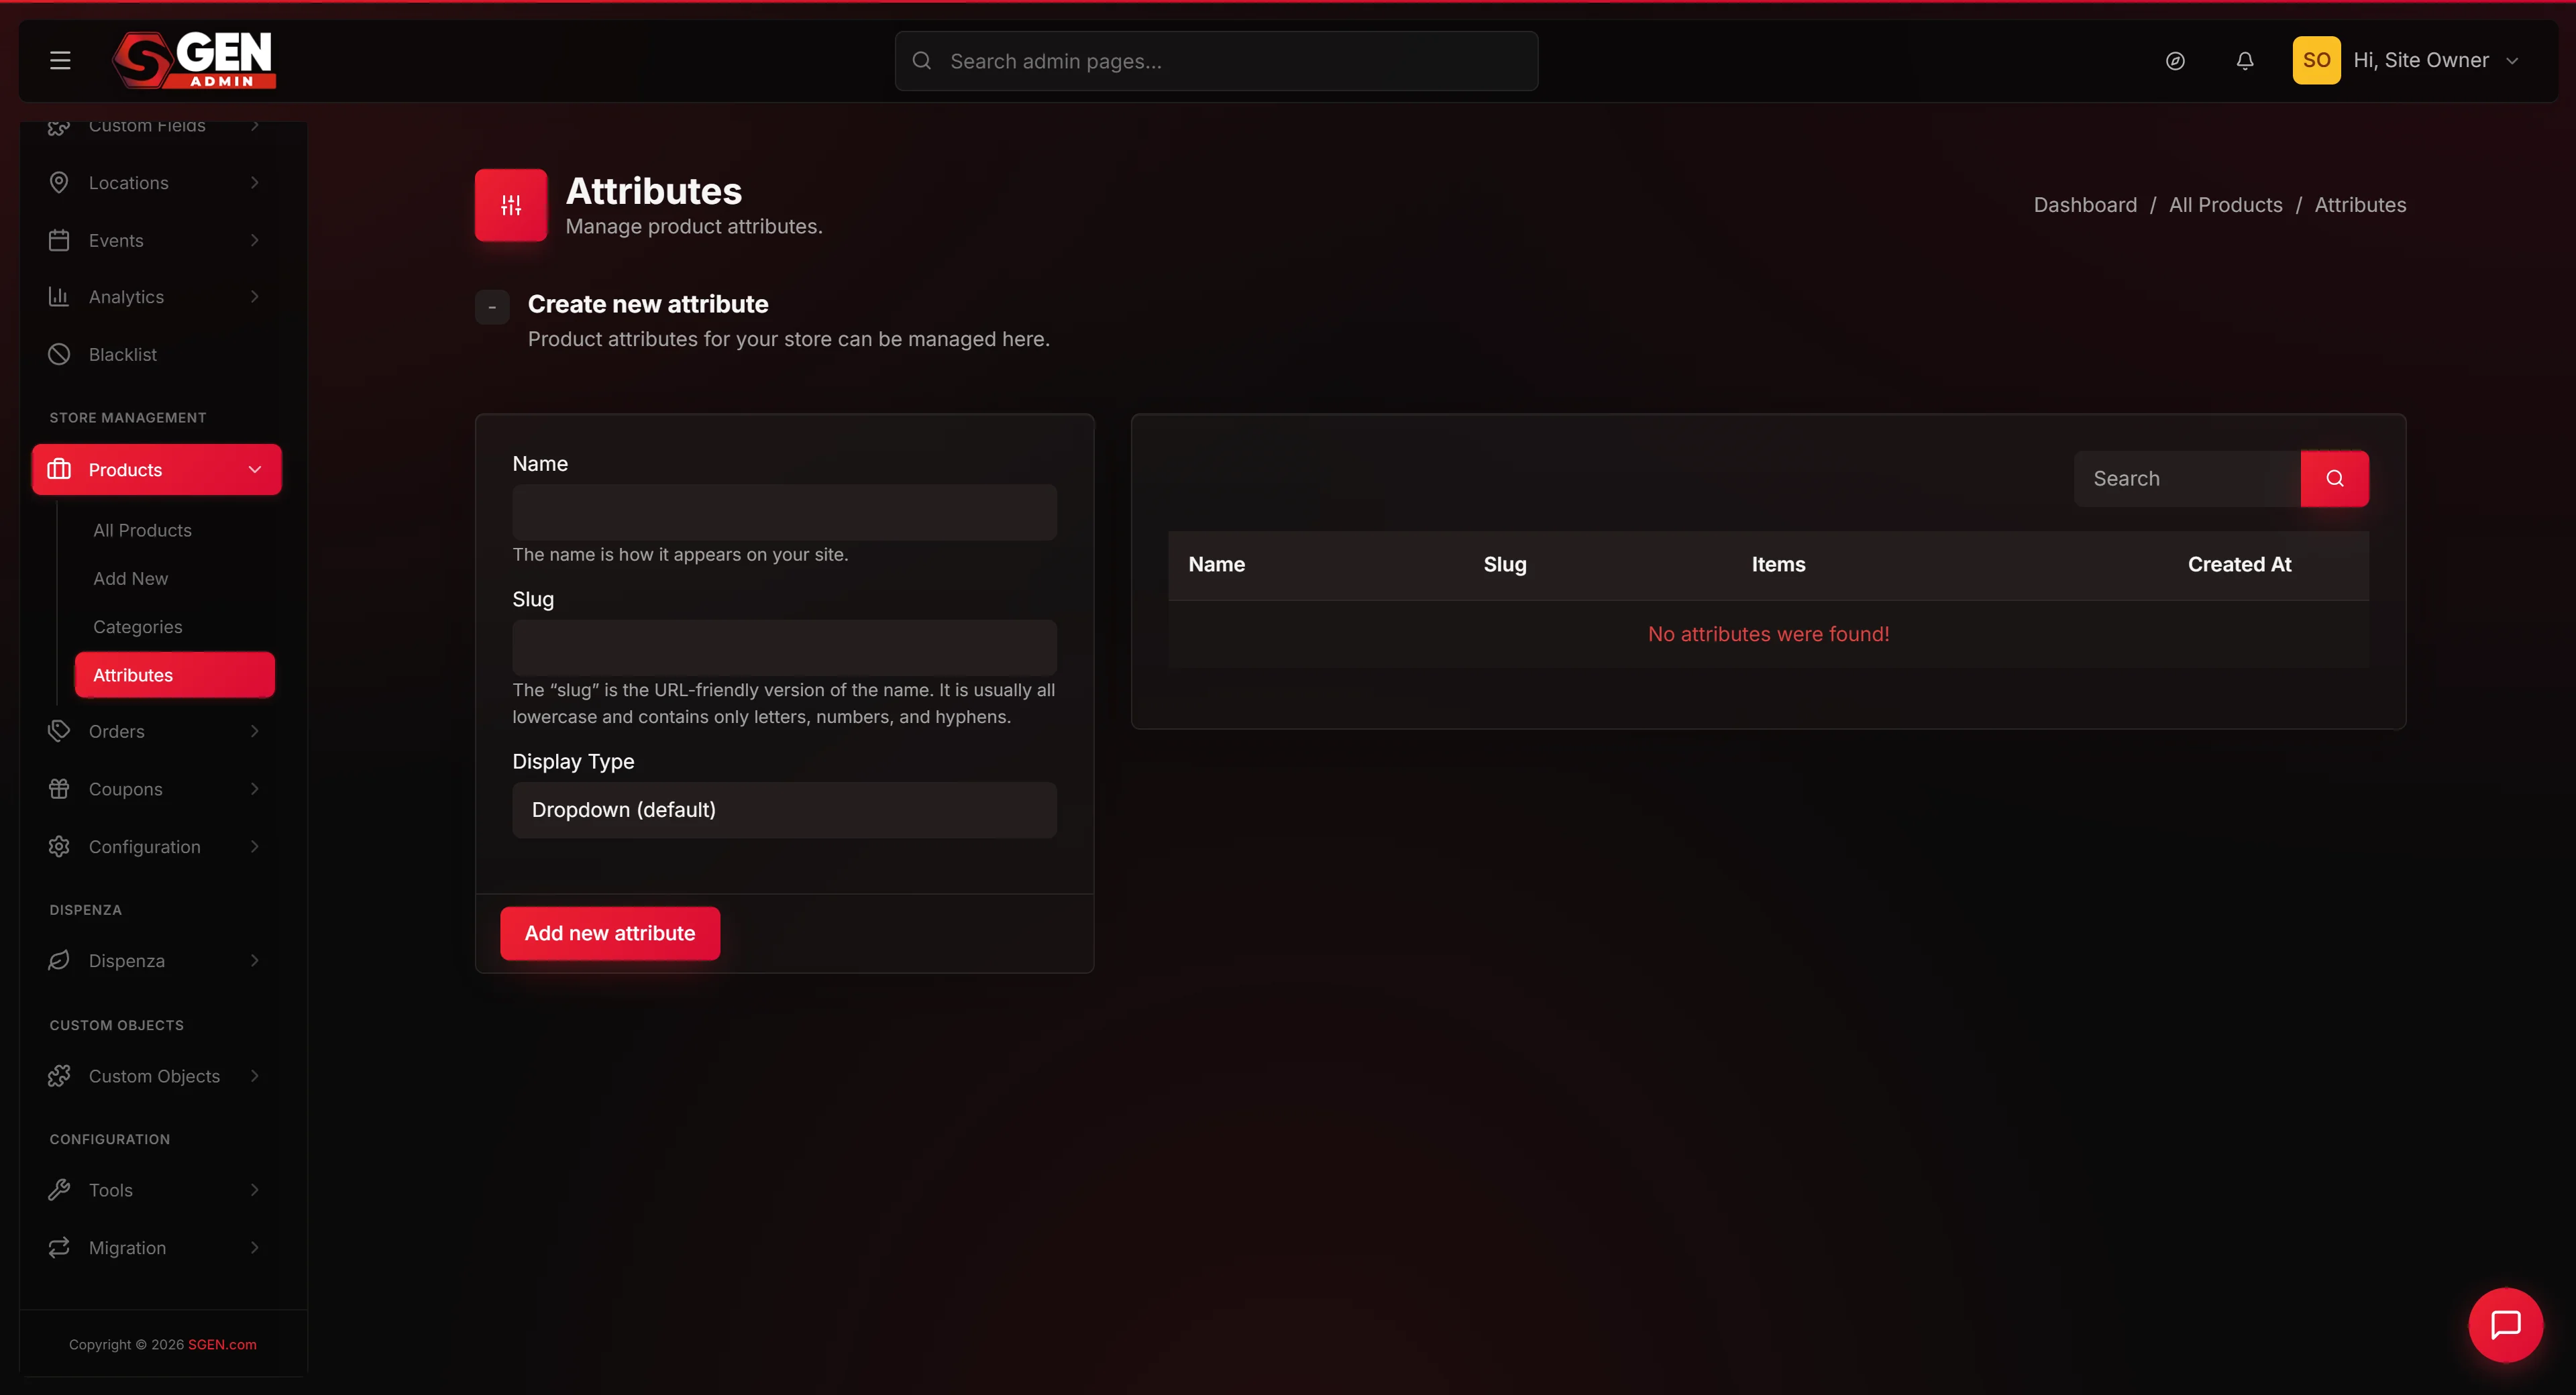
From the Attributes list page, click Add new attribute. A form opens inline with three fields: Attribute name, Slug (URL-safe), and Display type. No row is created until you click Save.
If you are setting up a brand-new store you will see an empty list:
2. Fill in the attribute name
Type the customer-facing label. Keep it short (2–50 characters) and use wording your customers use. The slug pre-fills automatically as you type.
A naming tip: keep it short and concrete. "Size" beats "Available size options" — long labels look cluttered in the storefront filter sidebar. Capitalize the first letter for a tidy list view.
3. Optionally set a custom slug
The slug auto-fills (e.g. "Material" → material). Leave it as-is in nearly all cases. Only override it if you need a specific URL shape. The slug must be at least 5 characters — if your attribute name is very short (like "Mfg"), the auto-derived slug may fail this check; type a longer slug yourself (e.g. manufacturer).
4. Pick a display type
Choose how customers will pick a value. See the Options reference table above. You can change the display type later without losing existing values.
5. Click Save attribute
The form closes and you return to the Attributes list. A green success banner reads "Attribute has been successfully created!" The new row appears with 0 values and no products yet.
Next: click the new row and add values. Without values the attribute is an empty label — customers cannot pick anything on a product that uses it.
Steps — Rename or update an existing attribute
1. Click the attribute row in the list
Open Ecommerce → Products → Attributes and click the row you want to edit. The same form opens, pre-filled with the current values.
2. Change the name, slug, or display type
Update whichever fields you need. Renaming is safe — the system tracks the attribute by an internal ID, not by name or slug. Every product variation stays working; only the customer-facing label changes. If the slug was auto-derived, it updates to match the new name; a custom slug is preserved.
Check that no marketing emails or published links rely on the old slug before renaming — if the slug changes, set up a redirect afterward.
3. Click Save attribute
A green banner reads "Attribute has been successfully updated!" The new label and display type are live across the store immediately. If caching is on, clear the site cache for an immediate storefront refresh.
What success looks like
After a successful save:
A complete setup has four things in place: the attribute exists in the list, the values are populated, at least one product is attached, and the storefront product page renders the customer-facing control.
Verify by opening a product page in an incognito window — if the dropdown or swatches appear and Add to cart reflects variant pricing, the setup is complete. If any piece is missing, the storefront shows a partial result: for example, the attribute exists but no dropdown appears on the product page (values are missing or the attribute is not attached to that product).
Examples
Example 1 — Setting up attributes for a new store. Open Ecommerce → Products → Attributes. Click Add new attribute, type "Color", leave the slug as color, leave Display type as Dropdown, click Save attribute. Repeat for Size (Radio buttons) and Material (Dropdown). Then open each attribute's Values tab and add the values. After values are in, open any apparel product, open the Attributes accordion, attach Color and Size as variation axes — the system generates one variant per combination.
Example 2 — Renaming after a rebrand. Your store rebrands "Fabric Type" to "Material". Click the "Fabric Type" row, change the name to "Material", click Save attribute. The slug auto-updates to material. Visit the product page — the dropdown now reads "Material" with all values intact. Add a redirect from the old slug in the Redirects panel so marketing-email links still land correctly.
Example 3 — Switching display type. Conversion data shows customers rarely open the Size dropdown. Click the Size row, change Display type to Radio buttons, click Save attribute. The four sizes now display as clickable buttons. If the storefront still shows a dropdown, clear the site cache — the old layout was cached.
Example 4 — Cleaning up after a CSV import. A supplier spreadsheet creates "size", "Size", "Size ", and "SIZE" as four separate attributes. Pick the canonical one ("Size"), rename the others to placeholder names ("Size Legacy 2", etc.), copy their values to the canonical attribute via the Bulk add textarea, re-attach the canonical attribute on each affected product, then delete the now-empty duplicates via the row's three-dot menu.
Example 5 — Seasonal attribute (park and reattach). A store adds a "Gift Wrap" attribute (Radio buttons; values: None, Standard, Premium) for the holiday catalog. After the season ends, they detach the attribute from those products — the attribute stays defined for next year. "Park-then-reattach" is the normal pattern for seasonal options.
Example 6 — Adding a new variation axis mid-catalog. Six months after launch, a store starts offering fitted options. They create "Fit" (Dropdown; values: Slim, Regular, Relaxed, Oversized) and attach it to every apparel product. The system adds Fit to each product's variant matrix, multiplying the existing variants. Fulfillment benefits from having consistent fit labels across the whole catalog.
What to do if it does not work
Form validation errors:
- "The Attribute Name field is required" — the Name field was blank. Fill it in and retry.
- "Must be at least 2 characters" — the name was a single letter. Use 2 or more.
- "Slug field must be at least 5 characters" with slug left blank — the attribute name is too short to auto-derive a 5-char slug. Type a longer slug yourself (e.g.
origin-typeinstead oforg). - "Slug field may only contain alpha-numeric characters, underscores, and dashes" — the slug had spaces or punctuation. Leave the slug blank and let the system derive it, or type only A-Z, a-z, 0-9, dashes, and underscores.
- Save button greyed out — there are unsaved validation errors. Look for red text under any field and fix the highlighted issue; the button enables once validation passes.
After saving:
- Save succeeded but the attribute does not appear on the product edit screen — hard-refresh the product edit page (Ctrl+Shift+R / Cmd+Shift+R). The attributes dropdown caches briefly.
- Two attributes with the same name — the create form does not block duplicates. Delete the duplicate row via its three-dot menu.
- "Please try again later!" — a temporary database error. Wait a minute and retry. If it persists, contact support with the time and the attribute name.
- Old label still showing on the storefront after a rename — the storefront page is cached. Clear the site cache (Settings → Cache → Clear site cache).
- Page redirected back to login — admin session expired. Log in again and retry.
- Color swatches showing as grey blanks — every value needs a hex color set on its values entry before the swatch fills in.
- Attributes panel not visible in the sidebar — your role may not include Ecommerce permissions. Ask the store owner to upgrade your role to admin.
- Variants missing after attaching an attribute — open the Variations panel on the product and click Generate variants.
- An attribute disappeared from a product — someone may have detached it. Open the product edit screen, open the Attributes accordion, and re-attach the attribute.
- Storefront filters not showing the attribute — confirm the attribute has values and is attached to at least one published product. The filter sidebar only lists attributes that are in active use on published products.
Steps — Delete an attribute
Before deleting: check the "Used by" count on the attribute row. That number is the size of the cleanup task that follows. An attribute with 0 products is safe to remove immediately. An attribute used by 6–20 products requires a cleanup window; more than 20 products — consider migrating products to a replacement attribute first.
1. Open Ecommerce → Products → Attributes
Find the row for the attribute you want to remove. Note the Used by count and write down the product names that will need cleanup afterward.
2. Click Delete on the row
A confirmation modal appears warning that this action removes the attribute permanently and that products using it may show broken variation pickers until cleaned up.
If you have any doubt about which attribute is selected, click Cancel and re-check the row.
3. Confirm — click Delete attribute
A success banner briefly appears and the row is removed from the list. Reload the page and confirm the row is gone — the "All Attributes" count should drop by 1.
4. Clean up products that used the attribute
For each product that referenced the now-deleted attribute:
- Open the product's edit page.
- Go to the Variations tab.
- Remove any variation rows showing an empty or orphaned attribute name.
- If the product should remain variable, rebuild its variations against a replacement attribute. If it should now be simple, switch its product type to Simple.
- Save and verify on the public storefront that the picker renders correctly.
Skipping this step leaves broken variant dropdowns visible to shoppers. The breakage is not loud but shoppers notice and leave.
What NOT to use Delete for:
- Fixing a typo in the name — use Edit to rename in place; this preserves all product references.
- Temporarily hiding an attribute — there is no soft-delete. Remove it from individual product variation tables instead.
- Resetting values — if you want to keep the attribute but remove some values, use the per-value delete inside the attribute's values screen.
- Peak traffic windows — do the deletion and product cleanup during a low-traffic window.
Next steps
After the attribute is saved, these are the natural follow-on tasks in order:
- Add values to your attribute — the immediate next step. The attribute is an empty label until values are inside it. Add them on the attribute's Values tab.
- Attach the attribute to a product — open the product's edit screen, open the Attributes accordion, and attach the attribute. Mark it as a variation axis if you want the system to generate variants per combination.
- Set up product variations — once an attribute is attached and marked as a variation axis, the system generates one variant per combination (e.g. Small/Black, Small/White). Set per-variant prices and stock in the variants table.
- Configure variant pricing and stock — after variants exist, set per-variant prices and per-variant stock levels. See "Set per-variant prices and stock".
- Set up category filters — once attributes are on products, configure the shop listing page to let customers filter by Size, Color, etc. See "Set up shop filters".
- Add redirects after a rename — if the slug changed, add a redirect so external links land correctly. See "Manage site redirects".
- Remove a product attribute — when you need to clean up an attribute you no longer use.
- Attribute hygiene pass — after large imports or seasonal pushes, review the Attributes list for duplicates, unused entries, or inconsistent naming. A quarterly review keeps storefront filters tidy.
Full detail on managing values inside an attribute: Manage values inside a product attribute.