
Configure how visitors comment on your site
⏱ 60-second answer below · full page ≈ 8 min · skim the bold lead-ins to move faster.
In short. Discussions Settings is the single page that controls how visitors talk back to your site — which post types accept comments, who must log in, whether new comments need approval, how deep replies nest, and whether star ratings are enabled. A fresh site has every scope off by default, so nothing appears until you turn it on. Configure once at launch; revisit only when your policy changes.
On this page: What this page controls · Where to go · Steps · Use cases · Troubleshooting · How it connects
How to configure comments and reviews on your site
What is this for?
Discussions Settings is the single page where you decide how visitors talk back to your site. Comments on blog posts, star ratings on products, replies between visitors, who must log in before they can join — all of that lives here, behind one Save button.
Most sites configure this once at launch and rarely revisit it. But the defaults matter: a fresh site arrives with all scopes off, so even a published blog post accepts no comments until you turn Blog on.
The page has six cards, each controlling one aspect of the conversation experience. You don't need to use every card — most sites enable one or two scopes (typically Blog, optionally Ecommerce) and leave the rest alone.
One important distinction: Discussions and Reviews are separate. A site might want comments on blog posts and star ratings on products but nothing on events. The Discussion Scope card is for comments; the Reviews & Ratings card is for star ratings. Once you understand that separation, the rest of the page falls into place.
Use cases
| Goal | Settings to change |
|---|---|
| Blog comments, moderated | Discussion Scope → Blog ON · Auto-approve OFF · Avatar: Initials |
| Blog comments, open flow | Discussion Scope → Blog ON · Auto-approve ON · Avatar: Initials |
| Product star reviews with spam protection | Reviews & Ratings → Ecommerce ON · Spam Protection ON (requires reCAPTCHA keys in Integrations) |
| Members-only commenting | Comments visibility → Login required |
| Privacy-respecting setup | Avatar mode → Initials or None (Gravatar sends email hashes to a third party) |
| Tame deep threads | Reply depth → 3 |
| B2B catalog (no comments anywhere) | All scopes OFF |
What NOT to use this for
- Don't use this page to disable comments on one specific post. That's a per-post setting inside the post's edit page (Discussions panel). This page sets the global default for an entire post type.
- Don't expect this to delete existing approved comments. Turning a scope off stops new submissions and hides the form, but approved comments stay in the database. Remove them from the moderation queue.
- Don't use Auto-approve on a public site without anti-spam measures. Auto-approve with no reCAPTCHA and no login requirement is an open invitation to bots.
- Don't set Reply depth to 5 with no pagination on high-traffic posts. Deep nesting on a single page grows load time fast.
- Don't enable Gravatar avatars without checking your privacy policy. Gravatar hashes commenter emails and sends them to gravatar.com on every page render — a third-party data flow that may need disclosure under GDPR. Initials and None modes have no such concern.
- Don't expect the Spam Protection toggle to work without configuring keys first. The toggle switches the feature on; the Google API keys live in Integrations and must be saved there separately.
How this connects to other features
- Discussions index (moderation queue) — once comments are enabled here, new submissions land at Dashboard → Discussions where you approve, reply, or delete them. Settings here determine whether submissions arrive pending or approved.
- Per-post overrides — every blog post, event, product, and custom-object record has its own Discussions panel. Use it to close comments on one specific post without touching the global setting.
- Custom Objects — if you've defined custom object types, the Custom objects checkbox lets you opt those types into discussions and reviews. The multi-select underneath lists every custom type you've defined.
- Integrations → Google reCAPTCHA — the Spam Protection toggle only switches reCAPTCHA on or off. Configure the Google API keys in Integrations; then use this page to enable or disable protection for review submissions.
- Email integrations — "Notify on reply" only fires emails if your site's outbound email is correctly configured. If nobody receives reply notifications, check Email Integrations.
- User accounts — when Comments visibility is set to Login required, only registered site users can comment. Manage user accounts under Dashboard → Users.
- Public site rendering — your published theme controls where the comment list and form appear on each post page. If your theme doesn't include a comment block in its blog template, enabled discussions settings won't render anything visible.
Before you start
- Your changes are immediate and global. When you click Save Changes, every matching post on your site picks up the new settings on its next page render. Flipping comments on across a 500-post blog at launch is fine; turning them off on an active community without warning is jarring for visitors mid-conversation.
- A fresh site has all post-type toggles OFF. No comment form appears on the public site until you turn on at least one Discussion Scope checkbox.
- "All post types" is mutually exclusive with the per-type checkboxes. Checking "All post types" greys out Blog / Events / Ecommerce / Custom — they're implied. To enable Blog only, leave "All post types" unchecked and check just Blog.
- Reviews and Discussions are separate scopes. Discussion Scope → Blog allows comments on blog posts. To allow star ratings on blog posts, also enable Reviews & Ratings → Blog. They're independent.
- The Save button is a sticky right rail. It floats while you scroll through the six cards.
- Module gating affects what you see. If your site doesn't have Events installed, the Events row won't appear. If you expected to see a row and don't, check whether that module is enabled for your tenant.
- The page submits as a single Save Changes click. Changes across all six cards apply atomically. Navigating away without saving discards all changes.
- Settings here interact with per-post overrides. This page sets the default. A post with "Closed for comments" checked at the post level refuses comments even if the global scope is ON.
Where to go
Dashboard → Discussions → Settings.
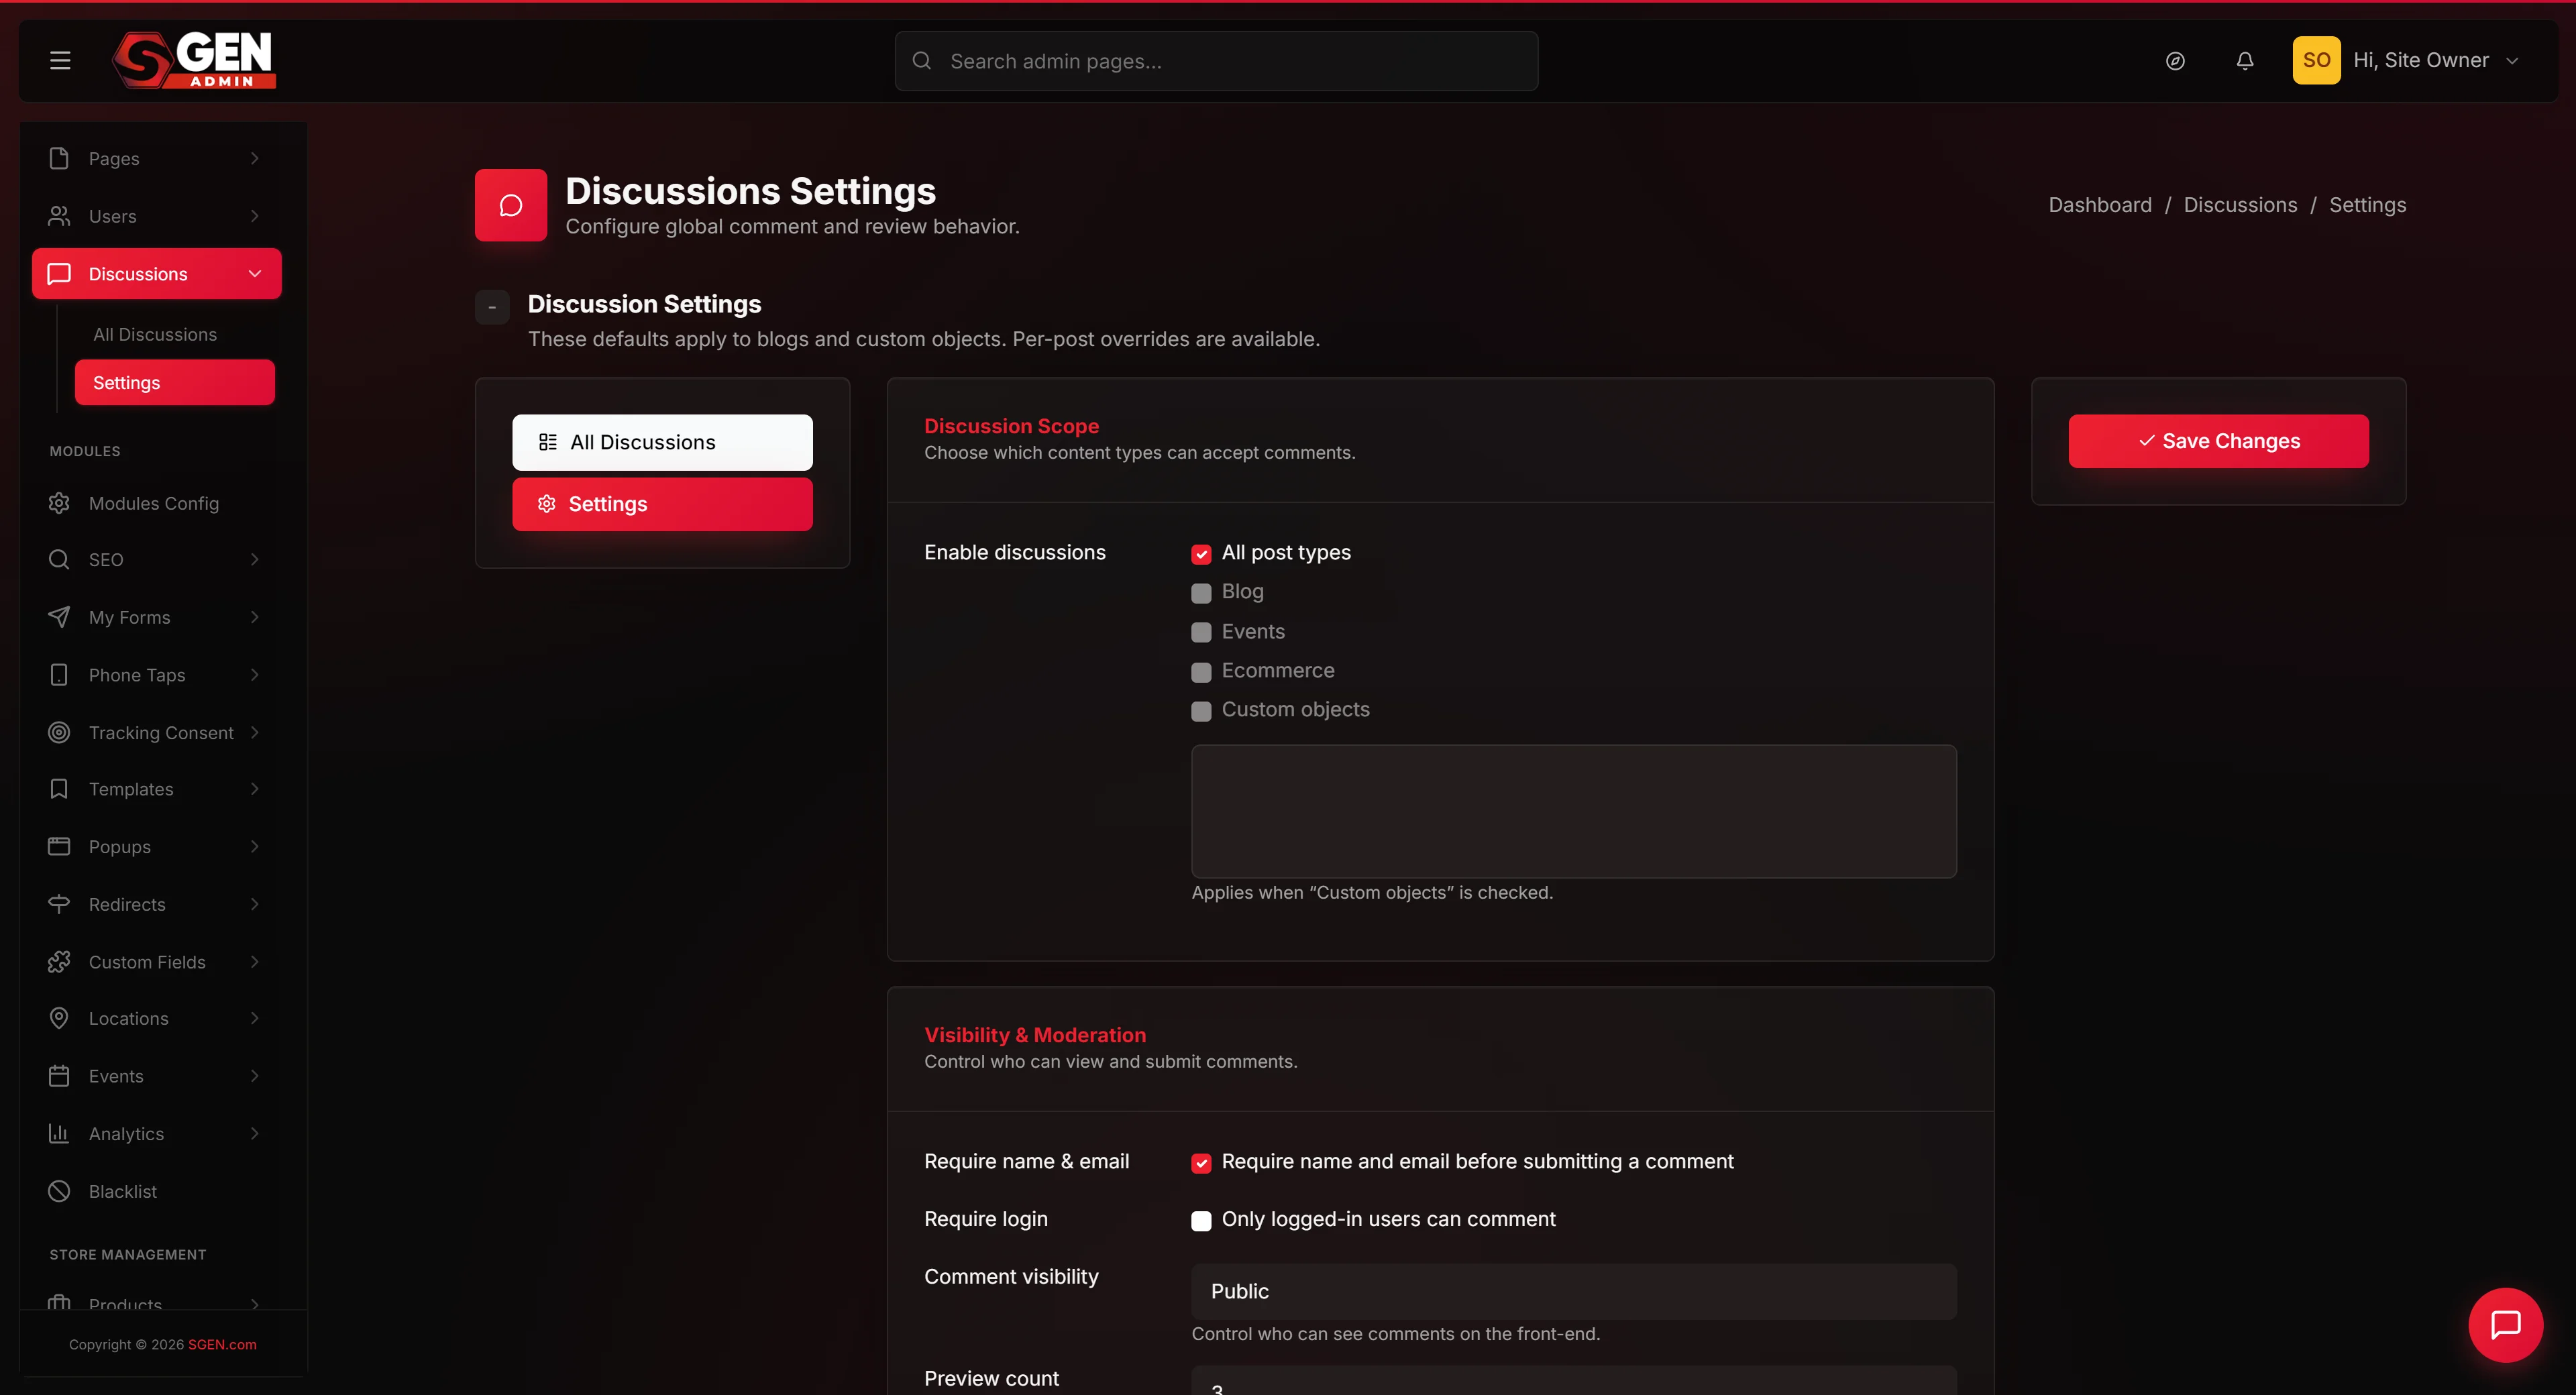
The page uses a two-column layout. The left panel has two buttons: "All Discussions" (the moderation queue) and "Settings" (the active page). The right side has the six cards stacked vertically with a sticky Save Changes button on the far right.
The breadcrumb reads Dashboard / Discussions / Settings. The page header reads "Discussions Settings" with a subtitle: "Configure global comment and review behavior."
Steps — Configure comments for a brand-new Your Store blog
1. Open Discussions Settings
From your admin dashboard, click Discussions in the left sidebar, then click Settings in the secondary navigation.
If Discussions isn't in your sidebar, the feature may not be enabled for your tenant — contact support. If Discussions is visible but you don't see Settings underneath, you're on the moderation queue page. Look for the Settings button in the secondary navigation panel on the left.
2. Turn on comments for blog posts
In the first card, Discussion Scope, check the Blog checkbox. Leave "All post types" unchecked — checking "All post types" would enable comments on Events, Ecommerce, and Custom objects too.
3. Decide your moderation policy
Scroll to the second card, Visibility & Moderation.
- Comments visibility — leave at Public so anyone can read and submit comments.
- Auto-approve — leave off. New comments land in your moderation queue first.
- Comments per page — leave at 20. On a high-traffic post, visitors see paginated pages rather than one long page.
Comments visibility options: Public — anyone can read and submit. Login required — anonymous visitors see "Please log in to comment" and cannot read the comment list. Login + preview count — visitors see the first N comments, then hit a sign-in wall. Good for enticing signups without fully gating the conversation.
4. Tune the reply behavior
Scroll to the third card, Replies & Avatars.
- Allow user replies — leave on to show a Reply button under every approved comment.
- Reply depth — set to 3. Threads can go three levels deep; after that, the Reply button stops appearing.
- Notify on reply — leave on so the original commenter gets an email when someone replies. Verify your Email integration is configured before relying on this.
- Avatar mode — choose Initials. Shows the first letter(s) of the commenter's name in a coloured circle — no third-party data shared.
Avatar mode options: None — name and message only, no image. Initials — coloured circle with the commenter's first letter(s). Gravatar — fetches a profile picture by hashing the commenter's email and sending it to gravatar.com. Has privacy implications under GDPR.
Note on Reply depth: this controls visual nesting depth on the public page, not whether deep replies exist in the database. Lowering the depth hides deeper replies from view but does not delete them. Raising it back later re-exposes them.
5. Skip Reviews for now
Scroll past the fourth card, Reviews & Ratings, and leave all checkboxes off. Reviews are for star ratings on products; they don't apply to a blog-focused launch. Return here when you turn on ecommerce.
6. Skip Spam Protection for now
The fifth card, Spam Protection, controls reCAPTCHA on review submissions. Since you're not enabling reviews yet, leave the toggle off. When you turn on reviews later, enable reCAPTCHA at the same time and configure the Google reCAPTCHA keys in Integrations.
Note: this toggle currently applies to review submissions only, not comment submissions. For comment spam, your controls are: Auto-approve OFF, Require name and email ON, and Login required.
7. Click Save Changes
The Save Changes button is in the sticky right rail. Click it. A green banner confirms: "Discussion settings have been successfully updated!"
If no banner appears, scroll up — it sometimes appears at the top of the page. If the page reloaded and your toggles reverted, contact support with a screenshot.
8. Verify on a public blog post
Open any published blog post in a new tab. Scroll to the bottom. You should see a comment form with Name, Email, and Message fields, plus existing approved comments above it.
If the form isn't there, see "What to do if it does not work" below. The most common reasons: browser cache (Shift+Reload) or a per-post override on the specific post you tested (try a different post).
9. (Optional) Test with a real comment
While logged out, submit a test comment. Return to Dashboard → Discussions, approve it, then reload the public post — your comment should appear. This confirms the full workflow: form renders, submission queues, approval goes live.
What success looks like
Open any blog post on your public site. At the bottom you should see:
- Existing approved comments, each with the commenter's initials in a coloured circle, their name, the date, and their message.
- A Reply button under each comment (up to depth 3).
- A new-comment form with Name, Email, and Message fields — all required.
If the post has more than 20 approved comments, pagination controls should appear above or below the list.
You should not see a "Please log in to comment" message (unless you set Login required), a reCAPTCHA challenge on the comment form (reCAPTCHA here applies to review submissions only), or star rating selectors (those appear only if you enabled Reviews & Ratings → Blog).
}}
What to do if it does not work
If you visit a public blog post after saving and the comment form is missing, work through this list in order:
- Confirm you saved the right post type. If your site uses Custom Objects for blog-like content instead of the built-in Blog post type, check Custom objects and select the right type from the multi-select — not just Blog.
- Force-refresh the public page. Hold Shift and reload.
- Check the per-post override. Open the post in your admin editor and scroll to the Discussions panel. If "Closed for comments" is checked, it overrides the global setting. Uncheck it.
- Verify the settings page itself. Return to Discussions Settings, confirm Blog is still checked. If your changes vanished after saving and reloading, escalate to support — that indicates a save problem.
- Check that comments exist. If the post has zero comments and comments are enabled, the form still appears — there's just nothing listed yet. Submit and approve a test comment to verify.
- If you see "Please log in to comment" instead of a form, Comments visibility is set to Login required. Switch to Public if that's not what you intended.
- If reCAPTCHA isn't appearing on review forms, confirm you've configured Google reCAPTCHA keys in Integrations. The toggle enables the feature only when valid keys are present.
- If reply notification emails aren't being received, verify your outbound email integration is configured and tested separately.
If the issue persists after all eight steps, capture a screenshot of your settings page (showing saved state) and the public page (showing what's missing), and share both with support along with the URL of the affected post.
Next steps
- Visit the moderation queue at Dashboard → Discussions to review pending comments and replies.
- Configure Google reCAPTCHA keys in Integrations if you turned on Spam Protection — the toggle alone doesn't add the keys.
- Set up Email Integrations if you turned on Notify on Reply but emails aren't going out.
- Use per-post overrides for individual posts that need different treatment than the global default.
- Return here after a month and review whether your moderation policy is working — if your pending queue is growing faster than you can manage, consider Auto-approve. If spam is creeping in, tighten with Login required or reCAPTCHA.
Full detail on managing the queue: Moderating discussions · Moderate comments and reviews
Discussions option-list reference
| Setting | Options | What each does |
|---|---|---|
| Comments visibility | Public / Login required / Login + preview count | Public = anyone reads & submits; Login required = anonymous see 'Please log in to comment' and cannot read the list; Login + preview count = visitors see first N comments then hit a sign-in wall |
| Avatar mode | None / Initials / Gravatar | None = name & message only; Initials = coloured circle with first letter(s), no third-party data; Gravatar = fetches picture by hashing commenter email to gravatar.com (GDPR implications) |