
Build a newsletter signup flow
What you set up, from the signup form to the subscriber list, in one sitting
A newsletter signup flow is the path a visitor takes from "I'd like updates" to a row in your subscriber list — and the path you take to get the form built, the alerts wired up, and the entries managed. This guide walks the whole newsletter signup flow with real SGEN features only: a Form to collect the email, optional Mail Settings and a confirmation message so both you and the subscriber know it worked, an optional Popup to put the form in front of more visitors, and the Submissions inbox where every entry lands.
Nothing here is a separate add-on or a paid extension. Forms, Popups, and Submissions are part of your dashboard already. You build the form once and reuse it anywhere — on a page, in a footer, or inside a popup — and every entry from every placement collects in the same searchable list.
By the end you will have a working signup form saved to your dashboard, a notification arriving in your inbox each time someone subscribes, a confirmation the subscriber sees on submit, and a clear view of your growing list. A basic signup takes a few minutes. The popup and the polish take a little longer, and you can add them later without rebuilding anything.
In short. Build a two-field Form (Email + a consent checkbox) in Forms → All Forms → + Add New. Fill the Mail Settings card so you get an alert per signup, and set a Success message in the Settings card so the subscriber gets a confirmation. Copy the form shortcode Err: Form not found! onto a page — or drop it into a Popup body so it greets visitors as an overlay. Read every subscriber under Forms → Submissions.On this page: What is this for? · Good use cases · What NOT to use this for · Before you start · Where to find it · Steps · What success looks like · Troubleshooting
How to collect newsletter signups from the form to your inbox
The newsletter signup flow strings together four parts of your dashboard that already talk to each other. The Form holds the fields and the alert settings. The Popup is one optional way to display that form. The Settings card on the form holds the confirmation the subscriber sees. The Submissions inbox holds every entry, no matter where the form was shown.
Your Forms list shows how many forms are live, in draft, or trashed at a glance. A small site partway through building a newsletter flow reads like this:
Preview: Forms — by status — a screenshot of this screen will be added here.
How the four parts fit together
It helps to picture the whole flow before you build any one piece.
- The Form is the engine. It holds the Email field, the alert settings, and the confirmation message. You build it once.
- The page or popup is the storefront. It is where a visitor meets the form — embedded in page content, or floated as an overlay.
- The alert is your signal. The moment a visitor subscribes, the form emails the address you set, so a signup never slips by unnoticed.
- The Submissions inbox is the ledger. Every entry, from every placement, lands in one searchable list you can export.
Change the form once and every placement updates with it. Move the form from a footer to a popup and your existing subscribers — and the list itself — stay exactly where they are. That reuse is the point: you are building a subscriber pipeline, not a one-off form.
What is this for?
A newsletter signup flow is for turning interested visitors into a list you can email later. It is the right setup whenever you want to capture an email address — a weekly roundup, a launch list, a "notify me" waitlist, or a first-order discount in exchange for a subscription.
The flow has a clear job: collect the email, tell you a signup happened, reassure the subscriber, and keep the record. You reach for it to:
- Add a short email-capture form to the footer of every page.
- Offer a discount or freebie in exchange for a subscription.
- Greet first-time visitors with a signup overlay instead of a static block.
- Keep one tidy, searchable list of subscribers you can export when you move them into your email tool.
Forms are stored separately from the pages they appear on. That separation is deliberate: build the signup form once, show it in as many places as you want, and change its fields later without touching any of the pages that display it.
Good use cases
Each of these is a real starting point that ends with subscribers landing in your Submissions inbox.
- Footer signup on every page. A single Email field plus a "Send me weekly updates" checkbox, dropped into the footer. Short forms convert best, so this is the most common newsletter starting point.
- Discount-for-subscription popup. A signup form inside a popup that offers ten percent off a first order. The overlay fires on a visitor's first page view; the subscriber gets the code by email.
- Launch waitlist. An Email field on a coming-soon page so interested visitors can ask to be told when you go live. The notification tells your team the list is growing.
- Event or product "notify me." A focused form on one page for people who want a heads-up when a specific thing is back or available. Each entry is a warm lead.
- Content upgrade. A short form that promises a guide or template in exchange for an email. The confirmation message points the subscriber to the download or tells them to check their inbox.
Preview: Newsletter signup — form canvas — a screenshot of this screen will be added here.
}What NOT to use this for
The newsletter signup flow is narrowly about capturing and managing email subscribers. A few things sit outside it, and reaching for the wrong tool will slow you down.
- Not a bulk email sender. SGEN collects and stores subscribers; it does not blast a campaign for you. Export your list and send from your email marketing tool. The flow feeds that tool — it does not replace it.
- Not a payment or checkout form. A newsletter form captures information, not money. If you need an order with checkout, use the Products area instead.
- Not a per-page popup targeting system. A popup is either auto-loading on every public page or fired by a button on the one page that holds the button. There is no per-page rule beyond those two choices, so plan the popup around them.
- Not a place to read responses. The form builder shows the form's shape, never its entries. Subscribers live under Forms → Submissions, covered below.
- Not a contact database you can edit. The Submissions list is read-only. To enrich or follow up on a subscriber, export the entry and work with it in your contact tool.
How this connects to other features
The newsletter flow leans on several parts of your dashboard, and knowing the connections saves rework.
- Form builder — the home of the signup form's fields, the Mail Settings alert, and the Settings confirmation. Full detail: Build a form.
- Popups — one way to display the signup form. The popup body holds the form by its shortcode; the popup itself controls when the overlay appears. Full detail: Create a popup.
- Submissions — every subscriber from every placement of the form collects here in one searchable list. Full detail: View and manage submissions.
- Pages and posts — the form's shortcode pastes into a page's Text block to render the live signup form for visitors.
- Reports — once subscribers start arriving, Forms → Reports charts where they came from and how the list grows over time. None of it is configured here; it builds itself from the entries.
- Settings → Integrations — if you want spam protection on the signup form, the form's reCAPTCHA toggle reads keys saved under Settings → Integrations → Google reCAPTCHA.
Before you start
A handful of things to have ready before you open the form builder.
Make sure you are signed in to your dashboard as an Administrator. The Forms and Popups areas are admin-level; lower roles may not see them in the sidebar.
Decide on the inbox that should receive a notification on each signup. Have the address handy — you will paste it into the To field in Mail Settings. A signup with no notification address still saves the entry, but no one is alerted, which is the most common cause of "my form isn't working" confusion.
Decide what the subscriber should see the moment they submit. A short confirmation message ("You're on the list — check your inbox for the welcome email") is enough. If you would rather send the subscriber to a dedicated thank-you page, have that page's path ready instead.
Decide whether the form lives on a page, inside a popup, or both. You do not need to prepare the page or popup in advance — the form is built first, then displayed. Wiring the placement comes after the form is saved.
If you plan to offer a discount code, have the code or the wording ready so it does not ship as placeholder text.
A pre-publish checklist
Run through these before you flip the form to Publish.
- The form has an Email field and, if you want explicit consent, a checkbox.
- The To address in Mail Settings is your real inbox, spelled correctly.
- Subject, From, and To are all filled in — the form will not save without them.
- The Success message, or a Redirect URL, is set so the subscriber sees a confirmation.
- You submitted the form once yourself from a private browser window and the alert arrived.
- If you built a popup, its body references the form and its status reads Published.
If every line is ticked, the flow is ready to collect subscribers.
Where to find it
Open the dashboard and look in the left navigation:
- Forms → All Forms is the list of every form on your site. The + Add New button at the top right opens the form builder. The direct path is
/sg-admin/forms/. - Forms → Submissions is the inbox of every entry from every form. The direct path is
/sg-admin/forms/submissions/. - Popups → All Popups is the list of overlays. The + Add New button opens the popup author screen. The direct path is
/sg-admin/popups/add_new.
The Forms list shows each form's title, its live submission count, and its status under tabs for All / Published / Drafts / Trash. A signup form with zero submissions that was created weeks ago is worth checking — it usually means the form is not displayed anywhere yet.
Preview: Forms — a screenshot of this screen will be added here.
Field and settings reference
The signup form's behaviour comes down to a handful of fields across two cards in the builder. Here is what each one does and a sensible newsletter default.
Mail Settings — the alert you receive on each signup
| Field | What it does | Newsletter default |
|---|---|---|
| Enable mail notifications | Master toggle for the alert email. | On |
| Subject | The alert's subject line. [form_title] and [all_fields] drop in the form name and the entry. | New subscriber: [all_fields] |
| From | The address the alert appears to come from. Use a verified sender. | Your verified site address |
| To | The inbox that receives the alert. Commas separate several recipients. | Your marketing inbox |
| Message | The alert body. [all_fields] lists every field and value in order. | [all_fields] |
Subject, From, and To are all required before the form will save.
Settings — the confirmation the subscriber sees
| Field | What it does | Newsletter default |
|---|---|---|
| Success message | On-page text shown the instant the visitor submits. | A short "you're on the list" line |
| Redirect URL | Sends the subscriber to a page instead of showing a message. Takes precedence if both are set. | Blank, or /thank-you |
| Enable reCAPTCHA | Adds spam protection. Reads keys from Settings → Integrations → Google reCAPTCHA. | Off for a quiet footer; on for a public popup |
Popup configuration — when and how the overlay appears (optional)
| Option | What it does |
|---|---|
| Autoload | Shows the overlay on a visitor's first page view, on every public page. |
| Frequency | With Autoload on, controls how often it re-fires: every visit, every few visits, or once and never again. |
| Popup Width | The overlay's maximum width in pixels. The minimum is 350. |
| Disable Popup Title | Hides the admin title so your body heading is the only one shown. |
Hashcode #sgp_N | The click trigger. Paste it into a button's link target to fire the popup on click instead of on load. |
A newsletter popup needs only two of these in practice: Autoload on, and a Popup Width around 480 pixels. Everything else stays at its default unless you have a specific reason to change it.
Steps — build the newsletter signup flow
The steps below take you from a blank form to a live signup that collects subscribers, alerts you, confirms to the visitor, and (optionally) greets people through a popup. Steps 1 to 6 build and place the form. Steps 7 and 8 are the optional popup surface and the ongoing list management.
1. Open the form builder on a new form
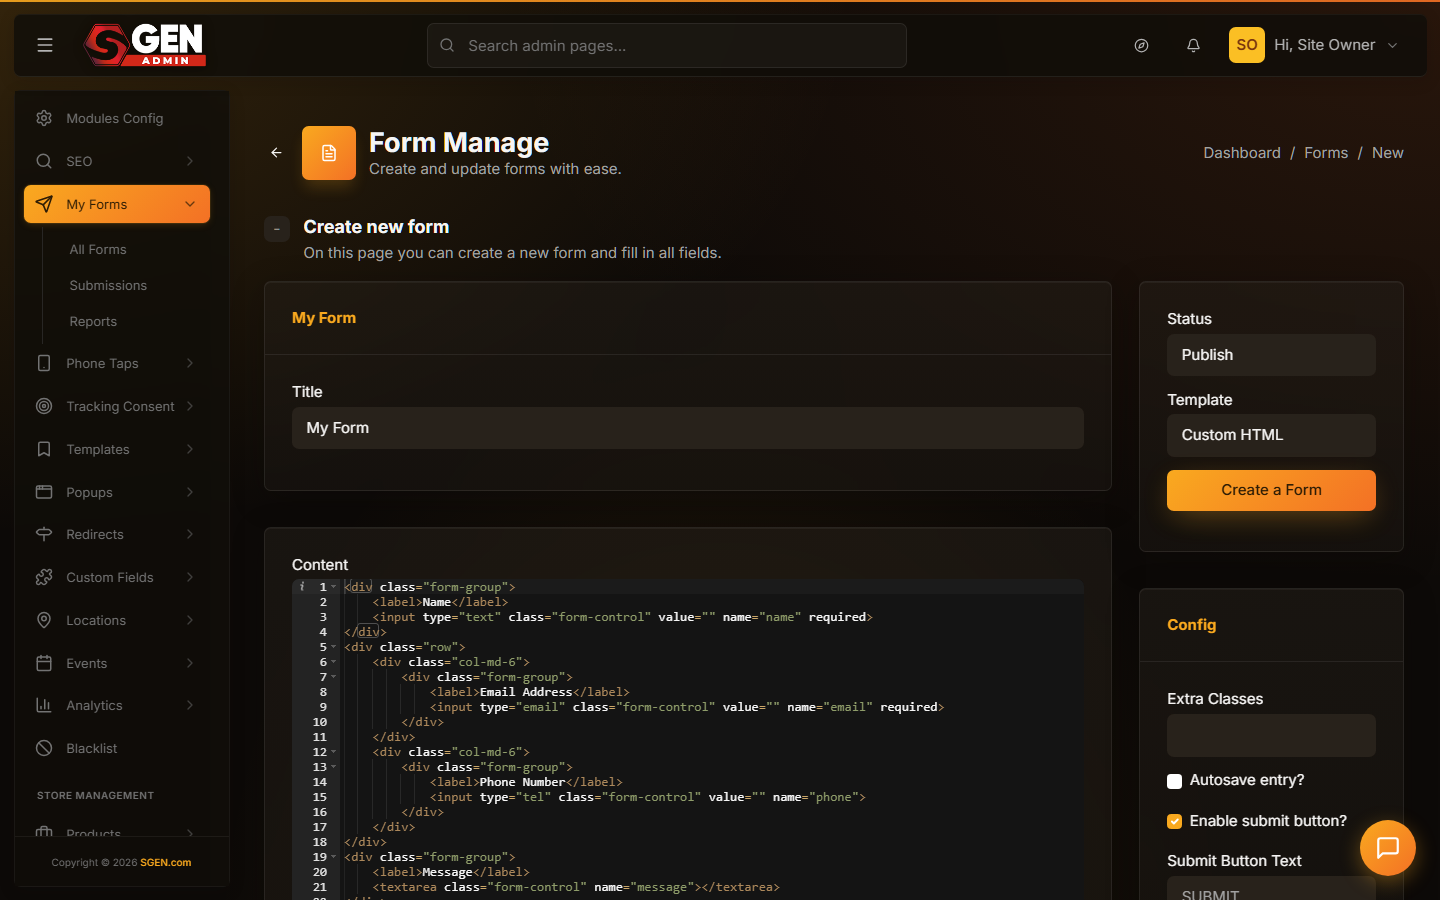
Go to Forms → All Forms and click + Add New. The builder opens on a blank form pre-loaded with a Name / Email / Phone / Message skeleton in the Default template. Nothing is saved yet — the screen is showing you what a fresh form looks like before you shape it.
2. Give the form a recognizable title
In the Form Title field, replace "My Form" with a name your future self will recognize in a list — "Newsletter Signup" beats "Form 1". The title is internal only; subscribers never see it. A good convention is to name the form after the visitor's goal, not the page it sits on, because one form can appear on many pages.
3. Trim the fields down to the essentials
For a newsletter, fewer fields means more signups. In the Content editor, remove the Name, Phone, and Message fields from the starter skeleton and keep just the Email field. Add a single Checkbox from the field palette labelled something like "Send me weekly updates" so the subscriber opts in on purpose.
Every extra field is one more reason a visitor closes the form without finishing. One field plus a consent checkbox is the sweet spot for a newsletter.
Preview: Form Manage — a screenshot of this screen will be added here.
}4. Set up the notification so you hear about every signup
Open the Mail Settings card and confirm Enable mail notifications is on. Then fill in:
- Subject — the email subject line that lands in your inbox. The
[all_fields]and[form_title]shortcodes drop the subscriber's details and the form's name into the subject so you can spot signups at a glance. - From — the address the alert appears to come from. Use a verified sender. If you have not set up sender verification, leave the default for now and your support team can help.
- To — the inbox that should receive the alert. This is the field that matters most; separate several addresses with commas to alert more than one person.
- Message — the body of the alert.
[all_fields]lists every submitted field and value in a readable block.
Subject, From, and To are all required before the form can be saved. Skip them and the entry still saves silently, but no alert is sent.
The Message body is where [all_fields] earns its keep. It expands into the subscriber's email and any other fields you collected, so every alert is self-contained — you can read the whole signup without opening the dashboard.
5. Set the confirmation the subscriber sees on submit
Open the Settings card.
- Success message — the text the subscriber sees on the page the instant they submit. Write something reassuring and specific: "You're on the list — watch your inbox for the welcome email." This is the confirmation half of the flow.
- Redirect URL — fill this only if you would rather send the subscriber to a dedicated thank-you page instead of showing a message in place. Enter the page path, for example
/thank-you.
If you set both, the redirect takes precedence and the success message is not shown. Pick one path: an in-place message for a footer signup, or a redirect when you have a real thank-you page to land on.
6. Publish the form and copy its shortcode onto a page
In the right sidebar, set Status to Publish so the form renders for visitors, then click Create a Form. The builder reloads onto the edit view and shows the form's shortcode in the sidebar — copy it.
To show the form on a page, open the page in Pages, and paste the shortcode into a Text block (not a raw HTML block, which escapes the bracket characters). Save and publish the page. A Draft form renders nothing even with the shortcode in place, so confirm the form's status reads Published first.
Preview: Page content → Footer → Text block — a screenshot of this screen will be added here.
7. Optional — surface the form through a popup
A popup puts the same signup form in front of more visitors as an overlay.
Go to Popups → All Popups and click + Add New. Give the popup a Title (admin-only, like "Newsletter Signup — 10% Off First Order"). Leave the Editor on Text Editor and write a short body — a heading, one line of copy, and the form shortcode. Reference the same form you built so submissions still collect in one place:
<h2>Get 10% off your first order</h2>
<p>Subscribe to our weekly newsletter and we'll send the code to your inbox.</p>
[form id="7"]
In the configuration panel, tick Autoload so the overlay appears on a visitor's first page view, set Popup Width to around 480 pixels for a compact signup, and tick Disable Popup Title if your body already contains its own heading. Set Status to Publish and click Create a Popup.
Prefer a click trigger over an auto-load overlay? Leave Autoload unticked, save, then copy the popup's hashcode (for example #sgp_3) from its edit page and paste it into a button's link target on the page where you want the overlay to fire.
Preview: Create Popup — a screenshot of this screen will be added here.
When a first-time visitor lands on any page, the overlay fires over the page content. The close button is visible by default, so anyone who would rather not subscribe can dismiss it. The form shortcode renders the live signup field right inside the overlay:
Preview: Newsletter signup popup on the live site — a screenshot of this screen will be added here.
8. Read and manage your subscribers
Go to Forms → Submissions to see every signup in one searchable list. Filter the All Forms dropdown to your newsletter form to see only subscribers. Click any row to open the entry and read the submitted email, the notification status, and the visitor's session trail. When you are ready to move the list into your email tool, use Export Entries at the top right to download the subscribers as a spreadsheet.
Preview: Form Submission #312 — a screenshot of this screen will be added here.
What success looks like
When the flow is wired correctly:
- The form saves and the builder shows the shortcode
Err: Form not found!in the sidebar, ready to copy. - The form's submission counter in the Forms list increments after each signup.
- A notification email arrives at the To address you set, with the subscriber's email in the body.
- The subscriber sees your Success message on submit, or lands on the redirect page you set.
- If you added a popup, opening any public page in a private browser window shows the overlay after the page settles, with the signup field rendered inside it.
- Every subscriber appears under Forms → Submissions, no matter whether they signed up from the page form or the popup.
Run one test before you call it done: open the page (or popup) in a private browser window, submit your own email, and confirm three things — the success message shows, the alert lands in your inbox, and the entry appears in Submissions. That single test catches almost every "my signup form is broken" question.
If the test passes, the flow is genuinely working end to end: the visitor sees a confirmation, you get told, and the record is kept. From here, the only thing left is to point more visitors at the form — in the footer, on a landing page, or through the popup — and let the list grow. Each new placement reads from the same form, so a copy change you make once shows up everywhere the form appears.
Preview: Settings saved — a screenshot of this screen will be added here.
After the signups start arriving
A newsletter list rewards a light, regular touch. A few minutes a week keeps it clean and keeps you from missing a warm lead.
- Skim the inbox weekly.
Open Forms → Submissions, filter to your signup form, and scan the latest entries. A form that suddenly goes quiet often means it stopped rendering on its page — worth a quick look.
- Clear spam in bulk.
Tick the obvious junk rows, choose Move to Trash from the bulk action menu, and apply. Trashed entries leave the default view and the exports until you restore them.
- Watch the Email Sent column.
A green check means the alert reached the mail system. If a row shows no check, open it and re-send the entry through your connected destinations from the detail view.
- Export on a cadence.
Pull the subscribers into your email tool on a schedule that matches your sending — weekly, monthly, or before each campaign. The export is a spreadsheet with one file per form.
- Mind the privacy rules.
For a removal request, export the entry first for your records, then permanently delete it from the Trash. A permanent delete cannot be undone, so keep the export as proof you honoured the request.
The Reports view under Forms → Reports turns the same entries into a picture: where subscribers came from, and how the list grows week over week. None of it needs configuring — it builds itself from the signups as they arrive.
What to do if it does not work
The short list of issues we see most, and how to fix each yourself before reaching out.
- The form saves but the page shows nothing where I pasted the shortcode. The form's status is likely Draft. Open the form, set Status to Publish, and save. Draft forms render nothing even with the shortcode in place.
- The shortcode shows as literal text on the page. It was pasted into a raw HTML or code block, which escapes the bracket characters. Move it into a Text or Content block.
- The "Create a Form" button is greyed out. The form title, the Mail Settings Subject, From, or To field is empty or under two characters. All four are required. Fill them in and retry.
- No notification email arrives after a test signup. Confirm Enable mail notifications is on in Mail Settings, and that the To address has no typo. Outbound email is also a hosting-level setting your support team can review.
- The popup is published but the overlay never appears. Open the site in a private browser window — logged-in admins are sometimes excluded from popup display. Hard-refresh once and wait for the page to settle; the overlay fires after the load finishes, not during it. Confirm the popup's status reads Published.
- The form does not render inside the popup. Confirm the form ID in the body shortcode matches a form that exists, and that the form's status is Published. A Draft form renders nothing inside a popup.
- A subscriber says they signed up but I can't find them. Check the date range on the Submissions list — it defaults to the last six months — and check the Trash tab in case the entry was trashed.
- The notification is marked sent but the recipient got nothing. A sent mark means the email was handed to the mail system, not that it was delivered. Check the recipient's spam folder and re-check the To address for a typo.
- The subscriber saw no confirmation after submitting. The Success message field is empty and no Redirect URL is set. Open the form, fill in a Success message in the Settings card, and save.
- The subscriber landed somewhere unexpected after submitting. A Redirect URL is set and it takes precedence over the Success message. Clear the Redirect URL if you want the in-place message instead, or correct the path it points to.
- Two popups fire on the same page view. More than one popup has Autoload on. Open each one and tick Avoid Multiple Popup so only a single overlay shows per visit.
- The consent checkbox is not saving with the entry. Confirm the checkbox field was added to the form canvas and the form was saved after adding it. Fields are held until you click Create a Form or Update a Form.
Tips
A few habits make every signup form you build behave better.
- Keep it to one field. An Email field plus a consent checkbox converts better than a long form. Cut anything you cannot justify asking for on a first contact.
- Always set a To address. A form with no notification address still saves the entry, but no one is alerted. This is the most common cause of missed signups.
- Write a confirmation that reassures. A line like "You're on the list — watch your inbox" tells the subscriber the action worked. A blank success message leaves them guessing.
- Test from a private window. A private browser window carries no admin session, so it sees the form and the popup the way a real visitor does. Submit your own email once and confirm all three signals fire.
- Build in Draft, publish when ready. A Draft form is saved but renders nothing on the public site. Refine the copy and fields first, then flip to Publish.
- Reuse one form everywhere. The same form can sit in the footer and inside a popup at the same time. Every signup, wherever it came from, collects in the one Submissions list.
- Export before you clean up. When you move subscribers into your email tool, export the entries first. A permanent delete cannot be undone; the spreadsheet is your backup.
Examples
Three concrete patterns, each ending with subscribers in your Submissions inbox.
Example 1 — Footer signup across the whole site. A small shop wants a quiet, always-present signup. They build a one-field form titled "Newsletter Signup" with an Email field and a "Send me weekly updates" checkbox, set the To address to their marketing inbox, and write a Success message: "You're subscribed — watch your inbox for a welcome note." They publish the form, paste Err: Form not found! into a Text block in the site footer, and publish the page. Within a month the footer alone brings in over three hundred subscribers, and every one of them is sitting in Forms → Submissions ready to export.
Preview: Public site preview — a screenshot of this screen will be added here.
Example 2 — Discount popup on first visit. A brand wants more reach than a footer block. They build the same one-field signup form, then create a popup titled "Newsletter Signup — 10% Off First Order" with a short heading, one line of copy, and the form shortcode in the body. They tick Autoload, set the width to 480 pixels, tick Disable Popup Title, and publish. First-time visitors see the overlay, subscribe for the code, and the entries land in the same Submissions inbox as the footer signups — indistinguishable from any other source except for the traffic-source column.
Example 3 — Launch waitlist with a thank-you page. A team building toward a launch wants a waitlist. They build a one-field "Launch Waitlist" form, but instead of an in-place message they set the Redirect URL in the Settings card to /thank-you, where a dedicated page explains what happens next. They set the To address to the founder's inbox so every signup is felt, not just logged. On launch day they open Submissions, export the full waitlist, and import it into their email tool for the announcement.
Example 4 — Content upgrade in exchange for an email. A studio offers a free planning template to anyone who subscribes. They build the one-field signup form and set the Success message to point the subscriber at the download: "Thanks — your template is on its way to your inbox." They paste the form onto the page that promotes the template, and they also drop it into a small popup on the related blog posts so readers can grab the template without leaving the article. Every subscriber, from the page and the popup alike, collects in Forms → Submissions, and the studio exports the list each month to send the follow-up sequence.
Related reading
Every doc below also links back to this flow.
- Build a form — the full form builder reference: fields, validation, Mail Settings, Success message, and the shortcode.
- Create a popup — every popup configuration option, including Autoload, width, and the
#sgp_Nbutton trigger. - View and manage form submissions — filter, search, open, export, and trash the subscribers your form collects.
- How to create a new form on your site — the first-form walkthrough this flow builds on.