
Set up a multi-site SGEN deployment
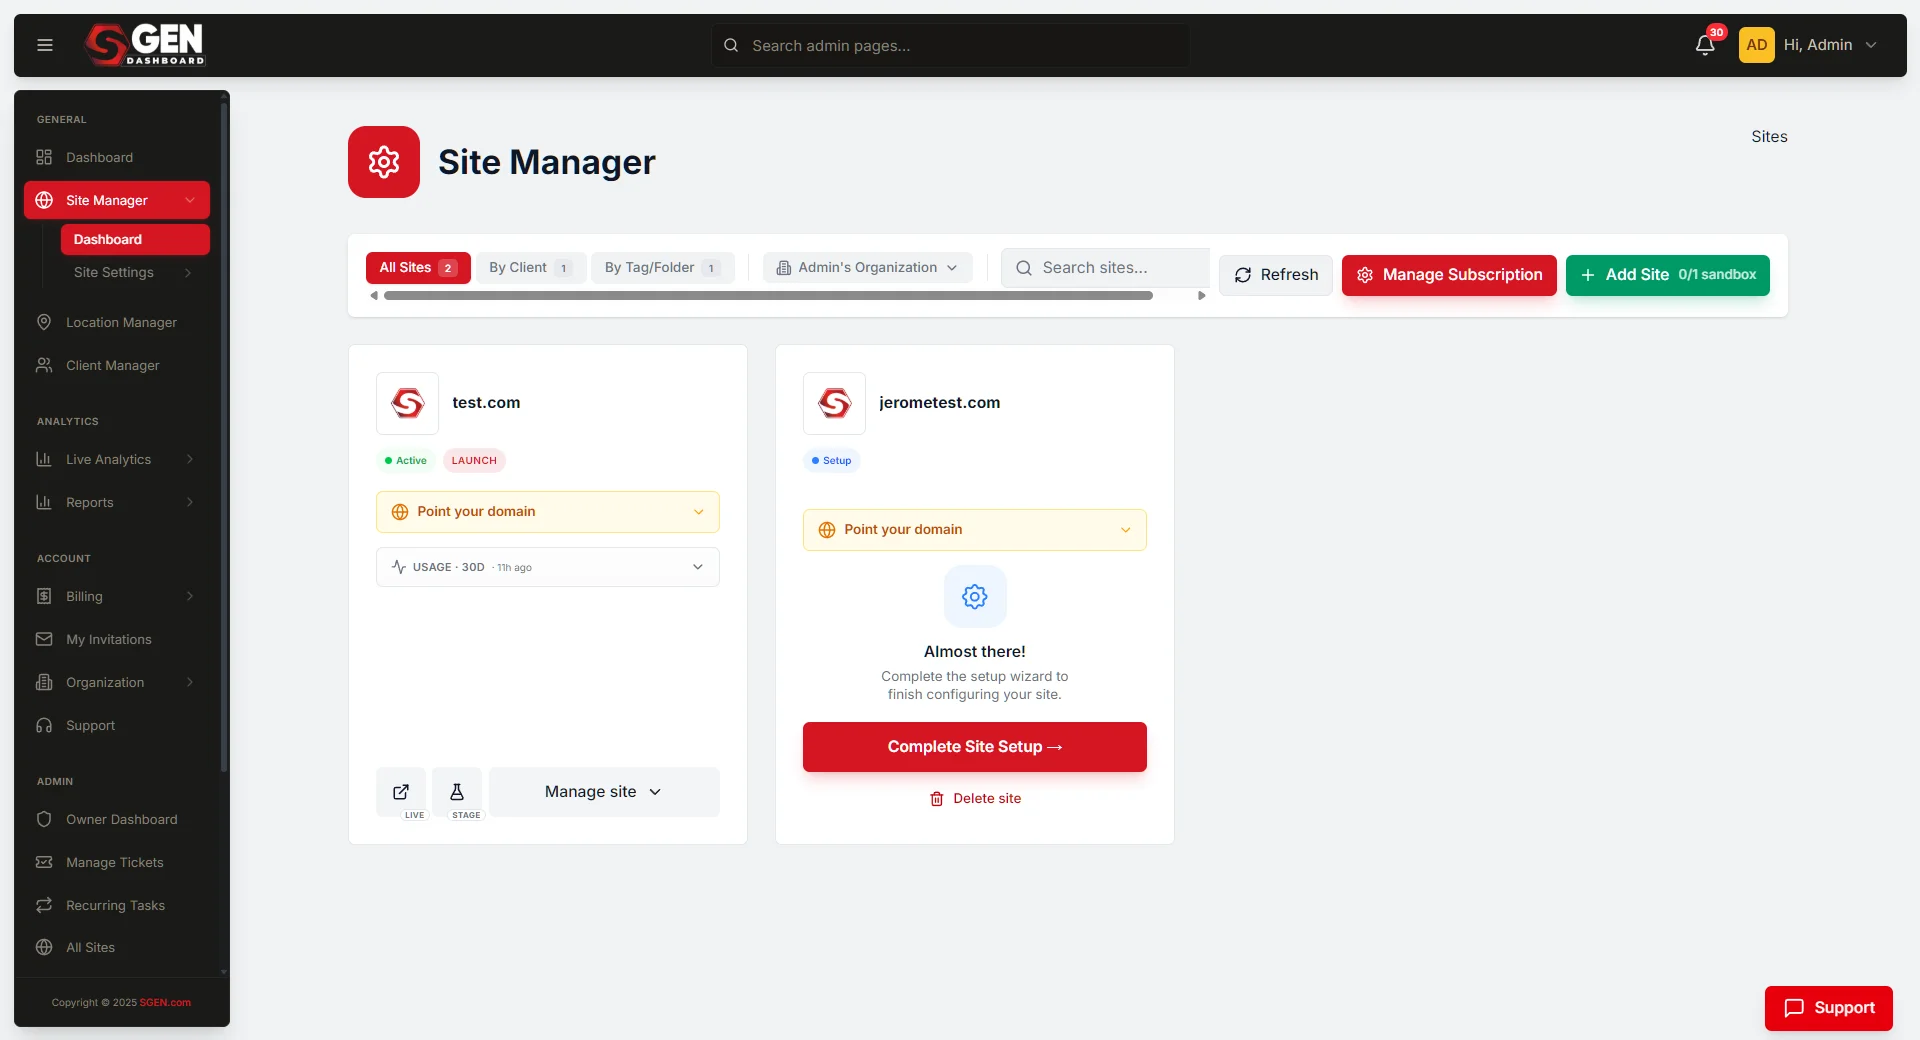 Sites — the multi-site Sites list with site cards/rows and the 'Add New Site' button at top right." loading="lazy" style="width:100%;max-width:900px;height:auto;border-radius:8px;border:1px solid #e5e7eb;display:block;margin:12px 0">
⏱ Quick answer below · full guide ≈ 12 min · skim the bold lead-ins to move faster.
In short. Multi-site deployment puts SG-Dashboard above your individual sites — one login, one billing account, each site on its own domain with its own admin panel and scoped user access. The six steps below take you from an empty dashboard to every site live on its own domain, with the right team members in the right lanes. If you only have one site and no plans to add another, you don't need this guide.
On this page: When to use multi-site · What NOT to use it for · How the features connect · Before you start · Steps · Troubleshooting
How to create and manage multiple SGEN sites from one account
Multi-site is a different deployment model — not a feature you layer on top of a single-site workflow. SG-Dashboard sits above your individual sites: create and provision child sites here, manage billing and aggregate analytics, and control which users can see which site. Each child site then has its own SG-Admin panel where content, pages, and settings live.
When to use multi-site
Multi-site is the right model in these situations:
| Scenario | What it looks like |
|---|---|
| Multi-brand company | Consumer retail + creative services + B2B trade portal — different audiences and content teams, one billing account and shared media library for brand assets. |
| Agency managing client sites | One login, one dashboard, ten child sites. Each client sees only their own admin panel; the agency account owner sees all ten. |
| Multi-region or multi-language | Separate editorial teams, separate pricing, separate tone — two child sites under the same account with a shared library for brand assets. |
| Franchise model | Franchisor owns the dashboard and the shared brand asset library; each franchisee controls their own pages, posts, and events. No franchisee can see another location's content. |
| Staging as a managed child site | Some teams run staging and production as two child sites — staging gets a subdomain and restricted user access, production is the public domain. |
If you have never set up a SGEN site before, start with the single-site quickstart first. This guide assumes you already know how to navigate SG-Admin for a single site.
What NOT to use this for
- A single website. Multi-site adds a coordination layer that has no value when there is only one site.
- Content syndication. Multi-site creates independent sites managed from one place — it does not push content from a parent site to child sites automatically.
- White-label reseller flows. If end customers should own their own accounts independently, that requires a different plan and a different setup.
- Content categories as separate sites. A blog site, a product catalog site, and an events site is not multi-site — that is one site with multiple content areas. Use pages, custom objects, and the blog system within a single SGEN site.
How this connects to other features
| Feature | Role in multi-site |
|---|---|
| SG-Dashboard | Parent surface — create child sites, manage billing, aggregate analytics, account-wide settings. |
| SG-Admin (per site) | Each child site has its own admin panel, identical to a single-site SGEN install. |
| Users and permissions | Two levels: dashboard users (see all sites) and site users (scoped to one or more specific sites). |
| Media library | Each child site has its own library by default. Plans with a shared library let you upload brand assets once and make them available across all child sites. |
| Templates | If your plan supports cross-site template sharing, a template built on one site can be applied to others, with per-site overrides allowed. |
| Billing | One billing relationship, one plan, one site-count limit. Adding a child site counts against your plan's limit — confirm before starting. |
Before you start
Confirm multi-site is on your plan. Check Account → Billing in SG-Dashboard. If your plan shows a site limit of one, upgrade before adding a second site.
List your sites and their domains. For each child site, know the site name, the domain, and whether DNS is already pointing at your provider. DNS propagation can take up to 24 hours — get your domains sorted early.
Example:
- Main site —
yourbrand.com - Studio site —
studio.yourbrand.com - Wholesale site —
wholesale.yourbrand.com
Decide shared vs. per-site assets. If sub-brands share photography, logos, or design files, a shared media library saves re-uploading. If each brand has a completely separate visual identity, per-site libraries are cleaner.
Map users to sites and access levels. Determine who needs dashboard-level access (sees all sites) versus site-level access (sees only their assigned site). Avoid giving everyone dashboard-level access.
Have your DNS credentials handy. Connecting a domain requires you to add DNS records at your registrar. SGEN shows you the exact records during the domain connection step.
Where to go
Go to SG-Dashboard → Sites in the left sidebar. Click Add New Site at the top right of the Sites list.
Steps — Set up your multi-site deployment
1. Create your SG-Dashboard account or confirm it is active
Open your SGEN account and check for SG-Dashboard in the left sidebar. If it's there, click it to open the dashboard view.
If SG-Dashboard is not in your navigation, your plan does not include multi-site. Go to Account → Billing and upgrade to a plan that supports the number of sites you need. The upgrade takes effect immediately.
Confirm the SG-Dashboard home screen shows your account name, your current site count against your plan limit, and a Sites section in the left sidebar.
2. Add your first child site
In SG-Dashboard, go to Sites → Add New Site. Fill in the site name and primary domain.
Choose a starting point: Blank site creates an empty install. Copy from existing site copies settings (globals, theme, navigation structure) from an existing child site — useful when two sub-brands share a design system. Use saved template applies a previously saved site template.
Set the timezone to match the editorial team for this site. Click Create Site. The site is added to your Sites list but is not yet live on its domain — that comes next.
Repeat for each site you are adding.
3. Connect the domain for each site
In the Sites list, click the site name, find the Domains section, and click Connect Domain.
SGEN shows you the DNS records to add at your registrar — typically one or two A records or CNAME records. Copy the values from the screen; a single character error causes the domain to fail resolution.
Log in to your DNS provider and add the records. For a subdomain like wholesale.yourbrand.com, add a CNAME for wholesale pointing to the value SGEN provides. For a root domain, add an A record.
Return to SGEN and click Verify. DNS propagation can take a few minutes to 24 hours — if verification fails immediately, wait 15 minutes and try again.
4. Configure per-site users and access levels
Go to SG-Dashboard → Users. You see two tabs: Dashboard Users and Site Users.
Dashboard Users can see all sites, create new sites, and manage billing. Add only the founding team here.
Site Users are assigned to specific child sites. Click Add Site User, select the child site, enter the user's email, and choose a role (Editor, Author, or Viewer). The user receives an invitation email with a login link for that site's SG-Admin panel.
Each content team member should see only the site they work on — not SG-Dashboard.
5. Publish your first piece of content on each site
From SG-Dashboard, click the site name, then Go to Site Admin. This opens that site's admin panel.
For each site, create and publish a simple test page or short blog post. The goal is not to build the full site — it is to confirm the site is functional before handing it to the content team.
6. Verify the live site on each domain
Open a private browser window and navigate to each domain. Check three things:
Domain resolves correctly. wholesale.yourbrand.com loads the Wholesale Site, not one of the other sites. If the wrong site is loading, the DNS record is pointing to the wrong site — return to SG-Dashboard, open domain settings for each site, and confirm the domain is connected to the right one.
Content is present and per-site. The page you published in step 5 is visible. No placeholder content from another site has appeared.
SG-Dashboard shows the correct site count. All sites should show as Active. The aggregate stats panel updates within a few minutes of each site going live.
What success looks like
When the multi-site deployment is set up correctly, all of these things are true at the same time.
- SG-Dashboard shows all sites as Active. Each child site shows an Active status and its assigned domain. No site is showing Pending, Suspended, or an error state.
- Each site loads on its own domain. Opening each domain in a private browser window loads that site's content — not another site's, not a parking page, not an SGEN default screen.
- Per-site users see only their site. A user assigned to the Wholesale Site sees that site's SG-Admin panel and cannot access the other sites by modifying the URL.
- Dashboard-level users see the full picture. An account owner logs in and sees all sites in SG-Dashboard — aggregate stats, the Sites list, and the ability to navigate into any site's admin panel.
- No content bleeds between sites. A page published on the Wholesale Site does not appear on the Main Site's blog feed or page list.
- Shared media is accessible from each site (if enabled). Assets uploaded to the shared library are visible and selectable from the media panel inside any child site's admin panel.
What to do if it does not work
- A domain is not resolving — the browser shows a "site not found" or parking page.
DNS propagation takes up to 24 hours. If you added records less than an hour ago, wait and retry. After 24 hours, go to the site's domain settings and click Verify DNS — compare what SGEN shows against what is published at your registrar. One character difference will cause the domain to fail.
- A user can see sites they should not have access to.
The user was likely added as a Dashboard User instead of a Site User. Go to SG-Dashboard → Users, find the user, and check their access level. Remove them from Dashboard Users and re-add them as a Site User scoped to the appropriate site. Send a new invitation.
- Shared media is not appearing inside a child site's media panel.
Go to Account → Settings and confirm the shared media library is enabled and includes this child site. If the setting looks correct, log out and back in to refresh the session. If the issue persists, contact your SGEN account manager — the shared media library requires a plan that supports it.
- SG-Dashboard is showing the wrong site count or a stale count.
Dashboard aggregate stats update on a short delay — typically under five minutes. If the count is still wrong after 15 minutes and the Sites list shows all sites as Active, this is a display cache issue — log out, log back in, and the count should correct itself.
- Cross-site links are breaking — resolving to the wrong site or a 404.
Links between child sites must use each site's full absolute URL. A relative path like /about on a page at wholesale.yourbrand.com resolves to wholesale.yourbrand.com/about, not to the About page on yourbrand.com. Update any cross-site links to their full absolute URLs.
- A site was created but the admin panel is not accessible.
In SG-Dashboard, click the site name and look for Go to Site Admin. If this button is missing or greyed out, the site may still be provisioning — this can take up to two minutes after creation. Refresh the page and try again. If the button is still unavailable after five minutes, contact your SGEN account manager.
- An invitation link is expired or returns an error.
Invitation links expire after 48 hours. Go to SG-Dashboard → Users, find the pending invitation, and resend it.
Tips for a clean multi-site deployment
- Name sites by brand, not by number. "Wholesale Site" is harder to confuse than "Site 3" when moving fast in the dashboard. Clear names reduce the risk of making a settings change on the wrong site.
- Set timezones per site, not per dashboard user. If editorial teams are in different time zones, set each child site's timezone to match. Scheduled posts and activity logs use the site timezone — mismatched timezones cause content to go live at unexpected times.
- Do a cross-site access check after onboarding each user. After sending a site-level invitation, ask the new user to confirm what they see. They should see one SG-Admin panel, not SG-Dashboard.
- Keep shared media intentional. Deleting an image from the shared library removes it from every site that used it. Reserve the shared library for account-wide assets (logos, brand photography, official design files) — upload site-specific images to each site's own media library.
- Use the domain verification tool before going live. SGEN's DNS check is faster than waiting for your DNS provider's propagation timer. Run it from the site's domain settings page.