
Set up form notifications so leads do not arrive silently
⏱ ~4 min read · 7 steps · full setup including test and audit log verification.
In short. SGEN records every form submission — but sends no email notification until you configure one. Open the admin → My Forms → [form name] → Mail Settings, set a recipient address, set the reply-to to {field:email}, click Send test notification, confirm delivery, then save. Repeat once per form. This guide covers each step plus troubleshooting for the most common failures.On this page: Before you start · Steps · What success looks like · Troubleshooting · Habits
How to configure form notification routing
SGEN stores every submission — but without a recipient set, no email fires. The lead exists; nobody knows. This guide covers the complete setup: recipient, subject, reply-to, test, and audit verification. Once per form — under ten minutes for most sites.
When to use this
| Situation | What to do |
|---|---|
| You published a new form and have not set up notifications | Complete Steps 1-7 for that form |
| You are auditing existing forms for gaps | Open Mail Settings on each form, check recipient + toggle |
| A team member left and their address is still a recipient | Update the recipient field in Mail Settings, re-test |
How this connects to other features
Form notifications work alongside several other parts of SGEN.
Webhooks and email notifications are independent. Enabling one does not affect the other. This guide covers the email path. Full detail: the Webhooks setup guide covers the CRM connection.
Before you start
- The form is built and published. Mail Settings on an unpublished form does not trigger notifications.
- You know the recipient address. For a shared inbox, confirm the address with your team first. For role-based routing across multiple forms, write down the form → recipient mapping before you start.
- The recipient actively monitors that inbox. A notification routed to an ignored inbox is no better than no notification.
- You have admin access. Mail Settings is available to admin-level users. If you cannot see the Mail Settings tab, ask your account admin.
Where to go
Navigate to the admin → My Forms, find the form, and click its name to open the detail view. Click the Mail Settings tab.
Path: yoursite.com/sg-admin/forms → click form name → Mail Settings
Every form has its own Mail Settings panel. Changes apply only to that form.
Steps — Configure form notification routing
1. Open the form's Mail Settings
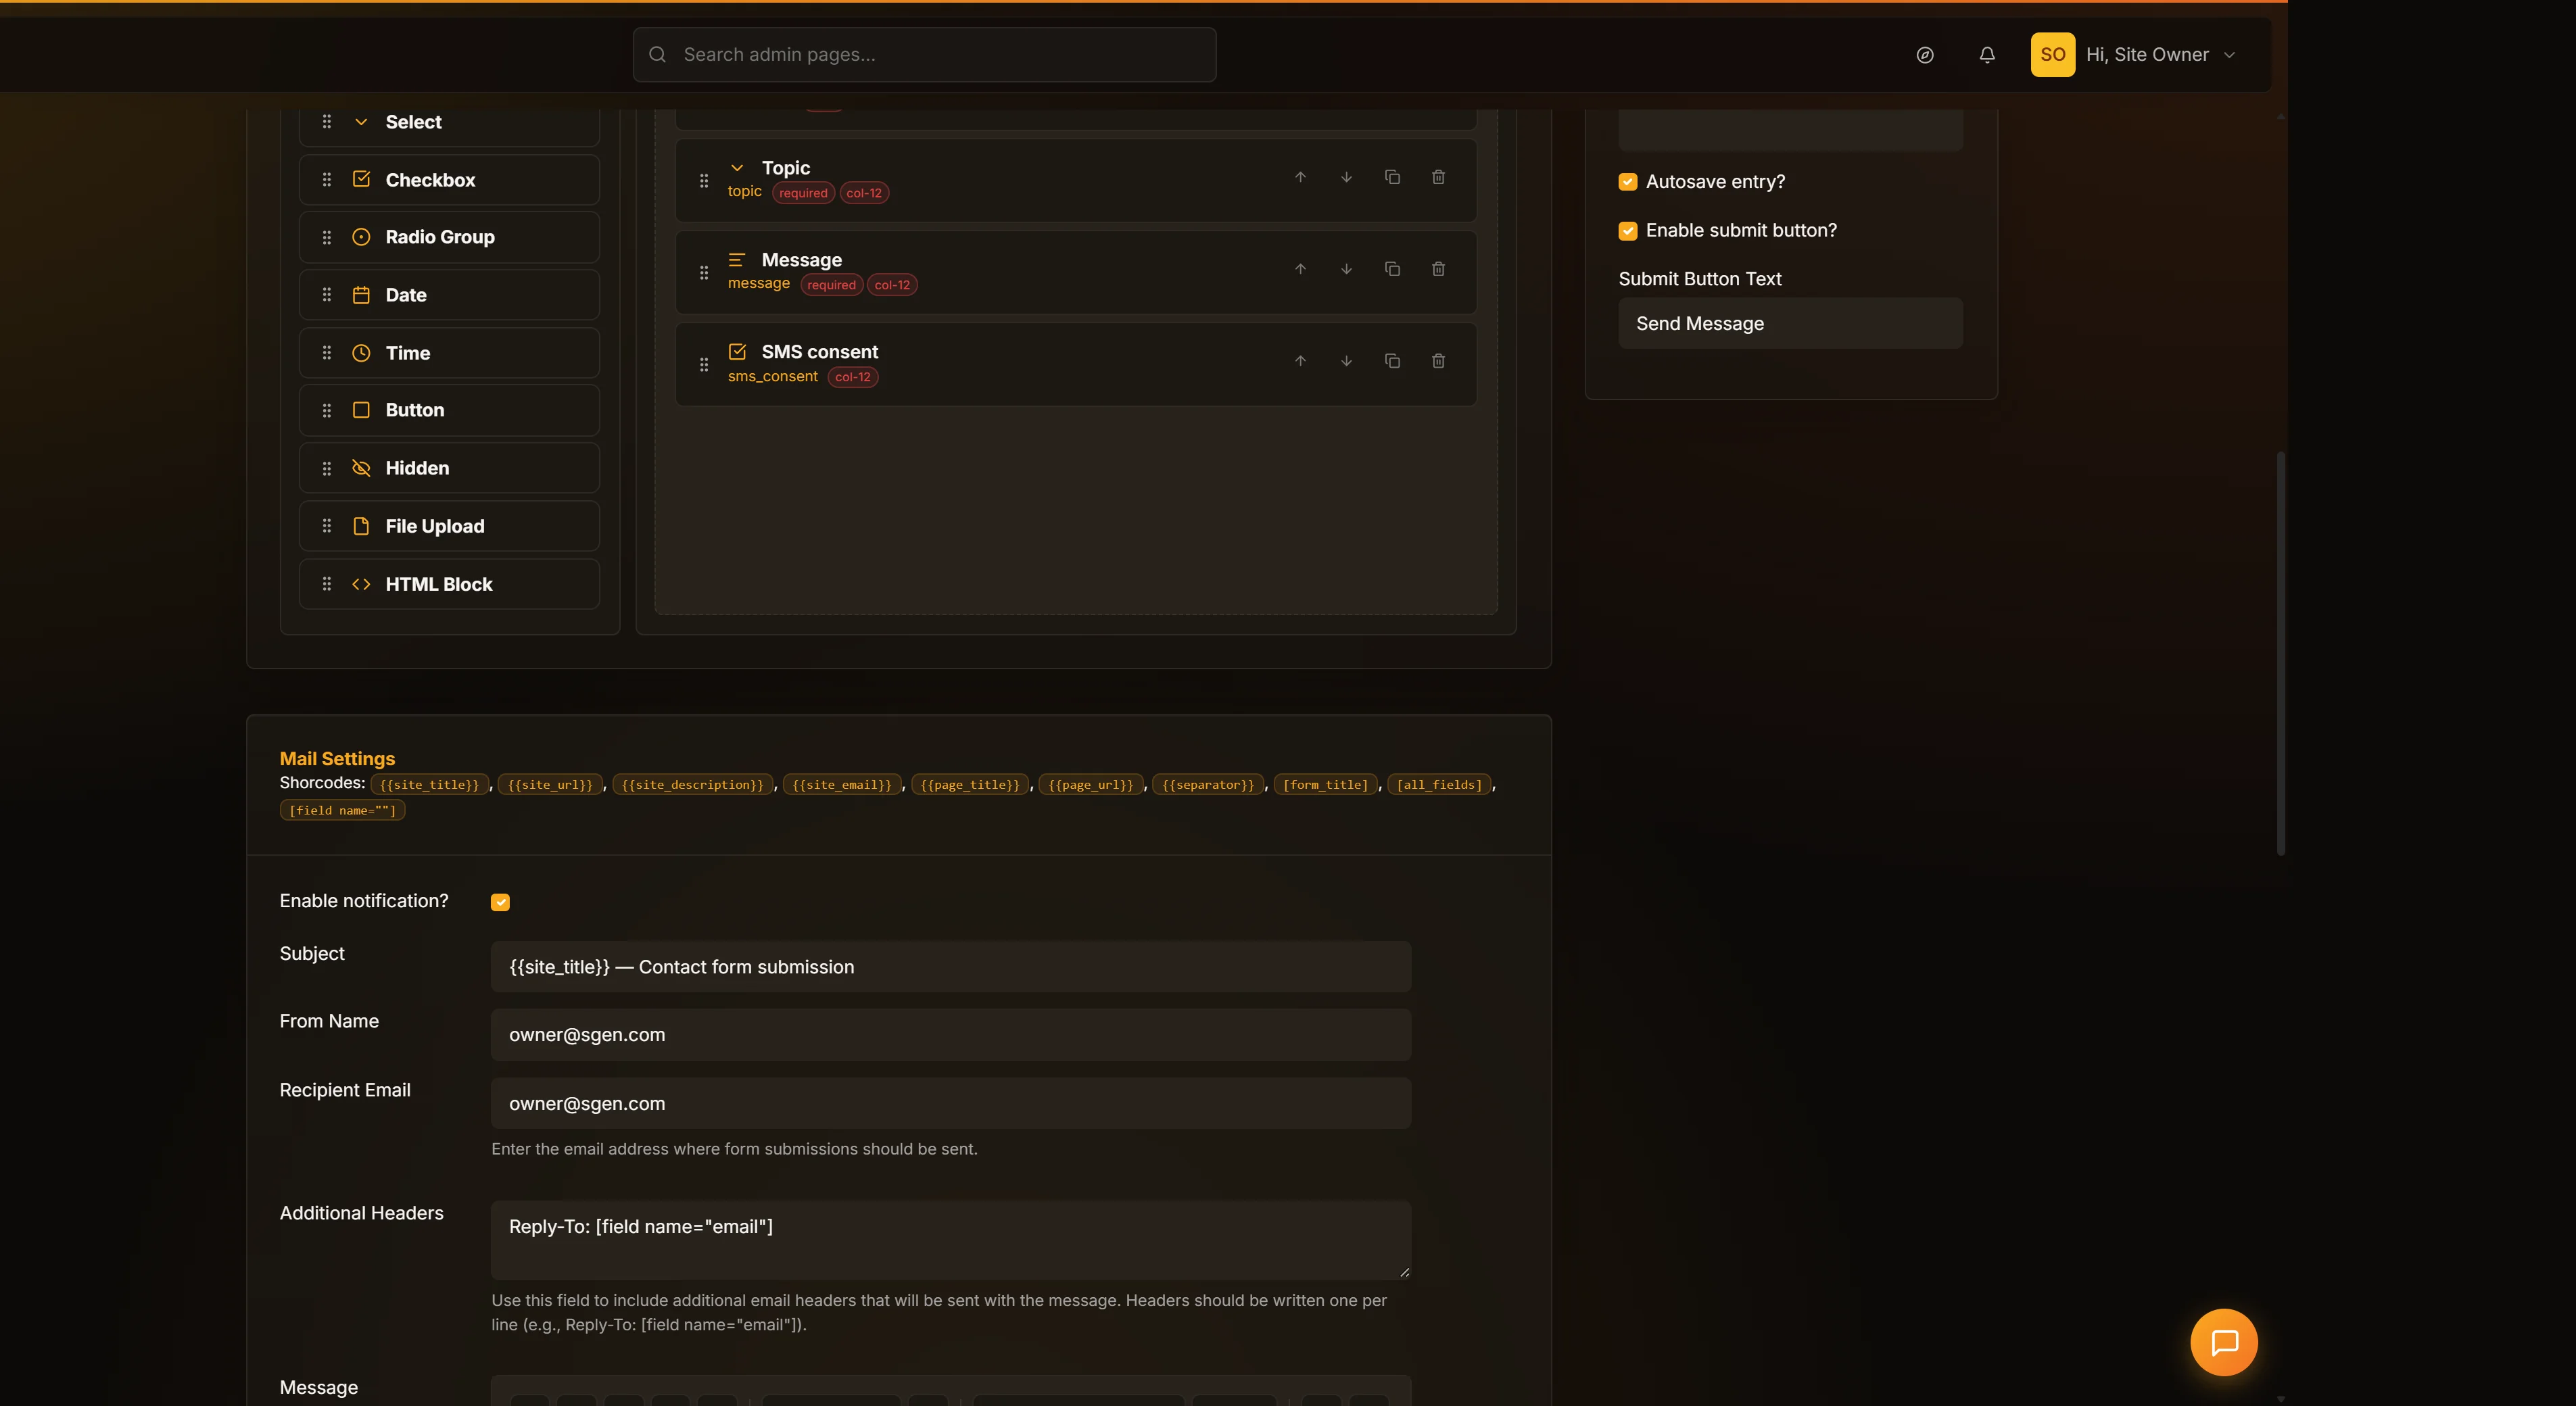 Mail Settings panel with Notification recipient, subject, reply-to and Send test notification controls" loading="lazy" style="width:100%;max-width:900px;height:auto;border-radius:8px;border:1px solid #e5e7eb;display:block;margin:12px 0">
From the admin → My Forms, click the form name to open the detail view, then click Mail Settings.
If the panel shows blank fields, notifications have never been configured. If it shows a pre-filled address, review it before making changes.
Check the Enable notifications toggle. If it is off, notifications will not fire regardless of what else is configured. Turn it on before proceeding.
2. Set the notification recipient
Enter the email address in the Notification recipient field.
- Single recipient:
you@yoursite.com - Multiple recipients: comma-separated, no spaces —
marketing@yoursite.com,you@yoursite.com
If routing to more than four or five individual addresses, use a distribution list or shared inbox at your email provider level and enter that single address in SGEN.
3. Customize the notification subject and body template
Make the subject line specific enough to be actionable at a glance. A generic "New submission" requires the recipient to open the email to understand it. A specific New wholesale inquiry — {site_name} gives them context before they open.
Supported dynamic variables:
| Variable | Inserts |
|---|---|
{form_name} | Form name as configured in My Forms |
{site_name} | Site name from Site Settings |
{submission_date} | Date and time of the submission |
{submission_fields} | Every form field and its submitted value |
{field:email} | Value submitted in the field named "email" |
{field:name} | Value submitted in the field named "name" |
Recommended subject template: New {form_name} submission — {site_name}
For custom field slugs, use {field:your_field_slug}. Check the form builder for the exact slug.
4. Set the reply-to address
Without a reply-to set, replying to a SGEN notification sends your response to SGEN's no-reply address — the lead never receives it. This is the most common configuration error.
Set the reply-to to {field:email}. When the recipient hits Reply, their response goes directly to the visitor's submitted email address.
This requires your form to have a field with the slug "email". If your email field uses a different slug — for example, "contact_email" — use {field:contact_email}. Check the form builder for the exact slug.
For forms that do not collect an email address, leave reply-to blank or enter a monitored team inbox.
5. Send a test notification and verify delivery
Click Send test notification at the bottom of Mail Settings. The test notification arrives at the configured recipient address within one to two minutes.
Verify three things:
- Subject line — dynamic variables are resolved, not showing raw
{form_name}placeholders. - Body — submission fields are present and formatted readably.
- Reply-to — hit Reply in your email client. The To field of your reply should show the reply-to address you configured, not SGEN's no-reply address.
6. Save and activate notifications
Once the test passes, click Save mail settings. SGEN confirms with a success message. Every subsequent submission on this form triggers a notification to the configured recipient.
To confirm the setting is active: navigate away from Mail Settings, then return. The recipient field should show your address and the Enable notifications toggle should be on.
Repeat this process from Step 1 for each additional form. Each form has its own Mail Settings — there is no global default recipient.
7. Verify delivery on a live submission
After going live, submit the form yourself from a browser tab where you are not logged in to the dashboard. Use your own email as the visitor email so you can verify reply-to behavior.
Check two things:
- The notification arrives at the recipient inbox within one to two minutes.
- The audit log shows a delivered status. Go to the admin → Audit Log and filter for form notification events.
What success looks like
- Every form that handles leads, inquiries, or RSVPs has a recipient set in Mail Settings.
- The Enable notifications toggle is on for each configured form.
- The subject is specific enough to identify the form and site without opening the email.
- Reply-to is set to
{field:email}(or the correct slug) so replies reach the lead, not a no-reply void. - A test notification was sent and passed all three checks before saving.
- At least one live submission confirmed the notification arrives within two minutes.
- The audit log shows a delivered status for the live submission.
What to do if it does not work
Notification not arriving at all. Check the audit log first. A delivered status means SGEN sent it — ask the recipient to check spam. A failed or bounced status means a typo in the recipient address — fix and retest. No log record at all means the Enable notifications toggle is off — turn it on, save, and retest.
Notification going to the wrong recipient. Open Mail Settings and update the recipient field. For comma-separated multi-recipient lists, SGEN expects no spaces after commas: address1@domain.com,address2@domain.com. A space silently drops the second address.
Subject shows raw {form_name} instead of the actual value. The variable is mistyped or the form name is blank in My Forms. Fix the form name or re-enter the variable, then retest.
Replies go to SGEN's no-reply address, not to the lead. The reply-to field is blank or incorrect. Enter {field:email} (or the correct field slug), save, and verify by hitting Reply on a test notification.
Webhook not firing while email works. Email and webhook are configured and fired separately. Go to the admin → Integrations → Webhooks, find the webhook, and check its status and delivery log independently.
Notifications stopped on a previously-working form. Check whether the Enable notifications toggle was accidentally turned off. If it is on and the address is correct, check the admin → Settings → Email — an SMTP relay issue can stop all form notifications across the site simultaneously.
Habits that keep notifications reliable
- Test every new form before publishing. Five minutes of testing before go-live beats discovering a misconfiguration after real leads arrive silently.
- Audit after team changes. When someone leaves, check My Forms for every form that still routes to their address. Update before the first missed lead.
- Use shared inboxes for high-volume forms. Routing to a single person creates a single point of failure. Set up a shared inbox at your email provider and enter that address in SGEN.
- Check the audit log before guessing. A delivered status in the log means the issue is on the recipient's side. A failed status means Mail Settings need attention.
- Configure reply-to before go-live, not after. It is what separates a notification setup where leads get followed up from one where the recipient's reply vanishes.
- Retest after any SMTP relay change. A delivery infrastructure switch affects all form notifications — even forms whose Mail Settings have not changed.