
How to add an integration destination to a form
⏱ ~4 min read · quick answer below · skim the bold lead-ins to move faster.
In short. A form destination routes submissions to a tool beyond the email notification — Slack for instant team alerts, Airtable for long-term storage, or a Webhook for any custom system. The flow is two screens: pick a provider tile, fill in credentials, click Create Destination. You can add as many destinations as you like to the same form; they fire in the order you set. Have credentials ready before you start and the whole task takes a few minutes.
On this page: What is this for · Scope · Fields · Before you start · Steps — adding a Slack destination · Airtable setup · Webhook setup · Examples · Troubleshooting
How to add an integration destination to a form
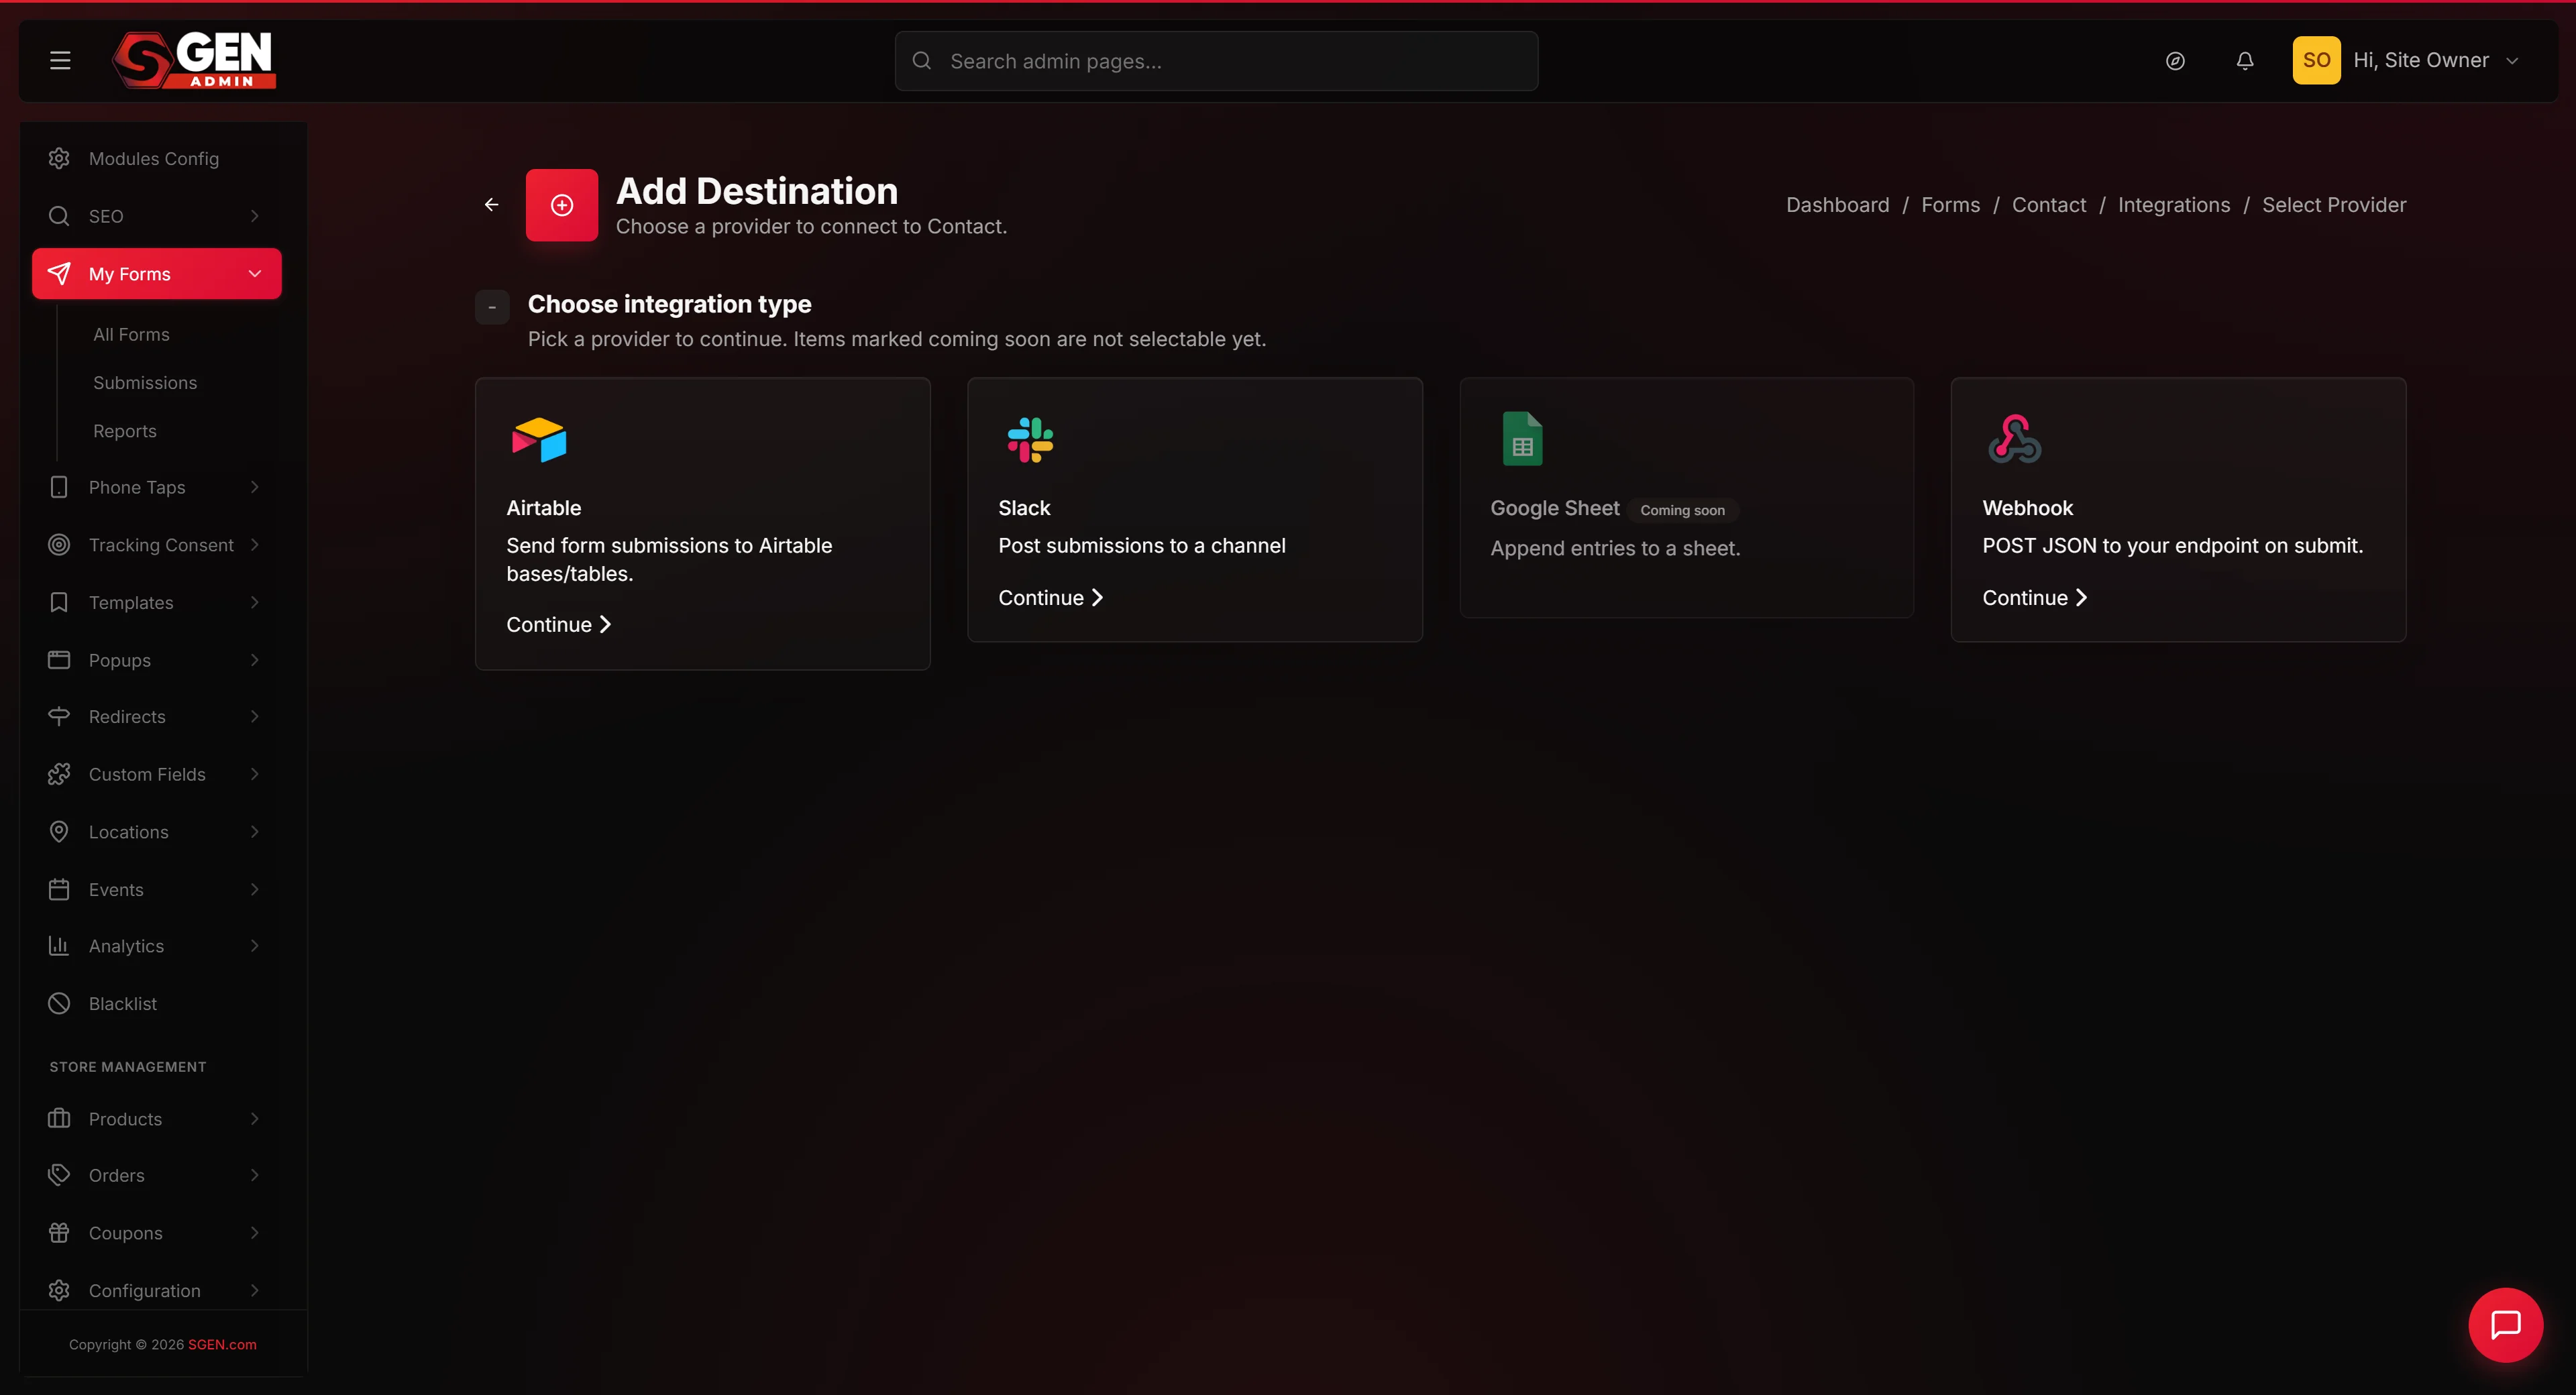
Each destination is a delivery channel that fires alongside your form's email notification. Available providers: Slack, Airtable, Webhook. Google Sheets is listed as Coming Soon (dimmed tile). You can attach multiple destinations to the same form; they fire in the order you set.
| Use destination when you need | Provider |
|---|---|
| Team alerts — ping a channel on every submission | Slack |
| Long-term storage — append every submission as a row | Airtable |
| Custom routing — forward to any URL (CRM, ticketing, Zapier) | Webhook |
What is this for?
An integration destination connects a form to an outside service so that every submission reaches your team tools automatically — no manual export required. When someone submits the form, SGEN sends that data to whichever destinations you have configured, in the order you set. The email notification you already have keeps working; destinations run alongside it, not instead of it.
Use this when you want submissions in Slack, a spreadsheet, a CRM, or any other system the moment they arrive.
Scope
What this covers: adding a new destination to an existing form — choosing the provider, entering credentials, and saving.
What it does not cover:
- Editing existing destinations — use Edit on the destination card
- Changing the provider on an existing destination — delete and recreate
- Email notifications — configure those in the form's Mail Settings
- Testing a destination after saving — use Test Connection on the edit page
Fields
The fields below appear on the provider-specific create form after you pick a provider tile.
| Field | What it does | Required |
|---|---|---|
| Label | Short name for this destination — only you see it on the integrations list | Yes |
| Order | Firing sequence (1 fires first). Lower numbers run first when multiple destinations are on the same form | Yes |
| Enable | When ticked, the destination fires on every new submission. Untick to pause it without deleting it | Yes |
| Stop on success | When ticked, destinations with a higher order number are skipped if this one delivers successfully | No |
| Slack webhook URL | The incoming webhook URL from your Slack app — starts with https://hooks.slack.com/services/ | Slack only |
| Channel override | Optional Slack channel to post to, overriding the webhook's default channel | No |
| Message template | Text sent to Slack — use {field_name} shortcodes to inject submission data | Slack only |
| Airtable access token | Your Airtable personal access token or API key | Airtable only |
| Base ID | The ID of the Airtable base to append rows to | Airtable only |
| Table name / ID | The table within the base where rows are created | Airtable only |
| Webhook URL | The URL that receives the POST request on each submission | Webhook only |
How this connects to other features
| Feature | Relationship |
|---|---|
| Integrations page | Add Destination is reached from the integrations list; after saving you return there |
| Form Mail Settings | Email notifications are set up here, independent of destinations — both can fire for the same submission |
| Form Submissions | Shows what visitors filled in; does not reflect which destinations are attached |
| Edit a destination | Change credentials, label, order, and field mapping without recreating |
| Field Mapping Guide modal | The provider form includes a "Show Field Mapping Guide" link listing available shortcodes ({name}, {email}, {message}, etc.) |
Before you start
- Pick the form the destination should attach to. You always start from one form's integrations page.
- Have credentials ready for the outside service:
- Slack — the incoming webhook URL beginning with
https://hooks.slack.com/services/ - Airtable — a personal access token, base ID, and table name or table ID
- Webhook — the URL of the destination that should receive submissions
- Decide on an order number. If this is the first destination, Order 1 is fine.
Where to go
Sidebar path: Dashboard → Forms → (pick your form) → Integrations → + Add Destination.
The breadcrumb at the top of every subsequent screen shows the form name plus "Add Destination," so you always know which form you are attaching to.
Steps — adding a Slack destination to a form
1. Open the integrations page for the form.
From the dashboard sidebar, click Forms, then click Integrations on the row for the form you want. You arrive on the integrations page for that one form.
2. Click + Add Destination.
The button lives at the top right of the integrations page. It takes you to the provider tile picker.
3. Pick the provider tile.
You see four tiles: Slack, Airtable, Webhook, and a dimmed Google Sheets tile labelled Coming Soon. Click Slack. The page transitions to the Slack-specific destination form.
4. Fill in the destination's basic fields.
- Label: a short name you will recognise, for example "Sales Team Slack."
- Order: controls firing order in the chain. If this is your only destination, 1 is fine.
- Enable: tick to activate immediately. Untick to leave it paused.
- Stop on success: tick if you want subsequent destinations to be skipped when this one succeeds. Most setups leave this unchecked.
5. Fill in the Slack-specific credentials.
- Slack incoming webhook URL: paste the URL from your Slack app. It starts with
https://hooks.slack.com/services/. - Channel override (optional): leave blank to post to the channel set in Slack when creating the webhook.
- Message template: a string with shortcodes sent to Slack on every submission. Click the Field Mapping Guide link to see all available shortcodes.
6. Set up field mapping (optional).
The Field Mapping section lets you customise which form fields map to keys in the outgoing message. Most setups leave this blank — the defaults work. Open it only if your form has field names that the message template needs to reference differently.
7. Click Create Destination.
The button is at the bottom of the form. Clicking it saves the destination and returns you to the integrations page, where the new destination appears as a card.
Airtable destination setup
The basic fields (Label, Order, Enable, Stop on success) are identical to Slack. The Airtable-specific fields are:
- Access token: an Airtable personal-access token from your Airtable account settings.
- Base ID: the unique ID of the Airtable base where rows should be appended — looks like
appAbCdEfGh1234567. - Table name or ID: the table inside the base, for example "Wholesale Leads" or its table ID.
The field-mapping section pairs each Airtable column with one form field. Default mapping uses field names verbatim; override only if column names differ from form field names.
Webhook destination setup
The basic fields are again identical. The Webhook-specific fields are:
- Webhook URL: the URL that should receive submissions.
- Method: usually leave at the default. Some legacy systems prefer the alternate.
- Custom headers (optional): used when the receiving service needs an authentication header.
The receiving service decides how the submission is handled once it lands.
Examples
Example 1 — Contact form to Slack. A site owner adds a Slack destination to their contact form, setting the message template to New message from {name}: {message}. From the next submission onward, the team's #leads channel receives an instant notification without anyone checking the SGEN submissions panel.
Example 2 — Event registration to Airtable. A marketing team uses an event registration form. They add an Airtable destination pointing at a "2026 Events" base and "Registrants" table. Every new registrant appears as a row automatically, and the spreadsheet stays up to date without any export step.
Example 3 — Inquiry form to a CRM via Webhook. A store owner wants new wholesale inquiry submissions to land in their CRM. They add a Webhook destination pointed at the CRM's inbound URL. The CRM receives the submission as a POST request and creates a new contact record. If they also want a Slack alert, they add a second destination with Order 2 — both fire for each submission.
What success looks like
You return to the integrations page after saving. A green confirmation banner briefly appears, and the new card is visible in the grid with its label, provider logo, Order number, and Enabled badge (if you ticked Enable). The next time a visitor submits the form, this destination fires.
To verify the destination works, click Edit on its card, then click Test Connection — this fires a sample submission so you can confirm Slack receives a message, Airtable inserts a row, or your webhook returns a healthy result.
What to do if it does not work
Most issues come down to typos in tokens or URLs. Walk through these in order:
- Provider tile is dimmed. That provider is Coming Soon (currently Google Sheets). Use a Webhook destination as a workaround — tools like Zapier or n8n have Sheets connectors that accept webhook input.
- Create Destination does not seem to respond. Scroll up for red validation text under required fields.
- Card not visible after saving. Refresh the browser tab — the list sometimes caches briefly.
- Card shows Disabled when you wanted Enabled. Click Edit, tick Enable, click Update Destination.
- Test Connection fails. A credential typo is the most common cause — an extra space in the access token or a wrong base ID. Re-copy from the outside service, paste into the edit form, save, retest.
- Wrong provider selected. Provider is fixed at creation time. Delete the destination and add a fresh one with the correct provider.
Next steps
- How to view all integration destinations for a form — inspect what is wired up after adding destinations.
- How to edit an integration destination — change credentials, label, or order.
- How to remove an integration destination — when a destination is no longer needed.
- How to save a new integration destination — deeper guide covering the save moment and what to verify after creation.