
Manage Object form
⏱ ~2 min read · answer above the fold · full field reference and worked examples below.
In short. The Manage Object form is the single screen used for both creating and editing a custom object type. It covers every structural setting: title, slug, status, listing layout, template assignments, permalink pattern, SEO defaults, and inject scripts. Only Title and Permalink are required — most other fields have defaults that work without touching them. The sidebar holds the primary action button (Create Item on create, Update Item on edit), plus a View Pages link and Move to Trash link on the edit flow. The field-by-field walkthrough below covers each step in order.
On this page: Form overview · Vocabulary · Steps · What success looks like · Troubleshooting · Worked examples
How to use the Manage Object form
The Manage Object form opens whenever you create or edit a custom object type — blank for create, pre-filled for edit. The main panel holds all structural settings. The right sidebar holds the action buttons. On a narrow screen the sidebar collapses below the main panel.
For most types you'll fill in 4–6 fields and accept defaults for the rest. The optional sections (SEO, header/footer scripts) can stay blank unless you have a specific reason to use them.
Scope: This form covers the type's definition only — identity, layout, templates, URL pattern, SEO defaults, and inject scripts. It does not manage items inside the type, Custom Fields groups, or template content.
Vocabulary
| Term | Meaning |
|---|---|
| Title | The human-readable name for the type. Appears in the sidebar, the All Objects list, and the public archive title. Required. |
| Slug | Auto-generated from the title on create. Used in the archive URL and as the type's internal identifier. Editable — but changing it renames the archive path and breaks Custom Fields bindings. |
| Status | Published = public. Draft = admin-only. Default is Published. |
| Permalink | The URL pattern for individual item pages — e.g., /accessories/%slug%. Required. |
| Header scripts | Code injected into <head> on every single-entry page for this type only — not site-wide. |
| Footer scripts | Code injected before </body> on every single-entry page for this type only. |
| SEO defaults | Per-type overrides for title format, meta description, canonical, and search-engine visibility. |
What NOT to use this for
- Don't use this form to manage individual items. Items have their own editor, reached from the type's items browser. This form is for the type definition only.
- Don't expect to add Custom Fields here. Custom Fields groups are attached to types by slug in the Custom Fields area — not on this form.
- Don't paste large scripts into Header / Footer scripts. These fields are for small, validated injects (analytics tags, schema.org snippets). A typo can break every public page of the type. Test in a private browser window after saving.
- Don't store credentials or secrets in any field. Header / Footer script content is visible in the public HTML of every page.
- Don't rename the slug on edit for SEO. Slug is part of the public URL. Renaming it breaks all existing item URLs unless you set up redirects. To rename for display purposes, change the Title only.
- Don't try to bulk-edit multiple types here. This form edits one type at a time. For bulk operations, use the All Custom Objects list's bulk actions.
How this connects to other features
- All Custom Objects list — where you launch the form via Add New or an existing row's Edit action.
- Custom Fields — groups attach to types by slug. Changing the slug on this form breaks that binding.
- Templates — the Single, Archive, and Loop Item dropdowns pull from templates configured in the Templates area. To add a template to the dropdown, create it in Templates first.
- SEO — SEO defaults set here apply to every item of the type unless overridden per item.
- Custom Codes — Header / Footer scripts here are scoped to one type. Custom Codes are site-wide.
- Move to Trash — soft-deletes the type. Items inside are not deleted, but the type is hidden. See How to move a custom object type to Trash.
- View Pages — jumps to the items browser for this type. Only appears on the edit flow.
Before you start
- Know which flow you're in. Create = blank form, need Title + Permalink at minimum. Edit = pre-filled, change only what you intend to change.
- Identify which fields you'll touch. The form is long; go in with a specific list.
- Screenshot the current edit screen before risky changes (permalink, slug, templates) so you have a record to roll back to.
- Confirm template availability before switching to a custom template — verify with whoever maintains your theme that it exists and is ready.
- Coordinate with your team. Two people editing the same type simultaneously causes save conflicts.
Where to go
- Create flow: Sidebar → Custom Objects → + Add New.
- Edit flow: Sidebar → Custom Objects → click any row title or its Edit action.
Both paths render the same form. The breadcrumb tells you which flow: Dashboard / All Objects / New for create, Dashboard / All Objects / Edit for edit.
Steps — Filling in the Manage Object form
1. Open the form (create or edit)
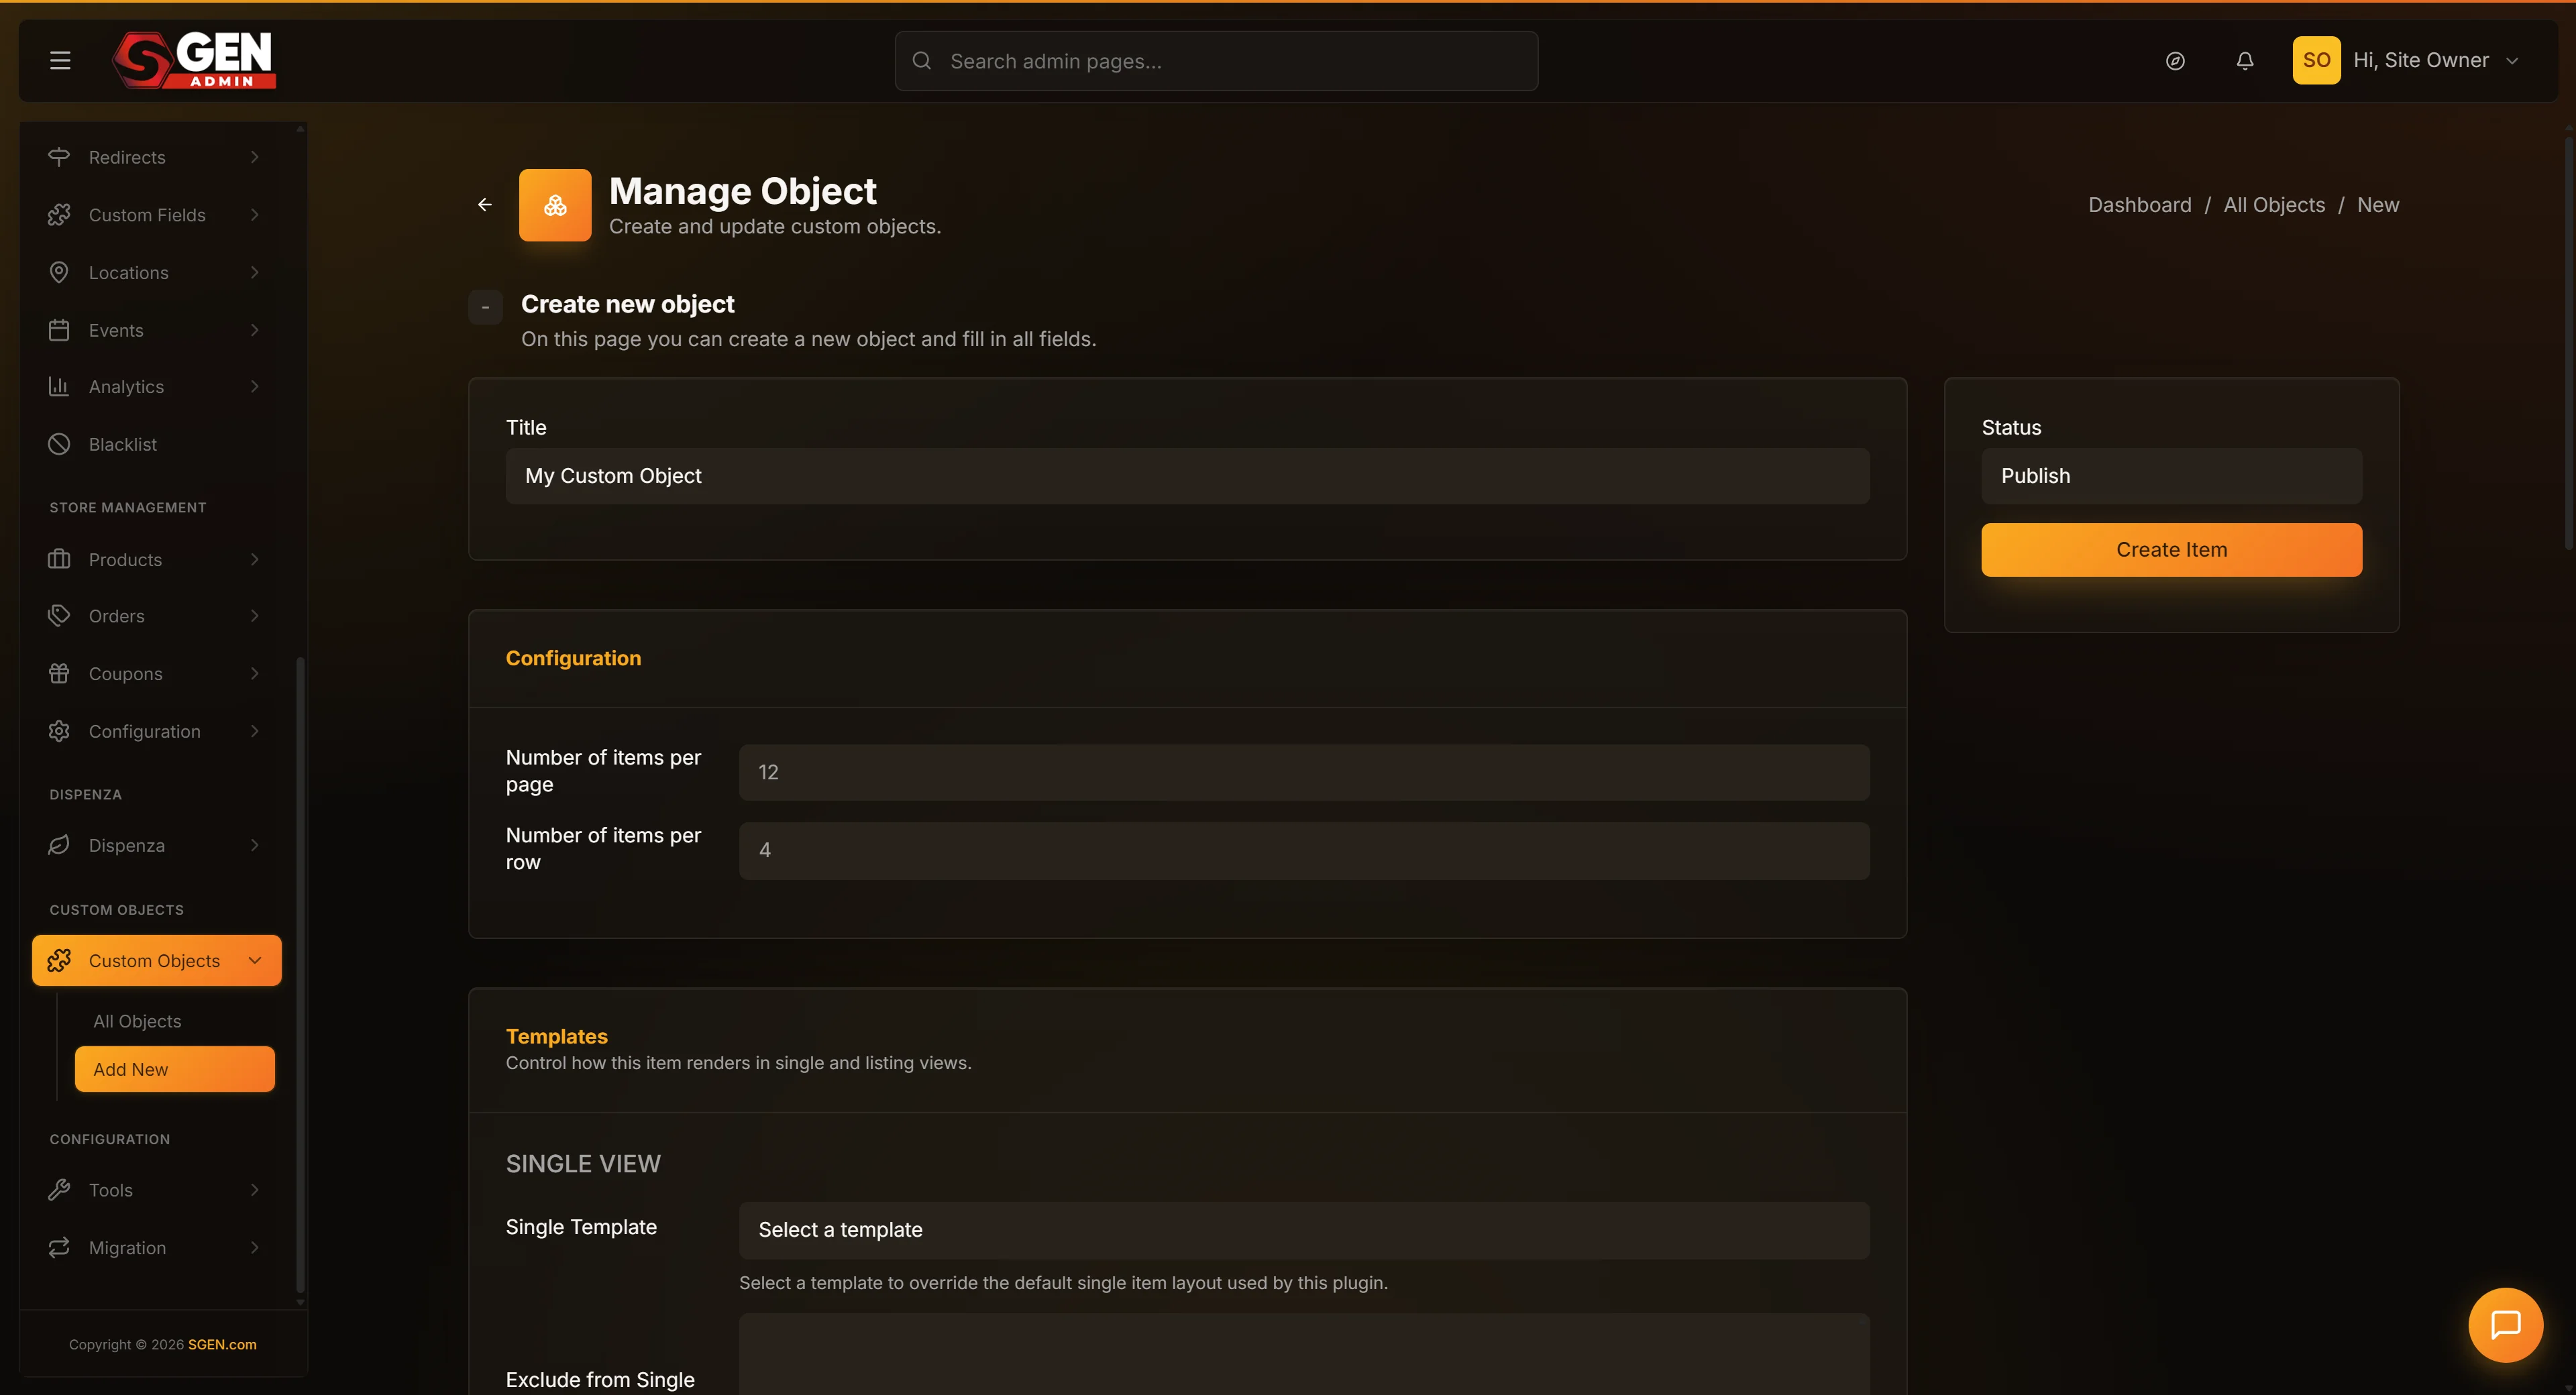
Click + Add New for a blank form, or click an existing type's row title for the edit form pre-filled with that type's values.
The breadcrumb confirms which flow you're in. The section header above the form also differs: "Create an object" on create, "Update an object" on edit.
2. Fill in or update the Title
Title is required. It's the human-readable name — shown in the sidebar, the All Objects list, and indirectly in URLs (the slug auto-derives from it on create).
Use a clear, descriptive name: "Recipes", "Case Studies", "Team Members". Avoid abbreviations only your team would understand.
3. Confirm or update the Slug
On create, the slug auto-fills from the Title. You can override it, but the default is usually correct.
On edit, the slug is pre-filled. Changing it on a published type is risky — it renames the public archive URL and breaks Custom Fields bindings. Leave it alone unless you have a redirect plan and have notified your Custom Fields maintainer.
4. Set or update the Status
Status defaults to Published on create. Published = active and publicly visible. Draft = saved but hidden — the public archive does not render and the sidebar entry does not appear.
Use Draft for types still in configuration, or to temporarily hide a live type.
5. Set or update items-per-page and items-per-row
These two fields control the public listing layout.
- Items per page — how many items appear per archive page. Default 12.
- Items per row — how many items sit side-by-side in each row. Default 3.
Defaults work for most types. Adjust for denser catalogs (16/page, 4/row) or long-form content (6/page, 2/row).
6. Pick the templates
Three dropdowns, each pulling from templates configured in the Templates area:
- Single template — how one item renders on the public site (e.g., one recipe page).
- Archive template — how the full listing renders (e.g., the
/recipes/archive). - Loop item template — how individual item cards render inside a listing.
Default templates work for most types. Switch to custom templates only after your design team has built and tested them.
7. Set the Permalink structure
The permalink defines the URL pattern for items of this type. It must start with / and must contain %slug%.
Examples:
/recipes/%slug%/t-shirts/%slug%/work/%slug%(where the type is "Case Studies" but the URL prefix is "work")
Once items are published, changing the permalink breaks all existing item URLs. Set it carefully on create; leave it alone on edit unless you have a redirect plan.
8. Optional: SEO defaults
The SEO section sets default meta tags for every item of this type. Per-item overrides take precedence. Leave blank if you prefer per-item control; fill in a consistent baseline (e.g., a meta description prefix) if you want uniform defaults across many items.
9. Optional: Header / Footer scripts
These fields inject HTML on every public page of this type — Header scripts go into <head>, Footer scripts go before </body>.
Common uses: schema.org JSON-LD snippets, type-specific analytics tags. Leave blank for most types. After pasting a snippet, test in a private browser window — a typo can break every public page of the type.
10. Click Create Item or Update Item
The primary action button is in the right sidebar.
- On create, the button reads Create Item. On success, you land on the edit form for the new type.
- On edit, the button reads Update Item. On success, you stay on the same edit form with the updated values.
If validation fails, the form re-renders with inline error messages. Fix the flagged fields and click again.
What success looks like
- A success banner appears: "The custom object has been successfully created!" or "...successfully updated!".
- The browser URL is the edit form for the type. On create, this is the new type's ID.
- The All Objects list reflects the saved values — title, status, items count, and updated timestamp.
- Any public-side change (new type visible, items per row changed, template switched) is visible in a fresh private browser window load of the relevant public page.
If the expected change isn't visible, retrace: did the success banner appear? Did the URL change? Does the list show the updated timestamp?
What to do if it does not work
- Form rejected with no obvious error. Look for inline error styling near each field. The most common rejection is an empty Title field.
- Save appeared to hang, then nothing happened. Likely a network blip. Refresh and check whether the type appears in the All Objects list. If not, re-fill and try again.
- Success banner appeared but the type isn't in the list. Refresh the list — it fetches data independently and may show a stale cache momentarily.
- Success banner appeared but the public archive returns a 404. Either Status was saved as Draft (open the type and flip to Published), or the Permalink is malformed (confirm it starts with
/and includes%slug%). - Single template switched but not applying on the public side. The template name in the dropdown may not match a deployed template. Confirm with your theme maintainer.
- Can't find the Update Item button. It's in the right sidebar. On narrow screens the sidebar collapses below the main panel — scroll down.
- Move to Trash was clicked accidentally. The type is now hidden. To restore: All Objects → Trash filter → find the type → Restore action.
- View Pages button is missing. That button only appears on the edit flow. On create flow the type doesn't exist yet.
- Form values don't match what you expected. On edit the form shows the type's current saved values. If those don't match your memory, someone else may have edited the type recently — check the All Objects list for the last-updated timestamp.
Example 1: Your Store — using the form to set up Tote Bags
Your Store opens the form (create flow) and fills in:
| Field | Value |
|---|---|
| Title | Tote Bags |
| Slug | tote-bags (auto-filled, accepted) |
| Status | Published |
| Items per page | 12 (default) |
| Items per row | 3 (default) |
| Single / Archive / Loop item template | Default (all three) |
| Permalink structure | /tote-bags/%slug% |
| SEO defaults | blank |
| Header / Footer scripts | blank |
They click Create Item. Success banner. URL becomes the edit form for the new type. Back on the All Objects list, "Tote Bags" appears as Published. Total time: about three minutes.
Example 2: Your Store — using the form to update T-Shirts
Your Store's T-Shirts type has been live for a month. They want to switch to a custom single template their dev team built called "Tee detail hero". They open the edit form for T-Shirts, change only the Single template dropdown from "Default single" to "Tee detail hero", and click Update Item. All 148 t-shirt pages now render with the new template. URLs are unchanged because Permalink was not touched.
Example 3: Your Store — using the form to switch a Draft type to Published
Your Store created a "Case Studies" type two weeks ago as Draft while the dev team finished the templates. Now ready to go live: open the edit form, change Status from Draft to Published, click Update Item. The sidebar Case Studies entry appears. The public archive at /work/ is now reachable. The 7 case studies they added internally are immediately visible.
Example 4: Your Store — using the form to add SEO defaults
Your Store has a Partners type with 380 items and no SEO defaults set. They open the edit form and fill in a consistent meta description template in the SEO defaults section. Every public partner page now uses those defaults unless overridden per item. Search engines will pick up the new descriptions on next crawl — no per-item edits required.
Example 5: Common form mistakes to avoid
| Mistake | What happens | Fix |
|---|---|---|
| Leave Title empty and save | Form rejects the save | Fill in a Title and try again |
| Override Slug manually with a typo | Typo becomes the archive URL | Double-check; slug is part of the public URL |
Paste a permalink without a leading / or without %slug% | Pattern saves but items return 404s | Must be /prefix/%slug% |
| Switch to a template that isn't deployed | Template name appears in dropdown but pages render broken | Confirm with theme maintainer before switching |
| Paste a long script into Header / Footer scripts without testing | A typo can break every page of the type | Test in a private browser window immediately after saving |
| Set Items per page to 100+ | Listing pages load slowly | Stay in the 12–24 range |
| Change Slug after publish | External links and Custom Fields bindings break | Avoid unless you have a full redirect + re-binding plan |
| Edit two types simultaneously in two tabs | Save conflicts | Edit one type at a time |
Next steps
- Create a new custom object type — the create-flow walkthrough.
- Edit a custom object type — the edit-flow walkthrough, including safe vs risky changes.
- All custom objects list — finding and filtering types before you open the form.
- Move a custom object type to Trash — what the Move to Trash link on the form does.
- For Custom Fields integration: Custom Fields area → create a group and attach it to the type's slug.
- For template work: Templates area → create or edit single, archive, or loop-item templates so they appear in the form's dropdowns.