
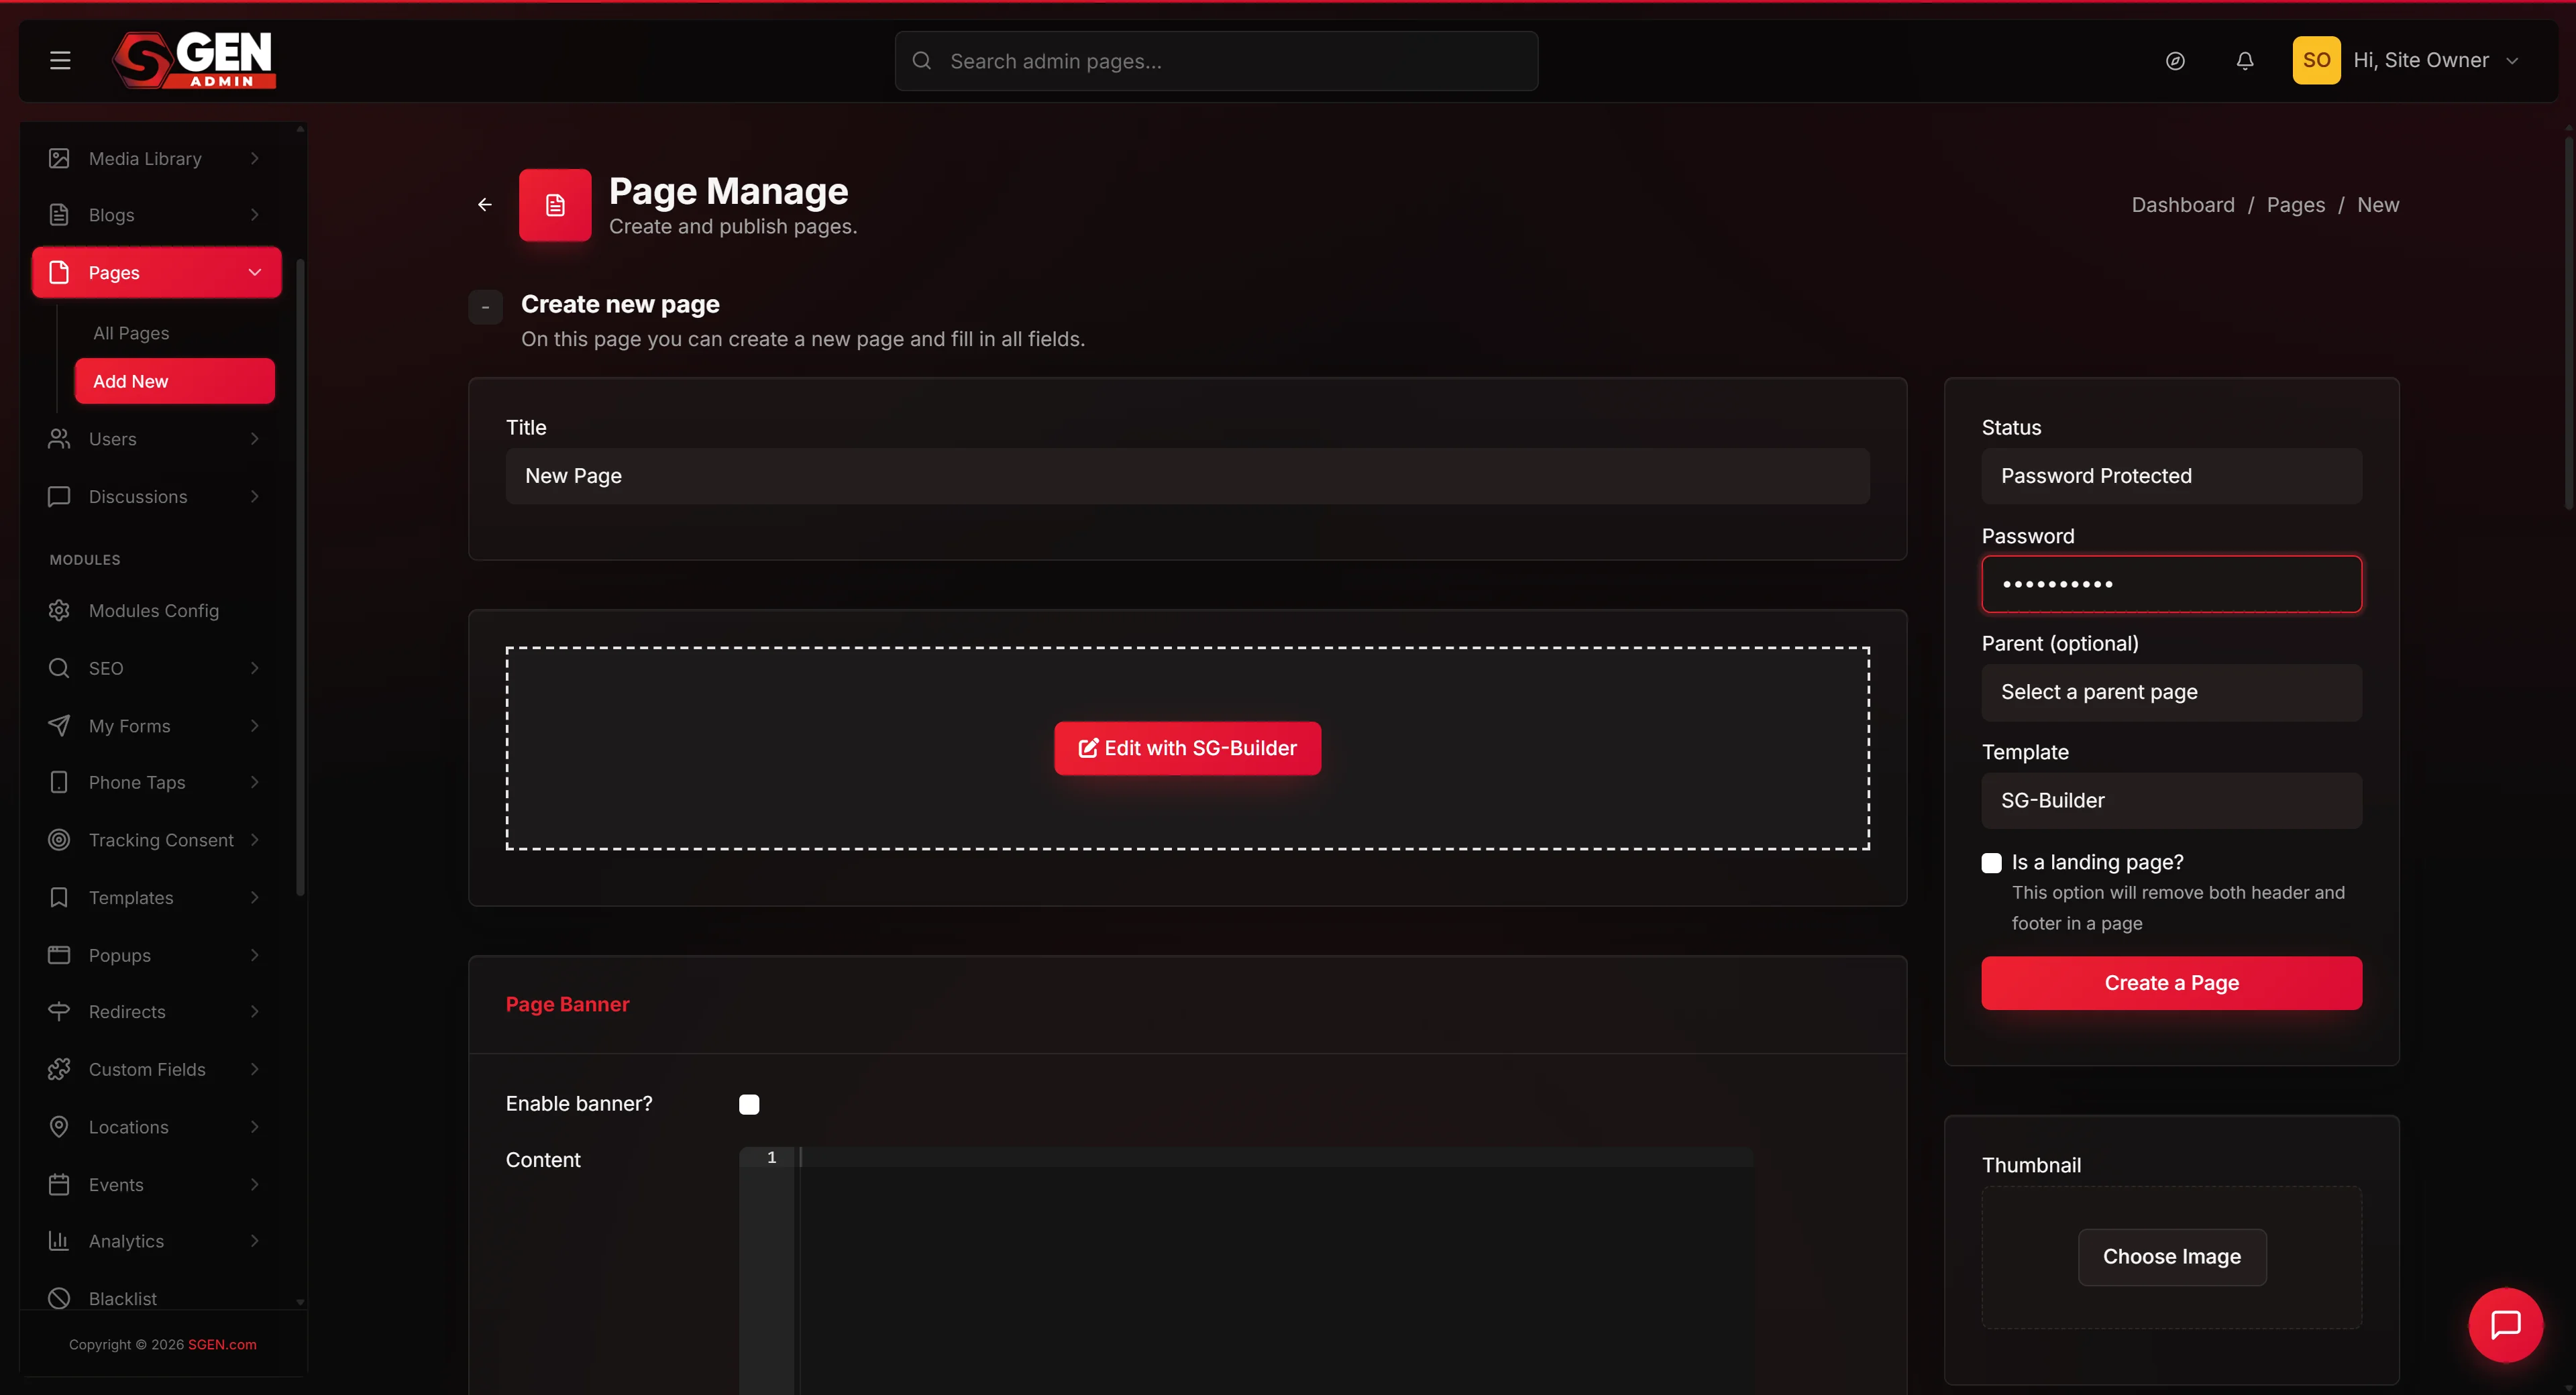
Password-protect a page and grant visitors access
⏱ Quick answer below · full page ≈ 10 min · skim the bold lead-ins to move faster.
In short. Mark a page as Password protected in its Visibility setting, type a passphrase, choose how long visitors stay remembered, and save. Visitors who land on the page see only a password prompt. They type the password, click Continue, and the page unlocks — no account required. Their browser remembers them for the window you set, so they won't be asked again until the cookie expires or they clear it. To grant access to someone locked out: share the password again. To close a leak: change the password in page settings — takes effect within minutes.
On this page: What it's for · Good use cases · What NOT to use it for · Steps · Troubleshooting · Tips
How to give visitors access to a passworded page after they enter the password
When you mark a page as Password-protected, visitors who land on it see a small password prompt instead of the page contents. They type the password you set, click Continue, and the page unlocks for them. From that moment on, that visitor can browse that page (and any other page using the same password) without being asked again — until the remember-me window you configured runs out, or until they clear their cookies.
This page covers: what visitors see, how to set the password, how long visitors are remembered, what to do when somebody loses access, and how to share gated content with the right audience without it being open to the whole internet.
What is this for?
Use a password gate when you have content that should live on your public site but isn't for everyone.
Picture this. You run an online store and want to show allocation subscribers a private page listing which limited-run products are reserved for them, with prices and pickup dates. The page needs to exist on your site (so customers can bookmark it), but you don't want it visible to anyone who finds it through search. Mark the page Password-protected, share the password by email with your subscribers, and SGEN handles the gate.
A visitor who knows the password sees the page exactly as you wrote it. Anyone else sees only the prompt. Search engines see only the gate — your private content stays out of indexes.
This is page-level protection. You decide which pages are gated and which are open — a public homepage, a public blog, and three gated internal pages can coexist on the same site. Each gated page can share one password (one key unlocks all three) or have its own.
After a visitor types the correct password and clicks Continue, the page unlocks immediately — no redirect, no second loading screen. Their browser drops a remember-me cookie that lasts exactly as long as the window you configured, then the gate reappears automatically.
Failed attempts: visitors who type the wrong password stay on the gate. The page contents never appear, no cookie is dropped. There is no rate limit on a normal page gate — a forgetful customer can retry as many times as they need. If you need lockouts after failed attempts, use a Members area with per-user accounts instead.
Good use cases
- Private allocation lists, wholesale price sheets, or member pricing pages — content for a specific audience that lives on your public site for convenience.
- Pre-launch product or event pages — built and ready, but shared only with reviewers or early customers before the official launch. Remove the password on launch day.
- Press kits and brand asset libraries — journalists who request access get the password by email; the kit is private without a full account system.
- Members-only resource pages — a curated page for paying members tied to a shared password that you rotate periodically.
- Course or workshop materials — cohort gets the password in their welcome email; the page hosts handouts, links, and recordings for the duration of the course.
- Internal staff reference pages on a public site — for small teams who run their site as a single source of truth, a gated "staff handbook" page can hold schedules and procedures without a separate intranet.
- Beta testing and survey pages for a hand-picked group — beta testers get the password in their welcome email; everyone else sees only the gate.
What NOT to use this for
- Anything requiring real account-level security. A page password is a shared speed bump, not a vault. There is no per-user accountability — you can't tell who forwarded the password. For per-user accounts with audit logs and revocation, use a Members area.
- Pages where content legally requires identity verification. The gate confirms "this person knew the shared password" — nothing more. Identity-verified access needs a proper verification flow.
- Payment information or sensitive personal data. Treat password-protected pages as semi-private. Don't put credit card details, medical records, or anything where a leak causes harm. Use a real authenticated customer account for that.
- Pages you want search engines to index. A protected page does not appear in search results — bots see only the gate. If your goal is search ranking, a password gate is the wrong tool.
- Replacing a storefront checkout flow. If you want to sell to a small group, use a coupon code or build a normal product — don't put a Buy button behind a password gate. The storefront has its own checkout, tax, and payment handling.
- Situations requiring detailed audit trails. The gate tells you someone with the password got in — not who they were. Per-user access logs need a Members area.
Scope
- Applies to any individual page or blog post — each has its own Visibility setting and can have its own password.
- The password is shared, not per-user — anyone with it can unlock the page; no visitor account is required.
- The remember-me window is per-browser, per-site; a visitor who unlocked on one device must re-enter on a different device.
- Password-protected pages do not appear in search engine indexes — bots see only the gate.
- No limit on how many pages you can protect; different pages can use different passwords.
Fields
| Field | Where to find it | What it controls |
|---|---|---|
| Visibility | Pages → Edit → Page settings | Public / Private / Password protected — sets whether the gate appears |
| Password | Pages → Edit → Page settings | The passphrase visitors must enter to unlock the page |
| Remember-me window | Site Settings → Security | How many days a visitor who entered the correct password stays unlocked before needing to re-enter |
How this connects to other features
- Page settings (Visibility) — every page has a Visibility setting. Public = open. Private = admins only. Password protected = gate for everyone without the right password.
- Custom CSS — the password gate uses your site's theme styles by default. Target the
.protected-page-gateselector in Custom CSS to match your brand. - Site Settings (Security) — sitewide defaults for cookie policy and session length. Per-page timing inherits from the sitewide default unless you override it on the page.
- Forms — if you want visitors to request the password via a form rather than receiving it in advance, put a contact form on the page that hosts the gate explanation. The two features compose well.
- Blog posts — every blog post supports the same Visibility settings as pages. Private editorial archives and behind-the-scenes posts for paying readers work the same way.
- Members area — when the password gate stops scaling (audience past a few hundred, per-user audit logs needed, revocation required), graduate to the Members area. The two systems can coexist on the same site.
Before you start
- Pick the password before you publish. Phrase-style passwords (
yoursite-spring-allocation-2026) are memorable, easy to share by email, and hard to guess. Avoid dictionary words or short strings — bots try these quickly. - Decide the remember-me window. Longer windows are more convenient for customers but keep a leaked password effective longer. A one-week allocation needs a few days; a year-round members page can use thirty.
- Plan how to share and rotate the password. Most teams use a single email blast to the customer group. Plan a rotation cadence — quarterly is a common default for ongoing pages; single-event pages (an allocation, a launch) can be archived or unpublished after the event.
- Plan recovery. A customer will lose the password, clear their cookies, or switch devices. Add a "lost the password? email us" link to the gate so the recovery path is discoverable.
Where to go
- Set or change the password: Dashboard → Pages → [your page] → Settings → Visibility → Password protected
- Confirm a page is protected: Dashboard → Pages → All pages list — protected pages show a Password badge in the Status column
- Adjust the remember-me window for one page: Dashboard → Pages → [your page] → Settings → Visibility → Remember for
- Adjust the sitewide default: Dashboard → Settings → Security → Default password remember-me
- Style the gate: Dashboard → Appearance → Custom CSS (target
.protected-page-gate) - See all protected pages: Dashboard → Pages → filter by Visibility = Password protected
- Test as a visitor: open the page URL in an incognito window
Steps — set up a password-protected page from scratch
This sequence takes about ten minutes once you know what page you are protecting and what password you want to use.
1. Open the page you want to protect and find its Visibility setting
Open your admin and go to Pages. Find the page in your list and click into it.
In the page editor, look for the right-hand sidebar. There is a Settings panel with a Visibility section. Open it — you will see three options: Public, Private, and Password protected.
If your page doesn't exist yet, create it first as a normal page. Build out the content you want behind the gate, save it as a draft, then come back to this step. The gate is the last thing you turn on, not the first.
2. Switch to Password protected and choose a password
Click the Password protected option. A password field appears. Type the password you chose in your planning step.
Phrase-style passwords with hyphens and a year work well: studio-press-kit-q3-2026, wholesale-catalog-ssr-2026, members-only-april-2026. Easy for customers to type, hard for bots to guess, and visually obvious if they appear somewhere they shouldn't.
Below the password field, set the Remember-me duration. For a one-week allocation window, three to seven days is right. For a year-round members page, thirty days reduces friction.
3. Save the page settings
Click Save. The Pages list will show a Password badge in the status column for this page.
If you don't see the badge or the page still shows as Public, check that you saved — the Save button is sometimes at the bottom of a long settings panel and easy to miss. Refresh the Pages list and confirm.
4. Test the gate as a visitor
This step is the most commonly skipped and the most valuable. Open an incognito or private browsing window. Paste the page URL. You should see only the password gate — no page contents.
Type the password and click Continue. The page should unlock at the same URL with no redirect. Close the incognito tab, open a new one, paste the URL again — the gate is back, confirming a fresh visitor without a cookie sees the gate.
In a regular browser tab, type the password, continue, then refresh — you should still see the protected content (the remember-me cookie is fresh). This thirty-second check catches the most common setup mistakes.
5. Share the password with your customer group
With the gate verified, send the password to the right audience. Common pattern:
- Subject: "Spring 2026 Allocation — your access details"
- Body: the page URL, the password, a note on how long they stay remembered, and a "reply to this email if you have any trouble" line.
Other channels: private Slack or Discord, a phone call, SMS. Every channel works as long as it reaches the right audience.
6. Watch for access issues in the first 24 hours
Expect a small number of customers to report trouble in the first day: a typo (extra space, wrong capitalization), a corporate browser that strips session cookies, or someone who shared the email and a colleague's mail client mangled the password. Reply quickly — after the first day, the recovery rate drops to near-zero.
What success looks like
Within a few minutes of saving the settings, three things are true:
- Anonymous visitors who navigate to the page URL see only the gate. No page contents are visible.
- Customers who type the right password and click Continue see the page contents and stay unlocked for the configured remember-me window.
- Search engines that crawl the URL see only the gate — your private content is not indexed.
A useful signal to monitor: the ratio of unlock attempts to successful unlocks on a high-volume gated page. A high attempt-to-fail ratio means the password may have been mistyped in the announcement email, the remember-me window may be too short (regulars keep getting re-prompted), or the password has leaked and strangers are guessing.
What to do if it does not work
A customer says they typed the password and nothing happened. Most often a typo — ask them to copy-paste the exact password from your email rather than typing it. If copy-paste also fails, the likely cause is a browser blocking cookies. Ask them to try a different browser (phone, personal laptop) and confirm they can get in there.
The gate stays on screen even after typing the right password. Two possibilities. First, check that you saved the password in page settings — open them, copy the saved password verbatim, and have the visitor try it. Second, confirm the page is published. A page in Draft status with a password set shows the gate but won't unlock — the page itself is not accessible.
You're not sure which pages on your site are gated. Open the Pages list. Click the Visibility filter and select Password protected. This audit view is useful when you inherit a site and need to know what's gated.
The gate looks ugly or off-brand. Open Custom CSS and target the .protected-page-gate selector. Most sites give the gate the same background color as their hero, the same heading font, and a primary-color Continue button.
A customer says it worked yesterday but doesn't today. Most likely the remember-me window expired. Ask them to type the password again — they'll unlock and stay remembered for another full window. If the password itself no longer works, check whether you rotated it recently; a change invalidates everyone's remembered access.
You suspect the password has leaked. Open page settings, change the password to a new value, and save. The new password takes effect within minutes. Anyone with the old remembered cookie keeps access until their window expires; anyone entering fresh needs the new password. For tight rotation, also shorten the remember-me window to one day so the leaked-cookie window closes quickly. Then send the new password to your customer group.
You want to remove the gate entirely. Open page settings, switch Visibility back to Public, and save. Anyone with a bookmark sees the contents directly. Search engines will pick up the page on their next crawl and start indexing it. If you want to take the page down completely rather than open it, set the page status to Draft or move it to the Trash instead.
The Continue button does nothing when clicked. Almost always a third-party browser extension or strict ad-blocker blocking the form submission. Ask the visitor to try in a private browsing window with extensions disabled. If the issue is widespread, escalate to support.
Example use: allocation gate for subscribers
Your Store has fifty allocation subscribers. The owner builds a single internal page at /private/spring-2026-allocation, marks it Password protected with yourstore-spring-2026-allocation, and sets the remember-me window to seven days — matching the one-week pickup window.
She tests the page in incognito (gate appears, password unlocks, refresh stays unlocked). She emails the fifty customers with the page URL and password. She tells her staff in the morning standup.
First 24 hours: three customers email saying they can't get in. One copy-pasted with a trailing space; one was on a work laptop that blocks cookies and switched to her phone; one had lost the email and wanted it forwarded. All resolved within an hour. After day one, no further support requests.
Over the seven-day pickup window, every customer accesses the page at least once. After pickup ends, the owner marks the page as Draft. The next allocation in the fall, she'll rebuild with a fresh password.
Common patterns the same mechanism covers:
| Use case | Password cadence | Remember-me window | Notes |
|---|---|---|---|
| Press kit (ongoing) | Annually in January | 30 days | Rotate after any significant media cycle |
| Course materials per cohort | New password each cohort | 30 days | Archive page after cohort ends |
| Staff handbook (small team) | Annually, or when someone leaves | 90 days | Share verbally during onboarding |
| Launch day head-start for subscribers | One-time; remove gate after 24h | 1 day | Switch to Public after exclusivity window closes |
| Wholesale pricing (stable audience) | Annually | 30 days | Share during buyer onboarding |
Tips for writing strong page passwords
- Use phrases, not words.
yoursite-spring-2026beatsspring. Three-or-more-word phrases survive email sharing, are easy to type, and are statistically hard to guess. - Add a date stamp. Including the year (or year + season) means a previous season's leaked password is automatically dead when you rotate.
yoursite-fall-2025is last year's;yoursite-spring-2026is this year's. - Avoid dictionary words alone. Bots that scrape URLs try common words in the first hundred attempts. Add at least one custom string — your brand name, the year, a date stamp — to step outside the dictionary range.
- Avoid patterns personal to one customer. Names in the password can't be shared without revealing personal information, and a pattern (
yoursite-john-2026,yoursite-mary-2026) means a single leak suggests all the others. - Document where the current password lives. Keep a single place (a password vault, a private Notion page, an internal wiki entry) listing every gated page and its current password. Anyone on your team who needs to confirm the password has a single source of truth.
- Rotate annually at minimum. Even without a specific leak, annual rotation refreshes the access list and forces you to reconfirm who still needs access.
Next steps
- Build a Members area for per-user accounts — if your audience is growing or access has high value, see the Members docs for per-user logins, profiles, and audit trails.
- Style the gate to match your brand — see the Custom CSS docs for targeting
.protected-page-gateselectors. - Set sitewide security defaults — see Site Settings → Security for the default remember-me window and other gate-related defaults.
- Gate blog posts or categories — the same Visibility settings apply to blog posts and entire blog categories.
- Audit your protected pages quarterly — open the Pages list, filter to Password protected, and confirm each still has an audience that needs the gate. Pages that no longer need protection should be unpublished or made public.
- Style the recovery contact prominently on the gate — a "lost the password? email us" link makes the recovery channel discoverable before visitors email a generic support address.
Password-protect — field locations
| Field | Location | Function |
|---|---|---|
| Visibility | Pages -> Edit -> Page settings | Public / Private / Password protected status |
| Password | Pages -> Edit -> Page settings | The passphrase visitors enter |
| Remember-me window | Site Settings -> Security | Duration before re-entry is required |