
How to activate a different theme on your site
⏱ 60-second answer below · full page ≈ 8 min · skim the bold lead-ins to move faster.
In short. Go to Sidebar → Appearance → Theme Editor → Themes. Pick a tab for the surface you want to change (Header, Footer, Blog Archive, etc.), click the radio circle on your chosen card, then click Save — the public site refreshes immediately. For a Style Preset (colors + typography site-wide), navigate to the Style Presets tab instead. A confirmation dialog appears before the global change applies. There is no automatic rollback; reverting means re-activating the previous card or preset.
On this page: Two kinds of activation · Before you start · Steps — theme card · Steps — Style Preset · Steps — Revert · Worked examples · Troubleshooting · Reference table
How to activate a different theme on your site
What to know before you activate
There are two distinct kinds of activation with different stakes:
- Theme card activation (focused) — only the one surface you picked changes. Header, Footer, Blog Archive, Location Selector, Age Verification, Global Buttons, and Sticky Mobile CTA each have their own card gallery. Activating a Footer card leaves the Header untouched.
- Style Preset activation (global) — presets bundle coordinated colors and typography site-wide. Activating a preset overrides every color token, heading font, and body font across every page. A confirmation dialog warns you before this applies.
Good use cases
- Focused chrome refresh. Activate a new Header, Footer, or Blog Archive card during a planned release window to update one surface without touching anything else.
- Brand relaunch. Activate a Style Preset off-hours to flip your site's colors and typography at once, then refine individual tokens in Styles & Layouts afterward.
- Quick revert. Re-activate a previous card or preset to undo a change — re-activation is the only rollback path.
- Batched chrome decisions. Pick new cards across multiple surface tabs (Header + Footer + Global Buttons) and click Save once — all commit together.
What NOT to use this for
- Don't activate a Style Preset during peak traffic. Visitors mid-session see the old chrome on one page and the new chrome on the next. Pick a low-traffic window.
- Don't activate without screenshotting your current Styles & Layouts settings first. A preset activation overwrites per-token tunings. Screenshots are your only quick reference if you want to re-create them.
- Don't expect automatic rollback. Re-activate the previous card or preset manually. Keep a note of what was active before you start.
- Don't run two simultaneous activations from different browsers. The second save wins. Coordinate with your team.
- Don't activate themes that depend on assets you haven't uploaded. Check the Edit your site Header / Footer doc for prerequisites.
How this connects to other features
- Browse and preview themes — the gallery walkthrough; read this before picking a theme.
- Edit your site Header — tune colors, fonts, and CTAs inside the activated Header theme.
- Edit your site Footer — tune columns, widgets, and copyright inside the activated Footer theme.
- Edit your mobile menu — configure the slide-out drawer's chrome after activating a theme.
- Set site-wide colors, typography, and layout defaults — where you refine individual tokens after a Style Preset activates.
Before you start
- Decide: theme card or Style Preset. Cards are focused (one surface); presets are global. The stakes differ.
- Plan the activation window. Schedule off-hours for Style Preset changes if your site has significant traffic.
- Screenshot your current configuration. Especially for Style Preset activations — capture Styles & Layouts before proceeding.
- Notify your team. A quick heads-up prevents confusion when the visual change goes live.
- Have a verification page list ready. After activation, click through 3–5 representative pages: homepage, article, product, contact, checkout.
- Write down the previous activation. Knowing which card or preset was active means you can flip back in under a minute.
Where to go
- Click Sidebar → Appearance → Theme Editor.
- Click Themes in the Theme Editor's left-side navigation.
- The Themes screen loads with the Header tab open by default.
- Click the sidebar tab for the surface you want to activate (Header / Footer / Blog Archive / etc.). Or, for a Style Preset, navigate to the Style Presets tab.
- Click the radio circle on the theme card you want to activate.
- Click Save at the bottom of the screen.
- For a theme card activation: the save commits immediately. The public site refreshes on the next page load.
- For a Style Preset activation: a confirmation dialog appears. Read the warning. Click Confirm to apply. Click Cancel to back out.
- After confirmation, a green banner appears: "Themes updated."
- Open the public site to verify.
Steps — Activate a theme card for one surface (the simple case)
1. Open the Themes screen
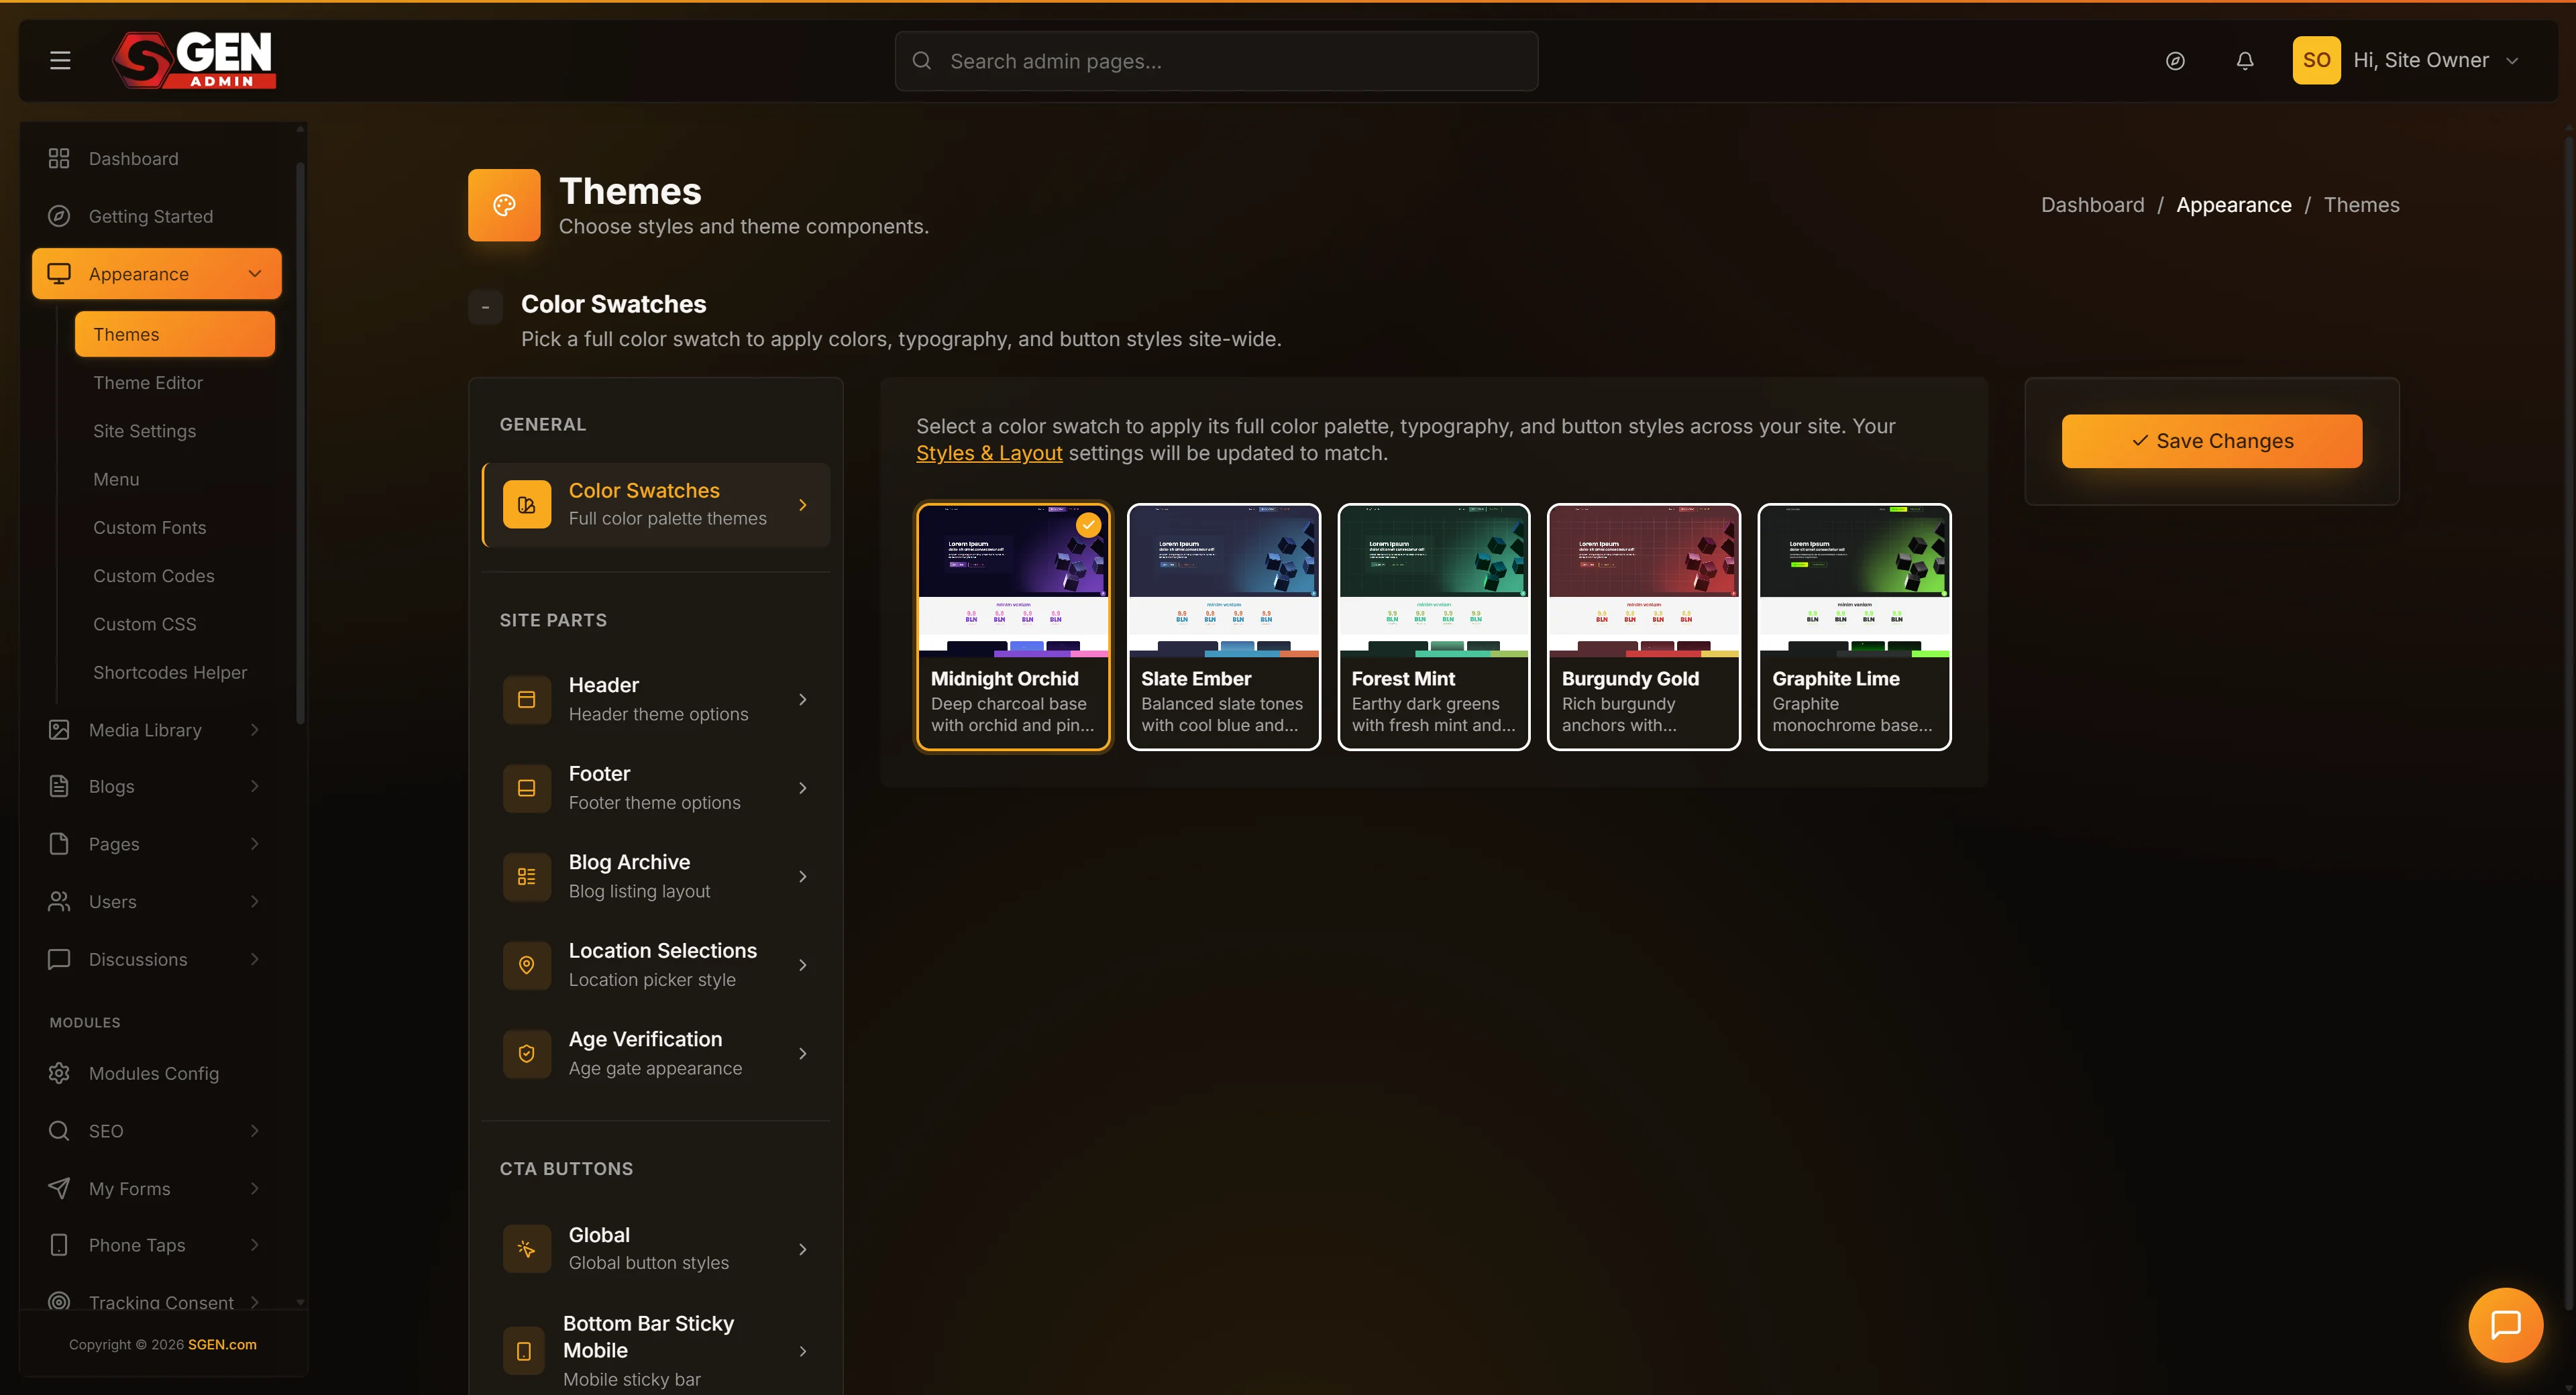
Click Sidebar → Appearance → Theme Editor → Themes.
2. Click the sidebar tab for your surface
For a Header change, click Header. For a Footer change, click Footer. For a Blog Archive change, click Blog Archive. The gallery for that surface loads.
3. Click the radio circle on your chosen theme card
The radio circle fills. The previous selection un-fills. Your selection is pending — not yet committed.
4. (Optional) Browse other tabs
If you want to activate cards for multiple surfaces in one save (e.g. a new Header + a new Footer), click each sidebar tab and pick the card you want. Selections are preserved as you navigate between tabs.
5. Click Save at the bottom
The save commits immediately. There's no confirmation dialog for theme cards (only for Style Presets). The public site refreshes on the next page load.
6. Confirm the green banner
A green confirmation banner appears at the top of the screen: "Themes updated."
7. Open the public site to verify
Hard-refresh if you're seeing cached content. The new theme card's layout should be visible on every public page that uses the activated surface.
Steps — Activate a Style Preset (the bigger case)
1. Open the Themes screen
Click Sidebar → Appearance → Theme Editor → Themes.
2. Navigate to the Style Presets view
Navigate to the Style Presets tab. The Style Presets gallery loads. Five presets are visible: Midnight Orchid, Slate Ember, Forest Mint, Burgundy Gold, Graphite Lime.
3. Click the radio circle on your chosen preset
The radio circle fills.
4. Click Save at the bottom
A confirmation dialog appears with the warning text:
"Update Theme Editor? Saving with a style preset selected will update your Styles & Layout (Theme Editor) settings."
The dialog has two buttons: Confirm and Cancel.
5. Read the warning carefully
The activation overrides global tokens. If you've heavily tuned individual tokens in Styles & Layouts (custom button radius, custom heading sizes, custom color slots), those tunings are replaced by the preset's defaults.
If you're not sure, click Cancel, screenshot your current Styles & Layouts configuration, and come back when you're ready.
6. Click Confirm
The preset activates. Every page on the public site refreshes with the new colors and typography on the next page load.
7. Confirm the green banner
A green banner appears: "Themes updated."
8. Verify on multiple pages
Click into your homepage, an article page, a product page, the contact page, and the checkout flow. Confirm the preset's colors and typography render correctly on each.
Steps — Revert to a previous theme
1. Open the Themes screen
Click Sidebar → Appearance → Theme Editor → Themes.
2. Navigate to the surface you previously had active
For a Header revert, click the Header tab. For a Style Preset revert, navigate to the Style Presets view.
3. Click the radio circle on the previous theme card or preset
Refer to your pre-activation screenshot if needed.
4. Click Save
For a theme card, the save is immediate. For a Style Preset, confirm the dialog.
5. Verify the public site is back to the previous state
Hard-refresh. The previous theme should be live again.
What success looks like
A successful activation produces:
- A green confirmation banner at the top of the Themes screen: "Themes updated."
- The Themes screen reloads with the activated card's radio circle filled.
- The public site refreshes on the next page load with the new theme's chrome.
- For Header activations, the Header layout shifts immediately — logo position, menu position, and CTA placement reflect the activated card.
- For Footer activations, the Footer renders with the new layout (column counts, alignment, spacing).
- For Style Preset activations, every button, link, heading, and paragraph on every page reflects the preset's colors and typography.
- For Blog Archive activations, the blog landing page renders with the new layout.
- The Styles & Layouts screen (for Style Preset activations) shows the preset's tokens in the form fields.
- No errors are visible in the admin or on the public site.
What to do if it does not work
My save didn't seem to commit
- Re-open the Themes screen. Confirm the radio circle on your selected card is filled. If it's not, the save didn't persist. Pick the card again and click Save.
- For a Style Preset, confirm you confirmed the dialog. If you cancelled the confirmation dialog, no change applied. Re-pick the preset, click Save, read and confirm the dialog.
- Look for a red error banner. If the save failed, an error message at the top of the screen describes the problem. Note the message and retry.
The public site doesn't show the new theme
- Hard-refresh the public site. Press Ctrl+Shift+R (Cmd+Shift+R on Mac). Cached pages can show the old theme.
- Wait 30–60 seconds. Some hosting setups cache aggressively. The new chrome may take a moment to propagate.
- Confirm the right surface. If you activated a new Footer theme, the Header is unchanged. Scroll to confirm.
- Confirm the right site. If you manage multiple sites, ensure you activated the theme on the site you're viewing.
A Style Preset activation didn't update some tokens
- Open Styles & Layouts. Confirm the preset's tokens are present in the form fields.
- If tokens look wrong, re-activate the preset.
- Per-component overrides on specific pages survive preset activation. A heading component with its own font assigned in the page builder keeps its font even after preset activation. To restore site-wide consistency, edit the per-component overrides.
Example 1: Your Store activates a new Header during a Tuesday-morning release
Their workflow:
- Tuesday 9 AM — the marketing manager screenshots the current Header for archive purposes.
- They open Theme Editor → Themes → Header.
- They pick the "Logo Left + CTAs" card. The radio circle fills.
- They click Save.
- Green banner: "Themes updated."
- They open the public site in an incognito browser window. The new Header is live: logo on the left, menu compressed, CTA on the right.
- They click into the homepage, the shop page, the about page, and the contact page. Each renders the new Header.
- They notify the team: "New Header is live. Please test and report any issues."
Outcome: The Header refresh is live in 5 minutes.
Example 2: Your Store activates the Burgundy Gold Style Preset for a brand relaunch
Their workflow:
- Thursday evening (off-hours): the design lead screenshots every Styles & Layouts tab for a record of current per-token tunings.
- They open Theme Editor → Themes, navigate to the Style Presets view.
- They pick Burgundy Gold.
- They click Save.
- The confirmation dialog appears. They read it carefully.
- They click Confirm.
- Green banner: "Themes updated."
- They click into the homepage, an article page, a product page, the contact page, and the checkout flow. Each renders with deep burgundy + gold accents + serif headings.
- They open Styles & Layouts and bump the body font line height from 1.4 (preset default) to 1.55.
Outcome: The brand is fully refreshed in 30 minutes. Friday's announcement has a working public site to point to.
Example 3: Your Store reverts a Footer activation that didn't fit
Their workflow:
- They open Theme Editor → Themes → Footer.
- They pick the Centered Single Column card — what they had originally.
- They click Save.
- Green banner.
- They hard-refresh the public site. The Footer is back to centered single column.
Outcome: The revert took 2 minutes.
Example 4: Your Store batches Header + Footer + Global Buttons activations
Their workflow:
- They open Theme Editor → Themes.
- Header tab — pick "Logo Left + CTAs".
- Footer tab — pick "Left-Aligned Columns".
- Global Buttons tab — pick "Pill Shape".
- They click Save once. All three activations commit together.
- Green banner.
- They verify on the public site. Header, Footer, and button shapes all reflect the new picks.
Outcome: Three chrome decisions activated in one save.
Activation safety checklist
Before clicking Save:
- [ ] Have you screenshot the current configuration?
- [ ] Have you notified your team if relevant?
- [ ] Are you in a low-traffic window (for big activations)?
- [ ] Do you know which previous theme card or preset was active (in case you need to revert)?
- [ ] Is the radio circle filled on the right card before you click Save?
After clicking Save:
- [ ] Did the green banner appear?
- [ ] For Style Presets, did you confirm the dialog?
- [ ] Did you hard-refresh the public site?
- [ ] Did you click into 3–5 representative pages to verify?
- [ ] Did you communicate the change to your team?
Reference
| Surface / option | Type | Scope of change | Confirmation dialog |
|---|---|---|---|
| Header | Theme card | Header layout only | None — saves immediately |
| Footer | Theme card | Footer layout only | None — saves immediately |
| Blog Archive | Theme card | Blog landing page only | None — saves immediately |
| Location Selector | Theme card | Location picker only | None — saves immediately |
| Age Verification | Theme card | Age-gate splash only | None — saves immediately |
| Global Buttons | Theme card | Button shapes sitewide | None — saves immediately |
| Sticky Mobile CTA | Theme card | Mobile bottom bar only | None — saves immediately |
| Style Preset | Preset bundle | Colors + typography sitewide | Yes — warns before applying |
Re-activation of any card or preset is the only revert path. No automatic rollback exists.
Known limitations
- No "undo last activation" button. Reverting requires re-activating a different card or preset.
- Style Preset activations override per-token tunings in Styles & Layouts. Per-component overrides on individual pages survive, but token-level customizations don't.
- No A/B testing. Activations are global — every visitor sees the active theme. There's no way to split traffic between two themes.
- No scheduling. The activation happens when you click Save (and confirm, for presets). You can't queue it for a specific time.
- No pre-activation diff. The picker shows thumbnails; the actual difference is visible only after activation.
- Concurrent activations from different admins. The second save wins. Coordinate with your team.
Next steps
- Read Browse and preview themes for the gallery walkthrough — read it before activating if you haven't picked a theme yet.
- Read Edit your site Header to refine colors, fonts, and CTAs inside the activated Header theme.
- Read Edit your site Footer to refine columns, widgets, copyright, and sticky buttons inside the activated Footer theme.
- Read Edit your mobile menu to refine the slide-out drawer's chrome.
- Read Set site-wide colors, typography, and layout defaults — Styles & Layouts is where you tune the underlying tokens after a Style Preset activates.